Friday, March 30, 2018

JoFy & Paperartsy at Topflight Stamps

Hi everyone, I'm on holiday in Tenerife at the moment, so it will be a quick blog today........
I made this set of tags using fabulous stamps designed by Jo Firth Young, available at TOPFLIGHT STAMPS      
Find them here-

Paperartsy have some fabulous designers and the stamps are brilliant quality, they will last forever. 
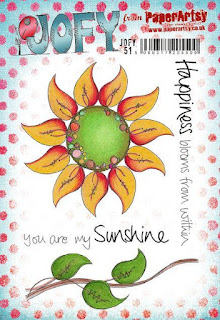
Anyway, this little trio of tags were coloured with Distress Oxides, then stamped using the Sunflower Set (51)......huge stamps with sentiments included. 
Each tag had it's own colour scheme - all I added was a few drops of water to make the splodges, a bit of doodling and some Ranger 'Glossy Accents'
 I layered onto black card then made a tie using American seam binding which has been coloured with the matching Distress Oxides.
Here are some close-ups ..........
 I quite like the idea of using scraps of 'bookprint', too, so stamped a few bits, cut them out and adhered to the design.
 I filled some of the leaves with Glossy Accents, to make them stand out.
I had to add a touch of glitter too......
Hope you like them.....please leave a comment, good or bad, I'm a big girl, I can take criticism 😀
Catch you next week,
Barbara x

Thursday, March 29, 2018

Go for the Magical Moments!

Hello Topflight fans! I had so much fun playing with the Katzelkraft Jungle Animals Stamp Set for the Topflight Stamps 1st Birthday Blog Hop that I had to create one more card. That flying hippo seems so impossible, and yet something we should all aspire to be like. After all, only be dreaming the impossible dream can it can it possibly come true.


I first created the background using the Katzelkraft Clouds Stamp with Tim Holtz Distress Ink in Tumbled Glass. As I wanted a horizontal card and the stamp has a vertical orientation, I stamped portions of the stamp out across my card front. Since the image was so loose, it really wasn't that difficult to create a seamless look. Then in the lower third, I wanted the look of rooftops so I stamped a portion of the Crafty Individuals Jingle Bells Rooftops with Momento Tuxedo Black Ink. To cover up some of my poor stamping, I filled in some stamping gaps and added some shadows to the buildings with Copic N1 and N3 markers.


I next colored up the flying hippo from the Katzelkraft Jungle Animals Stamp Set with Copic markers and fussy cut it out. For added shimmer and shine, I also coated the eyes and teeth with Ranger Glossy Accents and the wings with Clear Wink of Stella. Popping him up on double sided foam dots also helped him stand out and add dimension to the card. The sentiment, which is from the Dylusions Quote Medly, is heat embossed with charcoal embossing powder, fussy cut and popped up on foam dots as well. 


Lastly, I simply stamped out the clouds again on another piece of card stock and inked the edges to create a card liner. I love coordinating the inside of cards with the card fronts this way. It adds such a nice finished look, and it's so easy!


Thanks for joining me today for this whimsical card. If you'd like more details about the products I used, please check out my blog post HERE.

Tuesday, March 27, 2018

1st Birthday Blog Hop!!!

Welcome to the Topflight Stamps 1st Birthday Blog Hop!!!   The past year has been more successful than we ever could have imagined and it’s all because of our amazing customers. We are so excited to celebrate with you and give you our 1st Birthday Special Discount 20% off ALL orders - use code BDAY20.


Today we have an AWESOME blog hop with some of the best paper crafters in the industry. They are each featuring some of our favorite stamps. Be sure to comment on this blog and all the blogs on the hop to be eligible for the GRAND PRIZE a $50 store credit!!!  PLUS  - each of the designers on this blog hop are giving away a $10 gift certificate to one of the commenters on their post. They will each announce their winner on their blogs Monday, April 2 and we will announce our $50 Grand Prize winner here the same day.

We're kicking off this hop with a fun and colorful card made with the Darkroom Door Crayons stamp and Visible Image Bold Color stamp. 


Crayons


Bold Color


Now, be sure to check out all these blogs and comment for your chance to win the grand prize!!
   Topflight Stamps You are here
   Donna Bowman 
   Tenia Nelson
   LisaHoel
   Teri Anderson
   Jenny Marples
   Karen Bearse

   Kristina Song

Monday, March 26, 2018

A year at Topflight!

Welcome to the Topflight Blog.  It's Clare here today and I'm reflecting on my first year blogging with Topflight Stamps.  


Designing for Topflight stamps means that sometimes I end up using  stamps that I wouldn't normally select for myself but this is good, in fact it is excellent! It pushes you out of your comfort zone and stretches your creativity.  I have thoroughly enjoyed my journey with Topflight and I am looking forward to many more.


So I'm taking a walk down memory lane and re-visiting some of my favourite projects over the past twelve months and hopefully sparking some inspiration!


Stamping with smaller stamps is always a bit of a personal challenge for me, possibly because I normally enjoy working on a larger scale but I really enjoyed working on this pocket size mini-book and colouring in the images.  


I love working with inks but I equally love working with paint, I often flit from inks to paint or both!  Using a whole mix of medias keeps me interested in crafting.  I love experimenting on tags, postcards or reference cards.  I've also been known to go into hubby's garage and look for a spare bit of wood or three!


So there you have it! A few of my favourite crafty moments from the past year.  I'm going to take this opportunity to wish Topflight Stamps a Happy 1st birthday and hope that I'm here to see many more!

Happy Crafting,

Clare

Friday, March 23, 2018

For The Love Of Stamps @ Topflight Stamps

Hi blog friends, I'm on holiday at the moment in Tenerife, so I'll keep this post short & sweet.
This week I've used a pretty little set of stamps called 'Just My Cup Of Tea' from HunkyDory - find it HERE
I liked the cute little flowers and ferns, so I made a background of them using varigated inkpads from KALEIDACOLOR. 
I used an 'aquabrush' just to pull some of the outline ink and fill the flowers with colour. It reminds me of wallpaper I had in my bedroom as a kid....(long, long time ago 😄)
I made a circle frame from white textured card, then mounted onto an orange background. 
The teapot & cup were stamped,  heat-embossed in gold then 'fussy-cut' and adhered to the frame.
The little sentiment is from the same set, and fits the teapot perfectly.
Well, that's about it for now, I'd better get back to my sunbathing 😎......see you next week, still from holiday. Have a great week's crafting.
Barbara xx

Thursday, March 22, 2018

Classic Forget-Me-Nots

Hi Topflight fans! Today I'm sharing a birthday card that I've made for my mother, whose birthday is next week. Her favorite color is blue, and I thought the beautiful For the Love of Stamps "Forget-Me-Nots" bouquet in the shape of a heart would be perfect.


I stamped the bouquet on Strathmore Bristol Paper and used a couple of yellow and a couple of blue Arteza Real Brush Pens and a water brush to watercolor the flowers. I also stamped extra medium and small flowers and used the same colors to watercolor these but used a Clear Wink of Stella Brush Pen for added shimmer. I fussy cut these extra flowers out and inked the edges with a black marker for a nice finished edge.


For the card front sentiment, I heat embossed the sentiment that says "It's Your Birthday!" using white embossing powder on dark blue card stock and hand cut banner tails on each side. I popped up this sentiment on double sided foam adhesive to give a bit of dimension. Then I added the extra fussy cut flowers on foam dots and positioned them to overlap the banner here and there. As a finishing touch, I also added three 6mm and 4mm Pretty Pink Posh Clear Droplets in to add sparkle, dimension, and the look of fresh dew drops on the card. I matted the card front with a pale blue card stock and then adhered everything to a dark blue card base.


I also created a simple card liner by stamping a Forget-Me-Not branch in the lower left corner of more of the pale blue card stock so that it would coordinate (but not be matchy-matchy) with the card front bouquet. To finish, I stamped an "Enjoy Your Big Day" sentiment in the upper center of the card liner; both sentiments are from the Power Poppy "Party Time" stamp set. 


Thanks for joining me today. If you're interested in any more details about how to make this card, please visit me on my blog HERE.

Wednesday, March 21, 2018

You're a Gem!


This week Topflight offers us a stamp from 

For the love of stamp  "You're a Gem"


The background was done with Oxide inks
Fossilized, Hickory Smoke and Black Soot
I also used the stencil Tim Holtz "Bubble"
and Carta Bella Papers "Christmas Delivery"

Nathalie Fournier/Topflightstamps


Tuesday, March 20, 2018

For the Love of (Lovely Lillies) Stamps

Hello and thanks for joining us today over at the Topflight Stamps blog - it's Jenny here, joining you with a simple watercolored Lillies card. 


The image comes from the stunning new Lovely Lillies set by For the Love of Stamps.   I stamped all of the images onto hot press watercolor using waterproof black ink.  I masked off one of the blooms and part of the stem so I could create the effect of a bunch of lillies. 


The set also comes with some great sentiments, one of which I heat embossed here in Rose Gold embossing powder. 

I used Daniel Smith watercolors to color the image (I used a number 2 brush).  The colors were Ultramarine Violet on the petals with a touch of Quinacridone Violet, the leaves and stamens were Pthalo Turquoise with a touch of Prussian Green.  Once dry I added some accents to the flowers in white and gold gel pen, and a few dots of Wisteria Nuvo Drops.


For the edge of the card, I adhered a strip of double sided tape to the edge, and brushed gold gilding flakes over the top - I love the vintage effect this gives! I finished with a strip of co-ordinating watercolor paper.  

For more information on the other supplies I used, you can find more details on my blog.  Have a wonderful day!

Jenny 

Monday, March 19, 2018

Fast Food Fun!

Welcome to the Topflight Stamps Blog.  It's Clare with you this time and on the menu today we have Burger & Fries!  I've been playing with a cute little set of stamps, made for you by 'For The Love of Stamps'


I prepared a gelli printed background and stamped over using stamps from Paperartsy, designed by Tracy Scott.  I cut my sheet down to ATC sized cards, edged with some distress ink and mounted onto black card.


I used Neocolour II and Faber-Castell crayons to add colour to my Burger & fries, neatly cut them  out to place on my ATC's


Once I knew where my fast food meal was going to be placed 
I added in some of the smaller stamps.


I added some doodling with a white sharpie pen before I finally placed the burger, fries & ketchup in place with some silicone gel.


Thank you for visiting today, remember to stop by for some crafty inspiration every day!

Happy Crafting,

Clare.

Friday, March 16, 2018

More from Lavinia Stamps........

Hi Bloggers, Barbara back today with a tag for TOPFLIGHT STAMPS using fab images from Lavinia Stamps.
This week I covered a wooden tag with watercolour cardstock, then inked it with Distress Oxides in Wild Honey & Candied Apple.
I stamped the fairy 'Seeing is Believing' - HERE - and 'Whimsical Wisps' - HERE with Versafine Clair ink in Twilight.
All I had to add was some Ranger Glossy Accents and Ranger Liquid Pearls.
Checkout the beautiful selection of Lavinia Stamps at www.topflightstamps.com.......even if you're not 'into' fairies, there are loads of other brilliant images available.
Well, that's it for now, my next blog will come from the Canary Islands.....hopefully it will be warmer there, than it is here in the UK at the moment.
Catch you soon,
Barbara x

Thursday, March 15, 2018

Santa's Gang - LOL

Hey Topflight fans! As many friends and family face the latest Nor'easter it got me thinking about the one thing I love about winter, and that's Christmas crafting, baking and family time. When our family gets together its always about good food and often it involves dancing and singing, so when I saw this adorable Katzelkraft "Christmas Gangnam Style" stamp set, I HAD to get it.


The image is EVERYTHING, so I kept it simple and just colored it up using Arteza Fineliner Pens, blending it out for a watercolored look with a water brush. The also used an Arteza Arctic Blue Real Brush Pen and a water brush to add a bluish glow around the image. With gel pen highlights on the shades, noses, hooves, boots and gloves, and a little shimmer on the antlers and Santa's white fur trim with a clear Wink of Stella pen, I think the image really comes to life. I used scraps of holiday patterned paper from an old (2012) Recollections paper pad for the card front and popped up the image on some fun foam to add a little dimension. I also added a thin strip of silver glitter washi tape on one side for added sparkle and shine.


For the inside card liner, I used more scraps of the same patterned papers, inking the edges with Tim Holtz Distress Ink in Faded Jeans for a finished look. I also doodled some sparkly star bursts with a black fineliner pen in the upper third and in the lower left of the card liner for a festive look. Lastly, I  heat embossed the sentiment in white from the stamp set onto a scrap of dark blue card stock, and simply cut it into a banner shape. 


Thanks for joining me today for this unseasonably Christmas card! If you're interested in more details about the supplies used or a coloring process video for this card, please check out my blog post HERE.

Wednesday, March 14, 2018

How fragile we are!


Today, a new stamp from Visible Image at  Topflight


I could not resist to merge it with

"City Rats" from Katzelkraft

I used Distress inks for my background
Weathered Wood
Antique Linen
Iced Spruce
Black Soot

I used  Copic markers to color the rats.


Nathalie Fournier/Topflight

Tuesday, March 13, 2018

It's Always Time for Coffee!

Hi and welcome to the Topflight Stamps blog! It's Jenny here, with a card showing how to create a focal point using the fantastic Strobes stencil by Visible Image.  


I used the stencil with Nuvo Mousse in Burnished Bronze over embossed woodgrain cardstock. By using a light hand, the mousse allows the pattern and texture of the cardstock to show through.   I used dark cardstock for a tone on tone look, and set aside the panel to dry.

I also used as my focal image, a coffee cup from the Coffee Time set by For the Love of Stamps.  I love this set, it has some great images and sentiment fonts.  
 Strobes stencil:

I stamped the main image and the sentiment onto kraft cardstock using Distress Oxide ink in Vintage Photo.  I heat embossed the sentiment in clear embossing powder and popped it out with a circle punch. 

I colored the coffee cup with copic markers.  The main cup was shaded with 4 browns, and the flowers and leaves in pink and green. The lid and the base were colored using warm grays.  I also added white and gold highlights with gel pens.   As a finishing touch I added some Nuvo glitter drops (in chocolate) to accent the cup.  I then fussy cut it out.  Both the sentiment and the cup were popped up on foam tape. 


I adhered the entire panel to a kraft card base.   I used lots of masculine and darker colors here, but I think it's quite an uplifting card.  The Strobes stencil really makes an impact (and it is definitely a visual of how I feel after I've had my first coffee of the day!)

Hope you enjoyed! If you have any questions, leave us a comment or hop over to my blog for more details on supplies I used. 

Jenny x
01 09 10