Friday, November 29, 2024

O Christmas Tree


Hello friends!

Ericka here from Strangely Creative, and I hope you all had a wonderful Thanksgiving filled with family, food, and gratitude. Now that it’s Friday, I hope you’re indulging in some Black Friday shopping (hello, crafty deals!) or maybe just relaxing with some creative time. Don’t forget to check out the Topflight sale—there are so many amazing finds waiting for you!


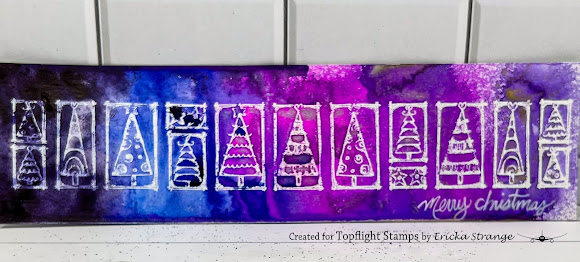
Today, I’m sharing a festive card featuring the O Christmas Tree stamp by Kate Crane for Carabelle Studio. While it’s bittersweet that Carabelle Studio closed its doors this year, there are still plenty of their incredible stamp sets available in the store. This one in particular is a gem that offers endless creative possibilities.


I started by stamping the O Christmas Tree image on watercolor paper and heat embossing it in white. This technique not only adds texture but also creates a resist effect that’s perfect for vibrant backgrounds.


For the background, I reached for my trusty Lavinia Acrylic Sprays and Mystical Mists. The colors blend effortlessly, creating a dreamy, ethereal effect that perfectly complements the whimsical style of the stamp. I layered shades to build depth, letting the sprays do most of the work—simple and stunning!


To finish the card, I added a touch of white hand lettering to balance the composition and tie everything together. It’s always satisfying to add a personal touch like this, especially during the holiday season.

And just like that, one more Christmas card is complete and ready to spread some holiday cheer. This project reminded me of how versatile a single stamp can be when paired with the right techniques and materials. Thank you for stopping by today! Whether you’re shopping, crafting, or simply enjoying a quiet moment, I hope your weekend is filled with joy and creativity. And don’t forget to grab those Carabelle Studio stamps before they’re gone!

Happy crafting!


Topflight Stamp Supplies


Carabelle Studio - Kate Crane Oh Christmas Tree
Shop at:
TP
WOW! Embossing - Clear Embossing Pad
Shop at:
 TP
Lavinia - Mystical Mist Spray - Purple Orchid
Shop at:
TP
Lavinia - Acrylic Spray - Midnight Blue
Shop at:
TP
Lavinia - Acrylic Spray - Periwinkle
Shop at:
TP
Lavinia - Mystical Mist Spray - Pinkella
Shop at:
TP


Thursday, November 28, 2024

Festive Tag-Making Fun: A Quick Project for the Holiday Season


Hello friends! Ericka from Strangely Creative here and I hope your Thanksgiving has been filled with joy, family, and delicious food—and maybe even a little holiday shopping! If you’re like me, you’ve got your eye on some crafty goodies during the Black Friday sales. Don’t forget to check out the  Topflight sale for some amazing finds, whether you’re shopping for the crafters in your life or treating yourself.


Today, I’m sharing a simple yet striking holiday tag that’s perfect for gifts, decor, or just adding a touch of handmade magic to your festivities. This tag features the whimsical PaperArtsy JOFY Mini 01 stamp paired with the vibrant Lavinia Chartreuse and Emerald Green Acrylic Sprays. Let’s dive in!


Step 1: Creating the Background

To start, I sprayed my tag with a mix of Emerald Green and Chartreuse Acrylic Sprays. These colors blend beautifully and bring a fresh, festive vibe to the project. Once the background dried, I used white embossing powder with the JOFY Mini 07 stamp to add delicate, snowy details that pop against the bold green backdrop.


Step 2: Adding Layers and Texture

Next, I brought in some pattern and texture by adhering PaperArtsy Printed Tissue 9 to the tag. For this step, I used Mattint in Greenstone as my glue—its smooth finish ensures a seamless application. I love how the tissue adds visual interest and depth without overpowering the design.

Step 3: Adding a Golden Touch

Every holiday project needs a little sparkle, right? I grabbed my Studio Light Paint Pens and added subtle gold accents to the tag. It’s amazing how a few shimmering details can elevate the entire look!


Step 4: Finishing Touches

Finally, I stamped the festive "Noel" sentiment from the PaperArtsy Kate Crane 007 set. This playful font tied the whole piece together, giving it a charming holiday flair.

Ready to Gift

And voilĂ ! My festive tag is complete. It’s such a fun and easy project to whip up, and it’s versatile enough to use for all sorts of holiday crafting.

Thank you for stopping by today! I hope you have a wonderful holiday weekend filled with love, laughter, and maybe a little time to create. Stay tuned—I’ll be back tomorrow with more Christmas card inspiration to keep those holiday vibes going strong.

Happy crafting!


Topflight Stamps Supplies


PaperArtsy - JOFY Mini 01
Shop at:
TP
PaperArtsy - Kate Crane 007
Shop at:
TP
WOW! Embossing - Clear Embossing Pad
Shop at:
 TP
Tsukineko - VersaFine Clair - Nocturn
Shop at:
TP
PaperArtsy - Mattint Greenstone
Shop at:
TP
PaperArtsy Printed Tissue 9
Shop at:
TP
Studio Light - Paint Pen Metallic Gold
Shop at:
TP
Lavinia - Acrylic Spray - Emerald Green
Shop at:
TP
Lavinia - Acrylic Spray - Chartreuse
Shop at:
TP


Wednesday, November 27, 2024

Purr-fect Birthday Card with Visible Image Stamps

Hello, Lisa Hoel here. I'm back with another Topflight Stamps card for you! This week's theme is "Anything Goes". I used the Visible Image stamp set Purr-fect Birthday to make my son's birthday card.


Lisa Hoel for Topflight Stamps #creativejuicefreshsqueezed #topflightstamps

I stamped everything on a gel print background with permanent inks. Having a stash of gel prints is handy!

Thanks for stopping by and be sure to check out the Topflight Stamps store for a wide selection of different and hard to find stamps, stencils and other paper crafting supplies from all around the world! Also keep an eye here on the Topflight Stamps blog. There is new inspiration posted daily!


Topflight Stamps Supplies Used:

Visible Image Stamp Set - Purr-fect Birthday


Visible Image Stamp Set - Birthday Wishes

Visible Image Stamp Set - Rays of Light
Versafine Pigment Ink Pad - Onyx Black

Tuesday, November 26, 2024

So Grateful and Happy Together - A Thanksgiving Card

Greetings! It's Tuesday so you've got Kathi here to share a project with you. This week is "Anything Goes" for the TFS team. Since Thanksgiving is Thursday, I made a card which can be used for Thanksgiving or other special occasions.

But before I get to my card, I wanted to remind you that Topflight Stamps' Black Friday Sale Week is going on right now! There are so many wonderful products (both new and old) that make wonderful holiday gifts for family, friends, and yourself!


***Back to today's project***
So back when I saw the truck filled with critters in the Warm Hugs Clear Stamp Set by Jane's Doodles for Creative Expressions, I immediately thought of the holiday song "Over the River and Through the Woods" and knew that I wanted to use it on a holiday card. So here it is!


Tuxedo Black Memento Ink by Imagine Crafts/Tsukineko was used to stamp the critter-filled truck stamp from the Warm Hugs Clear Stamp Set by Jane's Doodles for Creative Expressions twice — once onto a 5" x 7" panel of white cardstock and once onto repositionable sticker paper. The sticker paper version was fussy-cut and placed over its counterpart on the image panel as a mask. 

The acetate rolling hills mask from the Acetate Hills Mask Set by Lavinia Stamps was placed towards the top of the image panel and the flattish mask was placed over the truck covering the bottom of the image panel. Two colors of Copic-friendly blue ink were brushed over the top of the mask to create a night sky. While the rest of the image panel was still covered. White paint was splattered to add some stars.

I previously had traced the rolling hills mask onto cardstock and cut it out. I placed the top part of the traced cardstock over the sky portion, then brushed  dark green Copic-friendly ink over the top of cardstock mask to create the top part of the hilly area.  The same dark ink was brushed over acetate rolling hills mask to add the tops of additional hills. When done, I brushed lighter Copic-friendly green ink between the cardstock mask and the flattish acetate mask to complete the hilly background behind the masked truck.

A second previously traced and fussy-cut piece of cardstock was used to cover the hilly area of the image panel. Grey and black Copic-friendly ink was brushed over the paper mask and the masked truck.

The masks were lifted and the truck and critters were colored with Copic markers. I intentionally left the truck somewhat streaky to make it look old and worn. 

Blue Belle VersaFine Clair Ink by Imagine Crafts was used to stamp the words "happy" and "together" from the Artist Trading Coin Stamp Set 11 by That's CraftyAdditionally the sentiment "So Grateful" from the More Classic Sentiments by Heffy Doodle was stamped with the same ink onto wood-patterned paper from the Wood Textures 6x6 Paper Pad by Craft ConsortiumThe ink was heat set and both sentiments were die-cut, then edged with Blue Belle VersaFine Clair Ink.

A piece of plaid paper from the Distress Plaid Paper Pad by Creative Expressions was selected and cut with a large A7 rectangle frame die. The die-cut was edged with Morning Mist VersaFine Clair Ink by Imagine Crafts, heat set, then adhered over the image panel. The framed image panel was adhered to a grey 5" x 7" card, then edged with Morning Mist VersaFine Clair Ink

The sentiments were adhered to finish the card.

Please pop over to my blog, Kat's Tales of Stamping, for step-by-step instructions and complete supply lists.

Topflight Stamps Products Used:


Monday, November 25, 2024

Creating a Tropical Card

  Hi friends. Alanna with you today with a fun tropical themed card featuring the Tropical Sunset image from Crafty Individuals.

To get started, I stamped the Tropical Sunset image with some light grey ink onto a piece of white cardstock using my Misti. I didn't remove my stamp. I did this so I could see where the various portions of the image were. I then took my inks and blended on colors in blue, yellow, and aqua.

After my ink blending was done, I stamped the Tropical Sunset image again with Versafine Claire Nocturne ink. I stamped the sentiment which is from the More Classic Sentiments set from Heffy Doodle.

I trimmed the panel down and added it with foam tape to my white A2 notecard and that finishes it off.

Find these products I used below in the Topflight Stamps store. 
Crafty hugs! ~ Alanna

Friday, November 22, 2024

Deck the Halls with Festive Scraps


Hello friends! Ericka from Strangely Creative here. Christmas crafting is in full swing, and today I’m sharing a festive project that will have you reaching for those little scraps you just can’t bring yourself to throw away. Let’s turn them into something magical—a Christmas tag full of charm and creativity!


Step 1: Scraps to Stunning

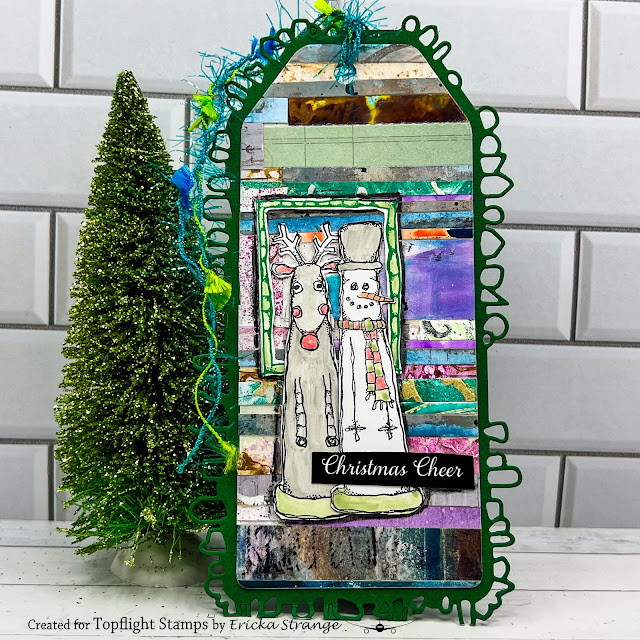
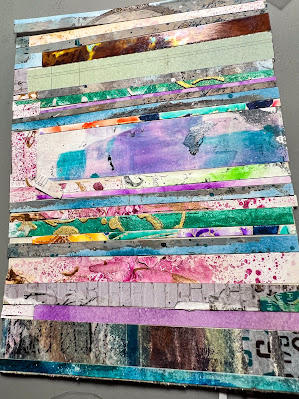
I began by gathering those lovely little bits of paper scraps scattered on my craft table—those colors and patterns were just too pretty to part with! I arranged them on a piece of paper until they looked just right, then glued them down to create a textured, layered background.


Step 2: Cutting the Tag

Next, I used the AALL & Create Hexalove Die to transform my scrap-covered paper into the perfect tag shape. I love how the intricate edges from this die add a touch of elegance!

Step 3: Reindeer and Snowman Fun

For the focal point, I turned to the adorable PaperArtsy Kate Crane 007 stamp set featuring a reindeer, snowman, and a playful frame. I stamped the images on a separate piece of paper to keep things crisp and clean.


Step 4: Painting the Magic

Using Mattints in Greenstone, Ladybug, Ash, and Squeezed, I brought the reindeer and snowman to life. These paints add a muted tone to my busy background. Once dry, I carefully cut out the images and adhered them to my tag background, creating a fun and festive scene.

Step 5: Finishing Touches

To finish, I added a sweet sentiment from the Creative Expressions Wordies Sentiment Sheets—they’re a go-to for adding the perfect final touch. A little ribbon tied through the top, and my Christmas tag was complete!

Thank you for stopping by today! I hope this inspires you to dig into your scraps and craft something festive. Have a wonderful weekend and happy crafting!

Until next time,
Ericka


Topflight Stamp Supplies

PaperArtsy - Kate Crane 007
Shop at:
TP
AALL & Create - Die Set 31 Hexalove
Shop at:
TP
Creative Expressions - Wordies Sentiment Sheets
Shop at:
TP
Tsukineko - Versafine Clair - Green Oasis
Shop at:
TP


Tsukineko - VersaFine Clair - Nocturn
Shop at:
CS | AZ | TP
PaperArtsy - Mattint Ash
Shop at:
TP
PaperArtsy - Mattint Greenstone
Shop at:
TP
PaperArtsy - Mattint Ladybug
Shop at:
TP
PaperArtsy - Mattint Squeezed
Shop at:
TP
01 09 10