Wednesday, February 28, 2018

You perk me up! Infusions and Darkroom Door


I propose this morning for Topflight Stamps a coffee break and Infusions!
A art journal page made with pigments Infusions from PaperArtsy Green man and Sleight Blue
the "Coffee Time" stamp
Distress Picked Raspberry, Abandoned Coral and Worn Lipstick inks
and Tim Holtz tissue wrap "Postale"


Green Man
Sleight Blue


Nathalie Fournier/Topflightstamps


Tuesday, February 27, 2018

High Tea Emboss Resist - Studio Light, Ultimate Crafts and ClarityStamp

Hi Everyone and welcome to the Topflight Stamps blog!

Today I have a pretty, soft card for you using stamps by Studio Light and Ultimate Crafts. I used the emboss resist technique with ink blending, and some simple Copic coloring to create the card. 


The stamps I used were this Studio Light background stamp which features gorgeous distressed flourishes, and Ultimate Crafts High Tea which features some super pretty, hand drawn look stamps which I love.   Both are clear cling stamps. 


I also used these AMAZING brushes from ClarityStamp for ink blending.  They make blending so easy to get a beautiful, light subtle blend, with no big marks!


To create the card, I first created the background panel.  I stamped the Studio Light Stamp in Versamark embossing ink onto Neenah Solar White cardstock and then heat embossed in white embossing powder.  


I trimmed the cardstock down to 4" x 5.25" and then used one of the Clarity brushes to blend three colors of pink dye ink across the panel, getting lighter towards the top.  To really bring out the embossed pattern, when done blending, take a dry babywipe and gently buff the embossing to remove any excess ink.   I also spattered a little bit of gold spray mist onto the panel with a paintbrush.  I popped the whole panel up on foam tape to a Neenah Solar White card base.


I stamped the images from the Ultimate Crafts High Tea in copic friendly black ink, and then colored them with Copic markers (three shades of RV and three shades of BG).   I added some gold gel pen for accents to match the background spatter, and some Sugar Stickles glitter (colorless glitter) on the cake and tops of the macarons for subtle sparkle.   I then trimmed them out with my Scan N Cut. 


The sentiment was from a set in my stash and was heat embossed in gold onto light grey cardstock, and trimmed out using a fishtail banner die.   I popped it, and the images up onto the panel using foam squares.   

Hope you like it!  If you want to see a full list of supplies, please hop over to my blog here.   Have a fabulous day !

Jenny 

Monday, February 26, 2018

Fresh as a daisy!

Welcome to the Topflight blog.  Clare here today and this week I have been working with a selection of Paperartsy stamps by Jofy along with some of their fabulous Fresco Acrylic paints.


Onto some card I blended a combination of Antartic, Teresa Green & Lake Wanaka Fresco acrylic paint, using a brayer.


Using stamps from Jofy's Paperartsy's 2018 release, Jofy 64, JM58 & JM64 I stamped with corresponding colours onto the tag.  Using the small daisy from Jofy 64 I stamped with Versamark watermark ink and heat embossed with with embossing powder.

Onto some of the spare painted card I stamped one of the large flowers from Jofy 64, embossed with white embossing powder, fussy cut and assembled my tag.


Thank you for stopping by today, we have inspiration on a daily basis so pop back soon for your daily dose!

Happy Crafting,
Clare.


Friday, February 23, 2018

IndigoBlu at Topflight Stamps

Hi everyone, it's Friday, (yeah) so I'm back on the blog showing a card I made with IndigoBlu stamps from www.topflightstamps.com - find them
HERE 
 This set is called 'Shine Bright'
I started with a piece of background which I had previously inked, then stamped over with various images from the set.

 I used Distress Oxides for the stamping & background.
I mounted the inked topper onto black card, then onto a 7" x 7" card base.
Once this was done, I liberally applied Ranger 'Glossy Accents' to the light bulbs, to give them a 'glass-like' appearance.
I love the number stamps from this set, and think I'll use them a lot.
Well that's all for today, have a good weekend, and I'll catch you next week.
Barbara x


Thursday, February 22, 2018

For Cat Lovers

Hello Topflight fans! I'm a dog person, but today I'm veering into the world of cat lovers. I designed this card for folks who love the independent spirit of cats.


The whimsical look of the IndigoBlu Kevin's Gang cat stamps are perfect for the sentiment in the set that says "DOGS come when they're called CATS take a message and get back to you". Because I wanted to simply highlight the silly kitty designs, I refrained from coloring them up (except for a tiny bit of Copic coloring for inside their ears - I couldn't help myself!). I went over the eyes, noses and fur patterns with a black Sakura Glaze Pen and just fussy cut them out. 


To create little windows from which the kitties could pop out, I used some Diemond Dies stitched heart dies that had the stitching on both the inside and outside of the hearts. I wanted the stitching detail for the heart windows and this worked perfectly. To add a bit of color, I used Tim Holtz Distress Inks in Spun Sugar and Picked Raspberry to create an ombre effect in each heart window.


I used thin double sided foam adhesive to position and pop up all the kitties and the card front with the heart windows. Then I heat embossed the sentiment on black card stock with white embossing powder and split it up so that the card front had the first doggy part and the inside of the card had the second kitty part. For the inside of the card, I added a fourth kitty in repose, which seemed to fit the idea of cats getting back to their people in their own time. :)


Thanks for joining me today for this homage to kitties! If you're interested in more details about the products I used or a process video, please check out my blog post HERE


Wednesday, February 21, 2018

"Wanted!"


Focus on the beautiful new IndigoBlu background stamp


stamp "Jane Collage"


 Infusions PaperArtsy "The Sage"


Nathalie Fournier/Topflight 

Tuesday, February 20, 2018

Modern Butterfly

Hi everyone, and welcome to the Topflight Stamps blog.  Today I'm showcasing the IndigoBlu Big Butterfly #2 stamp in a very different way to the project I showed you a few weeks ago, with a much more modern, graphic look.


The stamp I used today is IndigoBlu's Big Butterfly #2 stamp.  I love this stamp, it's a great quality rubber stamp, and it has so many ways it can be used.  It's almost the full size of an A2 size card front, so really takes front and center. 


To create the card, I took a panel of cold press watercolor paper, trimmed slightly larger than an A2 size card panel (approx. 6" x 4.5").  I placed it in my stamping tool (I use a MISTI) and inked up the stamp with a black waterproof ink (I used Versafine Onyx black ink).  I used a MISTI so I could stamp the image 3 or 4 times to get a good impression on the textured paper.  One I finished stamping, I heat embossed it with clear embossing powder. 


I taped the panel to a board and then used masking paper to mask off the butterfly.  I then spritzed the panel with water.   I then used my Derwent Graphik markers to flick paint onto the wet background.  These markers are paint that dries permanent.  You can layer light colors over dark if you dry them inbetween, which is what I did. Once dry, I removed the masking paper.  


I then colored in the butterfly itself with a grey Graphik marker.  You can pull out the color after you scribble it on, with a wet paintbrush.  

To finish I adhered a die cut sentiment and adhered the entire panel to a white cardbase.   For more details and to see the other supplies I used, head over to my blog.  

Hope you have a wonderful day!

Jenny 

Monday, February 19, 2018

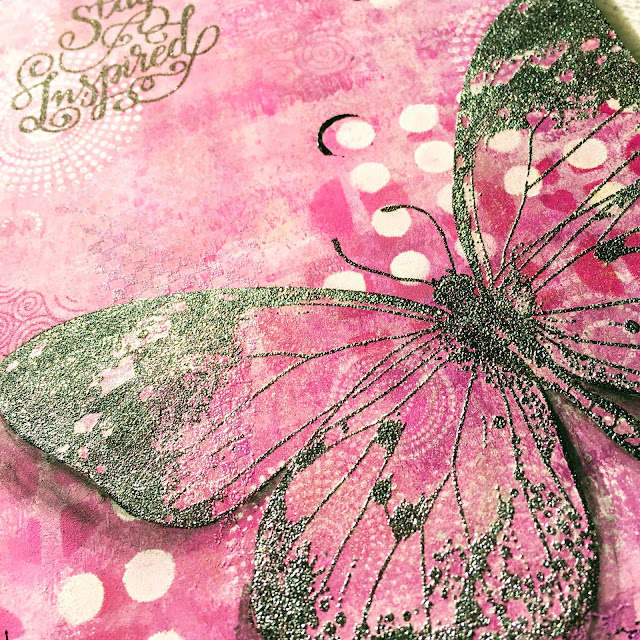
Indigoblu - Stay Inspired

Welcome to the Topflight Stamps blog.  Clare with you today and this week we are stamping with the wonderful Indigoblu Stamps.


On a plain MDF clipboard,  I picked up from a local store, I painted the clipboard with Paperartsy Fresco Acrylics: Amethyst, Bougainvillea & Chalk.  I stamped directly onto the clipboard using Indigoblu Big Butterfly & Tiny Backgrounds.  The inspiring sentiment came from  the Dreams come True set.


I stamped the large butterfly with versamark black ink, heat embossed with a frosted crystal embossing powde and glazed with some Paperartsy metallic glaze.


I hope you have enjoyed your visit today? Remember to pop back everyday and check out what the rest of our inspiring team have been up to.

Happy crafting.

Clare. 


Friday, February 16, 2018

Carabelle Studio at Topflight Stamps......

Hi everyone, welcome back to the Topflight Stamps blog. Barbara here today with 3 ATC's made with stamps designed by Birgit Koopsen for Carabelle Studio, called DUTCH TULIPS.
These are the very first ATC's I've ever made, but I think I'm 'hooked' 
TOPFLIGHT STAMPS carry a massive range of Carabelle Studio stamps, why not pop over to the website and check them out. 
 I made the backgrounds with Distress Oxides, then stamped the images in Versafine 'Clair'......a bit of shading & doodling and I was done.
These will definitely not be the last ATC's I make.....I already have a few 'ready-inked' for future projects
Please leave a comment if you've enjoyed looking, or have any questions.
Catch you soon,
                                                 Barbara x

Thursday, February 15, 2018

For Cat Lovers

Hi Topflight fans! Kristina CraftyPaws here today to share a card made with the crazy cute Duke's Gang stamp set by IndigoBlu.


I did a lot of masking as I stamped each adorable cartoony dog stamp over and over all the way around the card front. I wanted to make sure that I didn't stamp any one stamp next to or behind the same image, and toward the end it got a little dicey so I actually added some spots, extended the bodies, or doodled in more fur lines to some of them to make a few pups look a little more different.


I Copic colored all the pups in a rainbow of colors and when I was done, I was left with a open area right in the middle that was perfect for a sentiment. I borrowed the sentiment from a Simon Says Stamp "You Are Pawesome" stamp set and heat embossed that onto a strip of vellum. I wrapped the vellum strip around the whole width of the card front and secured it to the back. Then I tacked down the vellum with dabs of glue, which I covered with sequins and small metal confetti hearts. 


I wanted to add a little sparkle and interest to the base of the top folding card (I had cut the card front with all the pups down to 3 7/8" x 5 1/2"). So I used a scrap of patterned paper that had "LOVE THIS" written over and over that I glued to the bottom of the card base and then edged it with a bit of glittery washi tape. Then I finally popped on the card front backed with fun foam to add some dimension. 


Thanks for joining me today! If you're interested in any more details about this card, please check out my blog post HERE.

Wednesday, February 14, 2018

Topflight, Rubber Dance et Visible Image


What a pleasure today to gather on a page of my art journal

Rubber Dance and Visible Image

Here are the stamps I used


Rubber Dance "I Heart Art"


Visible Image "Live Life Now"


I created my page with DécoArt paintings
Violeta Africano
Soft Green
Deep Red
Antique White

Stencils:
TCW Mini Chicken Wire
Tim Holtz Mini Collection Set 9

Nathalie Fournier/Topflight Stamps

Tuesday, February 13, 2018

Watercolored Rose by Studio Light

Hi and Welcome to the Topflight Stamps blog! 

It's Jenny here today with you and I am sharing a watercolored card using a GORGEOUS stamp by Studio Light.


The stamp is from their Romantic Botanic Collection and is called Botanic Background Rose.  When I saw this in store at Topflight, I just had to get it.  It's a clear stamp and is big enough to entirely cover an A2 size card (4.25" x 5.5").  


The sentiment on my stamp is from an IndigoBlu sentiment set that you'll have seen me use before called 'Dreams Come True'.  It's a great go to set for sentiments. 


To create my card, I used Cold Press watercolor paper (I used Arches) trimmed to 4.5" by 6 " and then heat embossed the image using Versamark embossing ink and white embossing powder.   

I then painted the image using Daniel Smith watercolors.  The technique I used was wet on wet - adding clean clear water to the image first, then dropping in the paint and letting it wick out.  To create a two-toned look, I used two colors for each part of the image.  The colors were: Leaves: Prussian Green and Green Gold; Rose: Pyrrol Scarlet and Alizarin Crimson; Branches/Buds: Sepia, Burnt Sienna.


When the image was dry I stamped the sentiment directly over the top using Versafine Onyx Black Ink, trimmed it down to the size of an A2 card, and then backed it to a card base using double sided tape.  As a finishing touch, I scattered drops of clear Nuvo Jewel Drops to look like dew on the petals and leaves!

That's it!  I can't tell you how much I enjoyed coloring this - it was SO relaxing.  The Studio Light Romantic Botanic stamps are simply stunning, and Topflight carries several.    Let me know if you have any questions in the comments below.  Full supplies can also be found over on my blog.

Have a wonderful day!

Jenny
01 09 10