Wednesday, March 30, 2022

Topflight Stamps Birthday Celebration

  Hi Everyone,

Cornelia here today. This week it's all about the big birthday of Topflight Stamps! We had a birthday hop on the Topflight blog on Tuesday, but you can still hop along and win some fantastic prizes. Furthermore there is a 20% discount on all merchandise! So what are you waiting for????

You might remember my last blog post for Topflight stamps where we featured paints. As I told you, I made a bunch of backgrounds with my gel press plate. And I used one of those for this card.  

I stamped those wonderful candles from Darkroom Door onto the background. Colored them with water colors. Stamped the candles again and heat embossed them in white. Colored them with Copics. Stamped the turtle and bee onto scrap paper, colored them with Copics and fuzzy cut them. Trimmed the background paper. Arranged everything on the card and glued it down. Heat embossed the sentiment and fuzzy cut it as well. Added it. Mounted it onto a dark blue card base.

I hope you liked this. Thanks for visiting. 
See you next week with more Topflight Stamps inspiration.

GIVEAWAY DETAILS
Of course, it wouldn’t be a birthday celebration without prizes! Topflight Stamps is giving one lucky winner a $50 Gift Certificate to the store. But wait, there is more, each stop on the hop has an additional $25 Gift Certificate up for grabs for some lucky commenter. For a chance to win, make sure to visit every stop on the hop and leave a comment by April 3rd. Winners will be announced on the Topflight Stamps blog on April 7th. Good Luck!

And here are the stamp supplies I used: 

AALL & Create: Enjoy your special Day by Charmaine Canham

Good Morning!! 

I like to put my go-to Copic Markers away and pull out my Prismacolor pencils once in a while to create a very different look than alcohol markers. You still build color upon color, but it becomes magical when the colors create a new shade of blue, like today's flower. 


Here is my card using a stamp from AALL & Create (Textured Florals) from Topflight Stamps.


I used Prismacolor pencils and a simple masking technique to create the detail in the background. Use shades of blue, lightest first, and layer color upon color. Use a fade-out type of ink pad to create soft lines. 
Start with the lightest shade of blue and introduce darker colors as you go.


Add pink to the center.


Two shades of green for the stem with a white highlight.


Make short markings with the brown for the iris of the flower. Use a black Micron pen for more detail.


Next, stamp another flower on masking paper and cover
your colored flower. Use distress oxide for the background.


Add a stencil detail over the background. 


Stamp the included stamps in the set with distress
oxide for a softer look.


Add some shimmer with Prism Glimmer spray.


Pull the mask and add your sentiment
on dimensional foam tape. Add more shadows and highlights
 with a gel or paint pen.


I would love to hear your comments on this card!
Charmaine

Follow me on Instagram and Facebook for almost daily inspiration.


Tuesday, March 29, 2022

It's Our 5th Birthday! Let's Hop to Celebrate!

 It's Topflight Stamps 5th birthday and to celebrate, we’ve teamed up with some great designers to showcase celebratory projects using the unique products available at Topflight Stamps. Please hop along with us and see all the beautiful talent from this group of amazing designers! 

Here are some bonus cards from the designers to whet your appetite! There are many more to see so get hopping…

Annette Allen

Connie Mercer

Melina Dahl

Rachel Kleinman

Follow along here to the other stops on the Hop. You can win prizes too! See the details below the link list! Thanks for joining us.


Topflight Stamps

GIVEAWAY DETAILS
Of course, it wouldn’t be a birthday celebration without prizes! Topflight Stamps is giving one lucky winner a $50 Gift Certificate to the store. But wait, there is more, each stop on the hop has an additional $25 Gift Certificate up for grabs for some lucky commenter. For a chance to win, make sure to visit every stop on the hop and leave a comment by April 3rd. Winners will be announced here on the Topflight Stamps blog on April 7th. Good Luck!
Don't miss the sale going on during the Hop!


Monday, March 28, 2022

Bold Slimline Card Tutorial

 Happy Monday! This is Rachel Kleinman here to share a slimline card full of embossing powder!


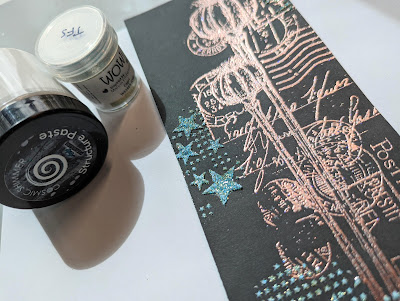
I love how the different powders pop on the black cardstock. I started by stamping the AALL & Create Poppy Seedhead stamp with Versamagic ink and heat embossing with Brassy Twinkle Wow! embossing powder.


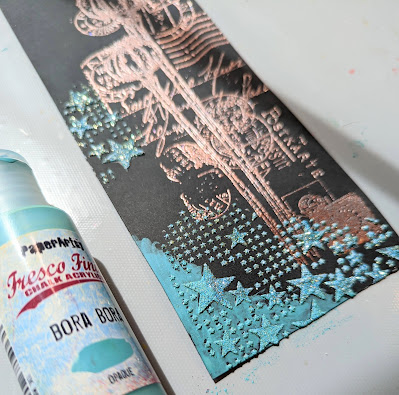
I used the AALL & Create Lotza Stars stencil with Cosmic Shimmer Structure Paste then put Wow! Embossing Powder in Capri on top of the paste. I hit it with my heat gun to melt the powder and also bubble up the paste a bit to give yummy texture.


I added Paper Artsy Fresco Paint in Bora Bora to the bottom and top corner. This color matches perfectly with the Capri embossing powder.


Can't have a mixed media card without some splatters! I added splatters with Glimmer Mist in Bronze Penny and Glamour Gold.


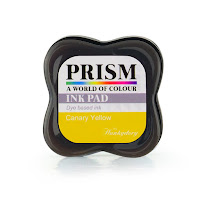
I colored the white sentiment strip with Prism Ink Canary Yellow. The yellow color will pop off the black cardstock.


Thanks for stopping in and hopefully you're inspired to pull out your embossing powders!

Topflight Stamps Supplies Used:


Sunday, March 27, 2022

Fairy Happy Birthday Card


Here it is!


Nocturne VersaFine Clair Ink by Tsukineko was used to stamp the gorgeous Fairy Rose Unmounted Rubber Stamp by Crafty Individuals onto mixed media cardstock, then heat set.

The Della Blue Elements Ink pad was smooshed onto a craft mat, spritzed with water, and a flat paintbrush was used to the sky.

 The smoosh, spritz, and brush step was first repeated with Lime Punch Elements Ink to create the spring grass, then again with Pine Elements Ink to add shade and shadows. A spiky brush was used to add the look of blades of grass.

Next up in the smoosh, spritz, and brush parade was Graphite Elements Ink which applied to the shadows and knots of the tree. Since I didn't have a good tree brown, I made my own my by smooshing Russet Orange, and Henna Elements Ink onto my craft mat, misting them, and brushing them onto the tree and the wooden swing seat.

Watercolor markers were used to color the fairy, the leaves, and the dragonflies.

The image panel was trimmed, edged with black ink, and adhered to white cardstock.

A piece of  patterned paper from the beautiful Ink Drops - Candy 6x6 Patterned Paper Pad by Craft Consortium was trimmed and edged with black ink. Onyx Black VersaFine Ink by Tsukineko was used to stamp the Fairy Happy Birthday Clear Polymer Sentiment Stamp by Lavinia Stamps, and heat set. The image panel was adhered to the patterned paper, which was then adhered to a white A6 card.

Please pop over to my blog, Kat's Tales of Stamping, for detailed instructions and complete supply lists.

01 09 10