Tuesday, December 31, 2024

Purrfect New Year Calendar Card

Greetings! It's Tuesday so you've got Kathi here to share a project with you. But before I get to all of that, I wanted to remind you that there's a Winter Sale over at Topflight Stamps that ends tonight, December 31st at 12:59 p.m.!


Our theme this week is "Anything Goes". I've made a calendar card with the That Lovin' Feline Clear Polymer Stamp Set by Visible ImageFiligree 8x8 Stencil by Lavinia StampsVersaFine Clair Inks by Imagine Crafts/TsukinekoBubble Talk Die Set 72 by AALL and Create, and sentiments from by Heffy Doodle and Time for Tea Design cat-themed stamp sets.

Here it is!


Use Copic markers to color the cats and use a white gel pen to add highlights to their eyes. 

Place a ruler or scrap paper horizontally under the right cat to cover the bottom portion of the image panel. Brush Cheerful VersaFine Clair Ink by Imagine Crafts/Tsukineko over the masks to add color to the top part of the image panel. 

Place the Filigree 8x8 Stencil by Lavinia Stamps over the image panel and secure with tape, magnets, etc. Brush Paradise VersaFine Clair Ink over the stencil on opposite sides.

Brush Verdant VersaFine Clair Ink over the stencil onto edges of the blue ink towards the center of the panel. Wipe the excess ink off of the stencil again. Brush Cheerful VersaFine Clair Ink over the stencil onto the center part of the image panel. 

Place the ruler on the dividing line so that it's now covering the top part of the image panel. Brush Paradise VersaFine Clair Ink over the ruler onto bottom of the image panel. Heat set the entire panel.

Cut white cardstock with two of the speech bubbles from the Bubble Talk Die Set 72 by AALL and Create. Use Summertime and Cheerful VersaFine Clair Inks to add color to the speech bubble die-cuts. Heat set the die-cuts.

Use Nocturne VersaFine Clair Ink to stamp select words or phrases from different sentiment or cat themed stamp sets to form the sentiments onto both of the speech bubbles. Stamp the hearts onto the bubble and color with a red marker. Heat set the sentiment speech bubbles and adhere to the image panel as shown. 

Use Nocturne VersaFine Clair Ink to stamp the "lovin' feline" sentiment from the That Lovin' Feline Clear Polymer Stamp Set on the bottom of the image panel as shown. Use Morning Mist VersaFine Clair Ink to stamp the line of pawprints. Use a black colored pencil to touch up the pawprints if necessary. Trim the image panel to 5.5" square and edge with a black marker.

Brush Summertime and Cheerful VersaFine Clair Inks over a ruler onto a piece of white cardstock that is slightly larger than the calendar. Heat set. Adhere the calendar to the inked panel using strong tape or glue.

Cut a piece of textured white cardstock to 5.75" square. Sponge Cheerful VersaFine Clair Ink around the outer .5" of the square. Place a checkerboard stencil over the inked area and sponge Summertime VersaFine Clair Ink over the stencil to blend with the orange ink. Heat set then use this layer to mat the image panel. Adhere the matted image panel to a black 6" x 6" card.

Please pop over to my blog, Kat's Tales of Stamping, for step-by-step intructions and complete supply lists. 


"Year" is from this set.


"You're" is from this set.


"Mew" and "Pawsome" are from this set.


Thanks for visiting today! Happy New Year!

Friday, December 27, 2024

Sparkle into the New Year

Hello, crafty friends!

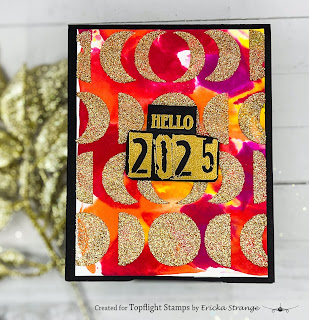
Ericka here from Strangely Creative, and I hope you had a wonderful Christmas celebration filled with joy and love. We’ve been busy catching up on everything as we prepare to welcome the new year, but I couldn’t resist sneaking in one last project before the countdown begins! Today, I’m sharing a fun and vibrant card designed to kick off the New Year with plenty of sparkle and shine!


I started this card with a lively print I made using my gel press and alcohol inks. The bright colors instantly remind me of fireworks and celebration—perfect for waking up the New Year!

To give my card that extra wow factor, I added Spectrum Noir Candlelight Gold Glitter Paste through the PaperArtsy Kate Crane 442 stencil. The stencil’s unique shapes paired with the golden sparkle create a bold and eye-catching design that screams celebration!


Once the glitter paste was dry, I brought in some WOW! Embossing Metallic Gold powder to add an embossed sentiment. I used the AALL & Create Snippet Alphabet stamp to spell out a fun greeting, along with the "Hello" sentiment from the PaperArtsy Scrapcosy 29 set. These finishing touches tie everything together beautifully.


And there you have it—a cheerful and bright card to ring in the New Year! I love how the vibrant background and shimmering details create a festive feel perfect for this time of year.

P.S. Don’t forget to check out the amazing sales happening now to stock up on supplies for all your creative projects in the New Year. Let’s make 2024 a year full of color and creativity!


Topflight Stamp Supplies

PaperArtsy - Scrapcosy 29
Shop at:
TP
PaperArtsy - Kate Crane 442
Shop at:
TP
WOW! Embossing - Clear Embossing Pad
Shop at:
 TP
WOW! Embossing - Metallic Gold Rich Pale
Shop at:
 TP
Spectrum Noir - Glitter Paste - Candlelight Gold
Shop at:
TP

Thursday, December 26, 2024

Looking Forward to the New Year!

Hello, Lisa Hoel here. I'm back again with another card to share! This week the designers are focusing on the new year. I created another New Year's card:

Lisa Hoel for Topflight Stamps #creativejuicefreshsqueezed #topflightstamps

The AALL & Create Studded Stars stencil is perfect for creating a festive New Years background. I applied texture paste through the stencil to black cardstock and then sprinkled gold embossing powder over it. When it dried, I heat embossed. Then I just added the sentiment (from Go To Christmas Words) in the middle. I also splattered it with silver Glimmer Mist for some extra shine.

Thanks for stopping by and be sure to check out the Topflight Stamps store for a wide selection of different and hard to find stamps, stencils and other paper crafting supplies from all around the world! Also keep an eye here on the Topflight Stamps blog. There is new inspiration posted daily!

Topflight Stamps Supplies Used:

Visible Image Stamp Set - Go To Christmas Words

AALL & Create stencil - Studded Stars

Versafine Pigment Ink Pad - Onyx Black
Prism Glimmer Mist - Silver Dollar
WOW! Embossing Powder - Polished Gold


Wednesday, December 25, 2024

2025 is Almost Here! – New Year's Card

Merry Christmas Topflight Stamps fans! Lisa Hoel here. I know you aren't focused on January 1st yet, but it will be upon us soon! This week the designers are focusing on the new year. I created a New Year's card to give to a friend.

Lisa Hoel for Topflight Stamps #creativejuicefreshsqueezed #topflightstamps

I spritzed Silver Dollar Prism Glimmer Mist through the AALL & Create Studded Stars stencil to create the background. Then I just added the sentiment (from Go To Christmas Words) and some die cut numbers. Easy!

Thanks for stopping by and be sure to check out the Topflight Stamps store for a wide selection of different and hard to find stamps, stencils and other paper crafting supplies from all around the world! Also keep an eye here on the Topflight Stamps blog. There is new inspiration posted daily!

Topflight Stamps Supplies Used:

Visible Image Stamp Set - Go To Christmas Words

AALL & Create stencil - Studded Stars

Versafine Pigment Ink Pad - Onyx Black
Prism Glimmer Mist - Silver Dollar


Tuesday, December 24, 2024

Happy New Year Calendar Starring Fortuneteller Dee

Greetings! It's Tuesday so you've got Kathi here to share a project with you. This week the team is focusing on New Year/New Beginnings, so I've made a 2025 calendar wall hanging with the Fortuneteller Dee Clear Stamp Set 1211 by Janet Klein, the Mosaic Stencil 54, and the Skycrossed Paradise Die Set 34 –– all by AALL and Create.


I used Tuxedo Black Memento Ink by Imagine Crafts/Tsukineko to stamp Fortuneteller Dee, the fortune teller booth, and the alternate sign from the Fortuneteller Dee Clear Stamp Set 1211 by Janet Klein for AALL and Create onto white cardstock. Tuxedo Black Memento Ink was also used to stamp the crystal ball stamp from the set twice — once onto white cardstock and once onto repositionable sticker paper. The sticker paper version was fussy-cut and placed over its counterpart as a mask. The table was then positioned and stamped under the base of the crystal ball.

All the images were fussy-cut, colored with Copic markers, and edged with black markers. The alternate sign was adhered over the existing sign. I added some Gelly Roll Bold Line Stardust Clear Glittering Ink Pen by Sakura to the crystal ball, then used a CG00 marker to spread the glitter over the ball. I also used a white gel pen to add a highlight to the ball.

The large die from the Skycrossed Paradise Die Set 34 by AALL and Create was used to cut metallic cardstock. 

A piece of white cardstock was trimmed so that it was a bit bigger than rounded rectangle die that is part of the Skycrossed Paradise Die Set 34. I used a corner rounder punch to round the corners. 

Low-tack tape was placed along the base of the white cardstock. Golden Meadow VersaFine Clair Ink by Imagine Crafts/Tsukineko was brushed over the tape to cover the background panel. I was fairly heavy handed with the ink, so I heat set it. When the ink was dry, the Mosaic Stencil 54 by AALL and Create was placed over the background, then Golden Meadow VersaFine Clair Ink was brushed over the stencil onto the inked cardstock to create a tone-on-tone look. The stencil was removed and the ink was heat set.

The horizontal strip of low-tack tape was removed, the top portion was covered, and Morning Mist VersaFine Clair Ink was brushed over the bottom portion of the background panel. The background panel was thoroughly heat set.

The Fortuneteller Booth was adhered to the background panel. Fortuneteller Dee and the table/crystal ball were adhered. Black chalk pencil and a cotton swab were used to add shadows. The background panel was edged with Nocturne VersaFine Clair Ink, then adhered to the black metallic die-cut. 

A "Happy New Year" die and number dies were used to cut black metallic cardstock. The "Happy New Year" sentiment die-cuts were adhered to the image panel.

The matted image panel, number dies, and the matted mini-calendar were adhered to patterned paper, which was then edged with Grass Green VersaFine Clair Ink. The calendar was adhered to black textured metallic cardstock to finish the piece.

Please pop over to my blog, Kat's Tales of Stamping, for numbered instructions and complete supply lists. 

Topflight Stamps Products Used:


Thanks for visiting today! Happy Holidays!


Friday, December 20, 2024

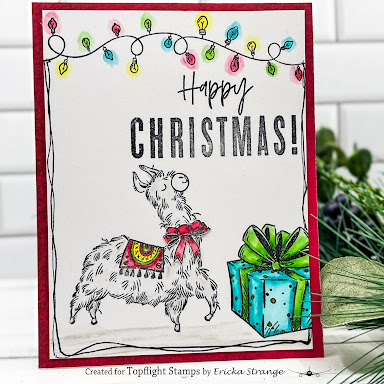
Llama Fun for the Holiday!


Hello friends! Ericka from Strangely Creative here, and can you believe it? We're in the home stretch—only a couple more days until Christmas! If you’re like me and still enjoying some last-minute holiday crafting, I’ve got one final festive project to share: a llama-themed Christmas card featuring some adorable sets from Katzelkraft.

Now, who doesn’t love llamas? They’re cute, quirky, and full of personality—perfect for a fun holiday card. I decided to dress up my llama with the Katzelkraft Christmas Holiday Accessories set to give it the ultimate festive makeover.


The Process:

1. Stamp & Accessorize: I started by stamping the llama and some adorable holiday accessories, including twinkling lights, a cheerful present, and a big festive bow. Because, really, what's a holiday llama without some sparkle?

2. Add Some Shine: After stamping, I clear-embossed the images to give them that extra polished look. It also helps the colors pop!

3.  Bring on the Color: Using my trusty Spectrum Noir Colorista Watercolor Markers, I brought the scene to life with bright, cheerful colors that scream holiday magic. These markers are a dream to work with and make blending a breeze.

4.  Fussy Cutting Fun: For the pièce de résistance, I stamped the wreath on a separate piece of paper, carefully fussy cut the bow, and attached it to my llama. Voilà—a holiday llama ready to spread Christmas cheer! 

5.  Add a Sentiment: I stamped the Visible Image Christmas Wishes sentiment to complete my card!


It’s whimsical, playful, and guaranteed to bring a smile to anyone who receives it. Plus, it’s a great way to make use of those fun accessory stamps that might not get enough love.

Thank you so much for stopping by and taking a peek at my festive llama creation! I hope this inspires you to get crafty with your holiday cards. Wishing you and your loved ones a wonderfully Merry Christmas and a joyful New Year! 🎄🎁

Stay creative,
Ericka 💖


Topflight Stamp Supplies


Katzelkraft - Llamas
Shop at:
TP
Katzelkraft - Christmas Holiday Accessories
Shop at:
TP
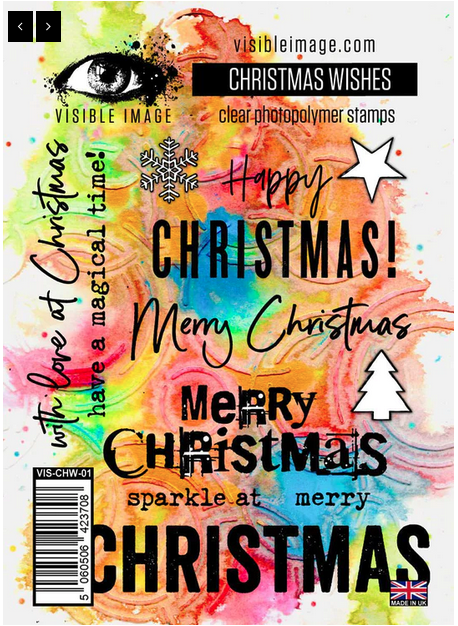
Visible Image - Christmas Wishes
Shop at:
TP
WOW! Embossing - Clear Embossing Pad
Shop at:
TP
Tsukineko - VersaFine Clair - Nocturn
Shop at:
 TP
Spectrum Noir - Colorista Watercolour Markers - Vibrant
Shop at:
TP


01 09 10