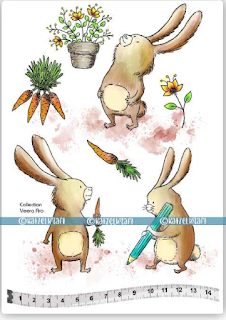
Greetings! It's Tuesday so you've got Kathi here to share a project with you. This week the team is focusing on Katzelkraft's wonderful stamps. I've made a holiday card with the one of the bunnies from the Rabbits Unmounted Red Rubber Stamp Set. He's wearing a Santa Hat from the Funny Accessories Unmounted Red Rubber Stamp Set.
Here's the card.
Tuxedo Black Memento Ink by Imagine Crafts/Tsukineko was used to stamp the Santa Hat from the Funny Accessories Unmounted Red Rubber Stamp Set by Katzelkraft twice –– once onto the image panel and once onto repositionable sticker paper. The sticker paper version was fussy-cut and placed over its counterpart on the image panel as a mask.
The looking up bunny from the Rabbits Unmounted Red Rubber Stamp Set by Katzelkraft was positioned so that the Santa Hat would be sitting on his head with his ears sticking out. Tuxedo Black Memento Ink was used to stamp him twice –– once onto the image panel and once onto repositionable sticker paper. The sticker paper version was fussy-cut and placed over its counterpart on the image panel as a mask.
The smaller die from the Frayed Frames Die Set 26 by AALL and Create was used to cut the image panel. Place low-tack tape along both edges of the image panel die-cut with the sticky side facing up.
The rolling hills mask from the Acetate Hills Masks-Stencils by Lavinia Stamps was placed over the masked bunny on the image panel die-cut. The low-tack tape will hold it in place.
Dark Denim Elements Ink by Lavinia Stamps was brushed over the top of the hills mask and the masked rabbit around the top and sides of the image panel. Blue Lagoon Elements Ink was brushed over the masks and blended with the darker blue to create a night sky.
While everything was still masked, a white paint pen was used to add spatter to create a starry sky.
When the paint spatter was dry, the rolling hills mask from the Acetate Hills Masks was moved downward and shifted to the side. Light grey ink was sponged over the top of the mask to create snowy hills. This process was repeated to add some more hills, then the flattish mask from the Acetate Hills Masks was placed under the rabbit's feet and more light grey ink was brushed over the top of the mask.
The masks were removed and the rabbit was colored with Copic markers. A white chalk ink re-inker was used to paint the hat's brim and pom-pom.
The North Star from the Christmas Charms Clear Polymer Stamp Set by Lavinia Stamps was positioned to be in the rabbit's sight line. The thread was covered with repositionable tape, the stamp was inked with embossing ink, the tape was removed, and the North Star was stamped. White detail embossing powder was added, the excess was removed, and the image was heat set.
The Christmas Greetings Clear Polymer Stamp Set by Lavinia Stamps was positioned on the upper right, inked with embossing ink, stamped, and embossed with white detail embossing powder.
Black cardstock was cut with the larger die from the Frayed Frames Die Set 26, used to mat the image panel, then adhered to a red card.
Please pop over to my blog, Kat's Tales of Stamping, for step-by-step instructions and complete supply lists.
Topflight Stamps Products Used:
Thanks for visiting today!


No comments:
Post a Comment