Showing posts with label hunkydory crafts. Show all posts

Tuesday, November 12, 2024

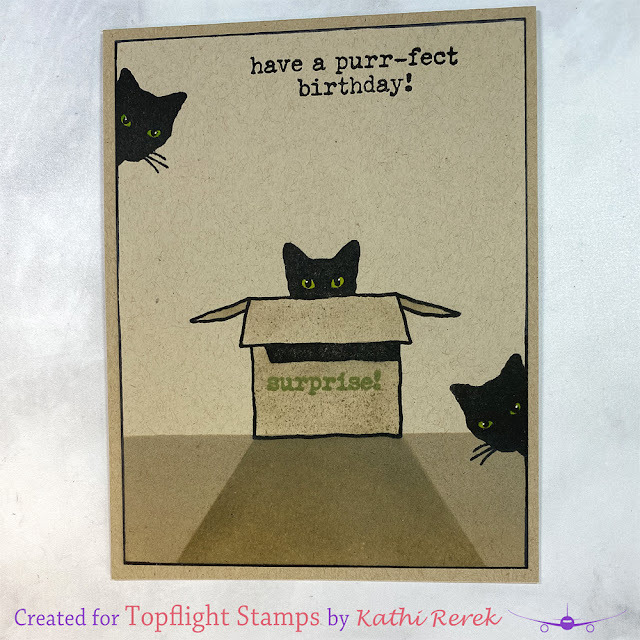
Have a Purr-fect Birthday!

  It's Tuesday so you've got Kathi here to share a project with you. This week is an "Anything Goes" theme, so I decided to make a CAS birthday card with the super-cute, super-versatile Purr-fect Birthday Clear Polymer Stamp Set by Visible Image.

Here it is!


Place a piece of 4" x 5.25" light Kraft cardstock onto a stamping platform. Place a piece of low-tack tape horizontally across the cardstock panel about 1.5" from the bottom. 

Position the right-facing cat stamp from the Purr-fect Birthday Clear Polymer Stamp Set by Visible Image on the top left border and the cat-in-the-box stamp from the stamp set on the tape in the center of the image panel. Ink both stamps with Nocturne VersaFine Clair Ink by Imagine Crafts/Tsukineko. Stamp the images. Re-ink and stamp again if necessary to attain a good impression.

Remove the panel from the stamping platform. Move the low-tack tape so that it covers the stamped box. Use Premier Blending Tool by Hunkydory Crafts to sponge Sand Dune VersaFine Clair Ink by Imagine Crafts/Tsukineko over the tape onto the bottom of the image panel. 

Place Post-It Notes on a diagonal from the bottom edges of the box. Use a second Premier Blending Tool by Hunkydory Crafts to sponge Portabello VersaFine Clair Ink by Imagine Crafts/Tsukineko over the tape and Post-It Notes to create a shadow. Remove the tape and Post-It Notes and heat set. 

Place the image panel back onto the stamping platform. Position the left-facing cat stamp from the  Purr-fect Birthday  set towards the bottom on the right border of the image panel, ink the stamp with Nocturne VersaFine Clair Ink by Imagine Crafts/Tsukineko and stamp.

Position the "Surprise!" stamp on the box on the image panel. Ink the stamp with Avocado VersaFine Clair Ink by Imagine Crafts/Tsukineko and stamp. Lightly ink the stamp with Grass Green VersaFine Clair Ink by Imagine Crafts/Tsukineko and stamp to deepen the color.

Position the "purr-fect birthday" stamp as shown and stamp with Nocturne VersaFine Clair Ink by Imagine Crafts/Tsukineko.

Remove the panel from the stamping platform and thoroughtly heat set it. Use watercolor markers to color the cat's eyes, then add highlights using a white gel pen. 

Edge the image panel with a black marker, then adhere it onto a darker Kraft A2 card.

Please pop over to my blog, Kat's Tales of Stamping, for instructions and complete supply lists.

Thanks for visiting today!


Thursday, June 20, 2024

Butterfly Card with PaperArtsy and Darkroom Door

 Greetings!  You've got Kathi here again today. I was really inspired by Tuesday's card so here's another butterfly themed card created for Topflight Stamps. This time I used Tracy Scott 39 Rubber Cling Mounted Stamp Set by PaperArtsy and the Butterflies Background Red Rubber Cling Mounted Stamp by Darkroom Door.

Here it is!


Use Tuxedo Black Memento Ink by Imagine Crafts/Tsukineko to stamp the butterfly/flower from the Tracy Scott 39 Rubber Cling Mounted Stamp Set by PaperArtsy onto a small panel of white Copic-friendly cardstock. Fussy-cut the image then use Copic markers to color the butterfly. When done, use a dark marker to edge the image. Set the image aside.

Smoosh Della Blue Elements Ink by Lavinia Stamps  onto a piece of acetate packaging, mist with water using using the Fine Spray Mister by Spectrum Noir, then smoosh the inked acetate randomly onto a piece of mixed media paper. Mist the panel with water and heat set.

Clean the piece of acetate, smoosh Dark Denim Elements Inks onto it, mist with water, and smoosh the inked acetate onto the mixed media paper Continue this process with Blue LagoonViolet ChalkConfetti, and Sundance Elements Inks by Lavinia Stamps until you're happy with the coverage. Heat set the panel thoroughly.

Use a stamping platform and Nocturne VersaFine Clair Inks by Imagine Crafts/Tsukineko to stamp the Butterflies Background Red Rubber Cling Mounted Stamp by Darkroom Door onto the inked mixed media panel. Re-ink and stamp again if needed to get a good impression.

I decided that the background was a bit boring and needed more blue, so I smooshed Della BlueDark DenimBlue Lagoon Elements Inks one at a time onto my craft mat, misted the ink with water to dilute it, and used a paintbrush to splatter the diluted ink onto the background panel. When I was happy with the splatter and splotches, the panel was heat set.

The background panel was trimmed and edged with Nocturne VersaFine Clair Inks by Imagine Crafts/Tsukineko, then matted with silver metallic cardstock and adhered to a black A6 card.

The butterfly was retrieved, flipped onto its back, and the body was shaped using the Premier Embossing and Shaping Tools by Hunkydory Crafts. I used a stabby tool to poke a hole in the butterfly's head,  put a silver jewelry pin through the hole to become the antenna, and secured the pin on the back of the butterfly. A second silver jewelry pin was a adhered to the back of the butterfly to become the second antenna.

The buttefly's body and the floral/leaf part of the butterfly image was adhered to the card front. The butterfly's wing was raised using dimensional foam adhesive to finish the card.

Please pop over to my blog, Kat's Tales of Stamping, for the step by step instructions and complete supply lists. 


Thanks for visiting today!

Tuesday, November 28, 2023

Merry Christmas

It's Tuesday so you've got Kathi here to share a project with you. 

However, before I get to that, I wanted to remind you that Topflight's Cyber Monday Sale ends tonight, November 28th, at 11:59 P.M.


This week our team's theme is "Anything Goes". I'm still in holiday card making mode, so here's another Christmas card, this time created with the Cold Hands Clear Stamp Set 941 by Janet Klein for AALL and Create


The penguins, from the Cold Hands Clear Stamp Set 941 by Janet Klein for AALL and Create, were stamped with Copic-friendly ink onto white cardstock, fussy-cut, colored with Copic markers, and edged with a black pen. When that was done, they were set aside while I created a background for them.
Low-tack tape, cut in a curve was placed over the bottom of the image panel. Premier Blending Tool by Hunkydory Crafts were used to sponge first Della Blue then Violet Chalk Elements Inks by Lavinia Stamps over the tape onto a white cardstock panel.

Shimmery white pigment inks were sponged over the The Christmas Snowflakes Mixed Media Stencil by Stamperia. The low-tack tape was removed from the base of the background panel and the same white inks were sponged across the base of the image panel. The panel was heat set, cut with the largest scalloped cutting die from the Rectangle Card Passe Partout Essentials Die Set by Studio Light, then detailed with chalk pencils. 

White cardstock was cut with the largest plain rectangle die from the  Rectangle Card Passe Partout Essentials Die Set. The outside .5" of this panel was sponged with Della Blue then Violet Chalk Elements Inks, then used to mat the background panel.

The sentiment, from the Holiday Fox Clear Stamp Set 607 by Janet Klein for AALL and Create, was stamped onto black cardstock, heat embossed, then die-cut. 

The penguins were adhered to the background panel as shown. The sentiment flag was adhered, then the matted image panel was adhered to a white card. A snowflake sequin was added to the sentiment flag to finish the card.

Please pop over to my blog, Kat's Tales of Stamping, for more detailed instructions and complete supply lists.


Thanks for visiting today!

Tuesday, November 21, 2023

Merry Christmas Gift Tag

It's Tuesday, so you've got Kathi here to share a project with you. This week my Topflight Stamps teammates and I are sharing gift tags, gift containers, or gift cards. I decided to combine two and created a large tag that holds cash! 

Speaking of cash, Topflight Stamps has its Black Friday Sale all week long! 


~~~


As usual for me, a lot of stamping, masking, inking, and suchlike went into the creation of this card. 

Please pop over to my blog, Kat's Tales of Stamping, for step-by-step instructions, notes, and complete supply lists. 

Tuesday, November 14, 2023

Cheers & Merry Christmas

It's Tuesday which means you've got Kathi here  to share a project with you. This week is an "Anything Goes" week for the TFS team. Since it's getting towards the winter holidays, I've made another Christmas card, this time featuring the fabulous Miss Dee, who is decorating her tree with style!

Here's my card!


My first step was to do a whole lotta stamping using Copic-friendly black ink onto white cardstock. I stamped Miss Dee, her Santa Hat, and the bottle from the HoliDEE Clear Stamp Set #947, two gift wagons from the Holiday Fox Clear Stamp Set #607, the couch from the Have A Seat Clear Stamp Set #461, and the cat from the Caturday Clear Stamp Set #477. I also stamped the throw pillows from the Have A Seat Clear Stamp Set #461 onto patterned paper by Craft Consortium

When all the images were stamped, it was time to fussy-cut them, color them, and edge them with a black pen. BTW, I trimmed the presents from the gift wagons from the Holiday Fox Clear Stamp Set #607, White gel pen was used to add highlights to the reflective elements such as Miss Dee's festive bauble earrings, her boots, the Christmas lights, the bottles, and the drinks glasses. All the colored, fussy-cut elements were set aside while I created a background for them. The cat napped and Miss Dee nipped at the martini. All were happy.

I cut a piece of white 8.5" x 11" cardstock to 6.625"  by 5.625", then trimmed 1" off the bottom. That piece was inked with brown ink, then lines were added to make that strip look like a wood floor. However, I messed up and it's now a brown tile floor. Oh well.

Premier Blending Tool and Premier Blending Sponges by Hunkydory Craft were used to apply light blue ink to the remaining 6.625" x 4.625" piece of white cardstock to create a background panel. This was sprayed with isopropyl alcohol to blend and lighten the color. When dry, the same blue ink was sponged over the Dynamic Stencil by Lavinia Stamps onto the panel to create a tone on tone pattern. The 1" strip of wood/tile was adhered to the base of the background panel.

Vellum was adhered to a piece of the same patterned paper I used to stamp the pillows. Black solvent ink was used to stamp "Cheers" from the HoliDEE Clear Stamp Set #947 and "Merry Christmas" from the Miss Merry Clear Stamp Set #608 onto the vellum covered patterned paper. A black ampersand (&) rub on was added between the two sentiments. The sentiment was die-cut with a sentiment frame die set which was also used to cut red cardstock. 

Miss Dee, her Santa Hat, the couch, the throw pillows, the cat, both sets of gifts, and the very CHEERful Christmas Tree were adhered to the background panel, which was matted with white cardstock (unevenly, which is my special gift), and adhered to a red 7" x 5" card. Framed sentiment die-cut was adhered to finish the card.

Please pop over to my blog, Kat's Tales of Stamping, for more detailed instructions and complete supply lists.  

Topflight Stamps Products Used:


01 09 10