Thursday, May 31, 2018

Oceanic Fun!


Summertime means oceans and animals to this SoCal-at-heart girl (I no longer live there but I'll always be a beach girl). So when I got the Creative Expressions Whale of A Time Stamp Set, I knew I wanted to make fun summer CAS cards.


For all three cards, I used Tim Holtz Distress Oxide Inks in Broken China, Salty Ocean and Blueprint Sketch to create deep ocean ombre backgrounds. I varied the amount of the card front that was inked up but because the colors used were the same, there is a consistency to the card set. I also splattered water on them to create a splotchy, more watery effect.


Then for the first card, I used a scrap of Bristol Paper that I had inked up and sprayed with Ken Oliver Color Bursts to stamp out and fussy cut five jellyfish from the stamp set. The fussy cutting was a bit intricate, but it was well worth the dimension and detail. I doodled some black and white squiggles and swirls to give each jellyfish a slightly different look and to add some extra interest. I hand wrote the sentiment to simply say, "FLOAT ON" with a white gel pen and black ink pen for the shadow.


I only blended ink on about 1/3 of the second card front. I wanted it to look like this was a peek into a much larger ocean scene. I also used the Lawn Fawn Waves Die Set to die cut in some wave details into this inked area. This also gave me a place to tuck in the adorable whale from the stamp set, which I Copic colored and fussy cut (including around the fin so it could be tucked over the wave). For a little added interest I also added some water drops spurting out from the whale's blow hole and coated those drops with Glossy Accents. The sentiment, "Have a WHALE of a time" is also from the stamp set.


For the last card, I wanted to give the sense of an ocean teeming with animal life. I had blended ink on 3/4ths of the card front and stamped in the octopus and the schools of fish directly onto the ink blended area so that I could avoid fussy cutting all those thin arms and tiny fish. To color up those images, I used Sharpie Markers, which provided great opaque coverage over the Distress Oxide Inks.  I stamped the dolphin, some splash droplets, and the turtle on separate pieces of paper, colored them up with Sharpie and Copic Markers, and fussy cut them out. I popped both up on double sided foam adhesive to add a little dimension. The "Oceans of Love" sentiment is from the stamp set, and to add a bit of shine, I traced the stamped sentiment with a Black Sakura Glaze Marker.


These ocean critters were so fun to play with to create these cards. If you'd like more details about the products or would like to watch a process video, please check out my blog post HERE.

Wednesday, May 30, 2018

Topflight and "Summer Breeze" from Penelope Dee


Today for Topflight Stamps a Sunny Stamp from Penelope Dee


I used Dylusions inks
Lemon Zest
Tangerine Dream
Funky Fuchsia
Cherry Pie
Chopped Pesto
Cut Grass
Dirty Martini

The stencil TCW Mini Confetti, the painting Dylusions "White Linen"

and the Archival ink "Cactus Flower "

Nathalie Fournier/Topflight Stamps


Tuesday, May 29, 2018

Topflight Stamps / Crafty Individuals - By The Sea

Hi everyone and welcome to the Topflight Stamps blog!  It's Jenny here, joining you with a simple card to usher in the summer!


The stamp set I'm using today comes from Crafty Individuals - it's called By The Sea and is filled with fun seaside images.  
To create my card, I die cut a panel of Bristol Smooth cardstock - this cardstock is great for blending watercolor ink / paint - today I'm using Zig Clean Color Real Brush Markers.   I then stamped one of the deckchairs from the stamp set in black waterproof ink and heat set it.  


I then masked off a square panel with masking tape and used my brush markers to create a sunset over a sea, very simply, overlapping and blending each color into the next.  I didn't mask off the deck chair, I just colored round the edges. I held my hand over the deckchair and spritzed the background with shimmery spray lightly.  I then removed the masking tape and used some simple coloring to the chair, and some shadows underneath.   I stamped the sentiment in grey ink underneath and added a glitter heart so it says 'love' By the Sea.

I popped the entire panel up on foam tape onto a woodgrain panel card base.   Super simple but really fun to create!  I hope you like it! You can find more details on the supplies I used over on my blog.

Have a wonderful day.

Jenny 

Monday, May 28, 2018

PaperArtsy JOFY Summer Card

Welcome to the Topflight Stamps Blog!

Today I'm sharing a quick and easy watercolor card I made using the PaperArtsy Jofy 16 Stamp Set and Studio Light Papers.

I just quickly stamped the row of beach huts in Ranger Archival ink, then I colored in the card with a water brush and using my Koi Water Color Pocket Field Sketch Box. To finish the card I stamped the sentiment and matted it with some Studio Light Papers from the #44 Paper Pad.

Not every card has to be complicated and use tons of supplies. Sometimes you just need to get something made quickly that looks nice. That's when I like to use Water colors, because you can't really go wrong with them.


JOFY 16

Paper Pad 44

Friday, May 25, 2018

2018 Spring/Summer Coffee Lovers Blog Hop - Super Sponsor!

Welcome to the Topflight Stamps Blog!

It's time for the 2018 Spring/Summer Coffee Lovers Blog Hop!

Here is the link to the main Blog Hop Page http://coffeelovingcardmakers.com/6523


Now for my card. 


 I used the new Katzelkraft Coffee & Tea To Go Stamp set 
for this card. I also used the Studio Light Paper Pad #44 for all the patterned papers. 
Paper Pad 44


We're also having a sale!! 
Check it out and get your Coffee stamps on sale!


Thanks for stopping by!
~Donna~

Carabelle Studio @ Topflight Stamps

Hi TOPFLIGHT STAMPS fans, Barbara back today with a bright card which I'm intending to frame......
I've had my CARABELLE STUDIO stamps out this week, they are superb quality, white rubber, and very detailed. (it's almost a shame to ink them up 😉)
Checkout the massive selection on Topflight Stamps website....
Anyway, I started my card by inking a piece of white textured card with Izinks ink pads, then made a few layers of colour using various stencils.
Once the background was finished, I over-stamped, using a couple of different sets of Carabelle Studio Art Stamps.
 I'll list at the end,  sets of stamps I used.....
Once the stamping was finished on the card, I stamped some of the images onto a printed book page, cut them out and adhered to the main topper.
A bit of doodling, some Ranger Enamel Accents, and I was almost done.
I darkened the corners with a charcoal pencil and smudged it a bit.
All I had to do was mount onto black, white, then black again to make an eye-catching frame.
Hope you like it. 
Have a great weekend and I'll catch you all next week
Barbara xx
Stamp sets used :-
 Leaves, by Birgit Koopsen - HERE
Circles & Stitches by Ana Bondu - HERE 
Heart & Bird by Zorrotte - HERE  


Thursday, May 24, 2018

I'm Late! I'm Late! Belated Birthday Card

Hello Topflight fans! Today I'm sharing a belated birthday card that I've made using the adorable white rabbit from the Carabelle Studio "Alice's Adventures in Wonderland" and the Katzelkraft Torn Paper stamp sets.


I thought that perpetually late white rabbit from Alice in Wonderland was the perfect character for a belated birthday card. And since the stamp depicts only half of the rabbit, having him pop out of the magical Alice in Wonderland world through the torn paper stamp hole would be a fun way of adding a colorful scene.


I Copic colored the hole using colors reminiscent of the Cheshire Cat and Alice's blue dress. I also colored up the white rabbit and fussy cut him out so that he could be inserted into the lower part of the hole where I used an X-Acto blade to cut along one of the torn paper curls. Popping up the rabbit and that base torn paper curl with foam dots added interest and a bit of dimension.


I hand wrote the sentiment, "I'm late! I'm late! For a very important date!" with an ultrafine sharpie marker in teal and added a super fine shadow to the letters with a Copic multiliner pen in 0.05 pt.


Thanks so much for joining me to today! If you're interested in more details about the products I used or a video of the whole process, please check out my blog post HERE.

Wednesday, May 23, 2018

Topflight, Visible Image for a masculine card!


Today for Topflight, Visible Image stamps for a masculine card!

Here are my stamps


My Oxide inks for my background
Faded Jeans
Bundled Sage
Frayed Burlap
Walnut Stain

My stencil
TCW Mini Sheet Music

Nathalie Fournier/Topflight Stamps


Tuesday, May 22, 2018

Floral Background - IndigoBlu

Hi Everyone and welcome to the Topflight Stamps blog - it's Jenny here, and I'm joining you today to show you a really simple but versatile way to use one stamp to create a patterned background.


The stamp I'm using today is the IndigoBlu Collector's Edition No.8 Floral Bouquet.  It's a small stamp with lots of great detail, perfect for heat embossing or repeat stamping to create a pattern. 


To create the card, I used a 5 x 6" panel of coldpress watercolor paper.  I mounted the stamp onto an acrylic block and stamped it multiple times in embossing ink, turning the stamp each time to get a random pattern.  I heat embossed after each stamping using WOW! White Pearl embossing powder.   


Once I was happy with the pattern, I adhered the panel down to a board with masking tape and spritzed liberally with water.  I then added dark blue, light blue, and deep pink/purple paint (I used Peerless Watercolors) randomly over the panel, letting it blend together.  I let it dry naturally.  When dry I spritzed with shimmer spray and then die cut the panel with a stitched rectangle die.  


I adhered it to a white card base with foam tape and added my sentiment.  The hugs is die cut several times and stacked together.  The & Kisses is taken from this set (Lovely Lilies) by Hunkydory Crafts/For the Love of Stamps which was selectively stamped in embossing ink on black cardstock and heat embossed in white, then popped up on foam tape.   I added a few Nuvo Jewel Drops as a finishing touch. 

That's it!  I hope you enjoyed - you can find a full list of supplies over on my blog

Jenny 


Monday, May 21, 2018

Topflight and a Carabelle Studio Mini Journal

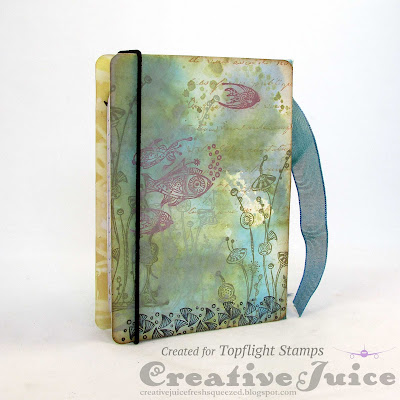
Hello, Lisa Hoel here with a Mini Journal featuring the Carabelle Studio stamp set, Zinouk of the Ocean! I love all things mermaid so this set was a must have when I spied it.


I have an extended tutorial over on my blog if you'd like to check out how I made this journal.

Topflight Stamp Products used are:

Carabelle Studio - Rubber Cling Stamp Set A6 - Zinouk of the Ocean - Mermaid - by Azoline
Zinouk of the Ocean Stamp Set

Baked Texture embossing powder - Deep Sea
Visible Image Stencil - Fibres
PaperArtsy Infusions Dye - A Bit JadedTerracotta

Thanks for stopping by! I hope you have a great week.

Friday, May 18, 2018

IndigoBlu @ Topflight Stamps

Hi everyone, and welcome back to the TOPFLIGHT STAMPS blog......Barbara here today with a masculine card to show.
I've used a stamp from IndigoBlu called 'Fairway to Heaven', a golfing image, for all the men in your lives who love a round of golf!
IndigoBlu are an English company who make mounted, red rubber stamps.....they are very detailed and high quality. Checkout the IndigoBlu section on the Topflight Stamps website for a great selection.
To start, I laid a stencil over a piece of watercolour card, spritzed some water on the stencil then sprinkled on powdered paint. Once the stencil was removed, it left the coloured background.
I stamped the image using Versafine Clair ink, in Twilight, then coloured the golfer with watercolours.
A little bit of inking around the edges, and a couple of layers of green & yellow card, and I was done. 
Let me know what you think, by leaving a comment......
Catch you next week, 
Barbara x


Thursday, May 17, 2018

Cat in a Box Surprise Slider Card

What it is about boxes that cats love so much? As a dog person, I don't get it, but I have a friend, whose cat spends hours exploring, sitting in, and sleeping in boxes. So I thought I would create this surprise slider card for him, because what guy doesn't like an interactive card honoring his cat?


The adorable kitty looking innocently up with wide eyes comes from the Katzelkraft Cats Stamp Set. I Copic colored him like my friend's cat and fussy cut him out. Then for the box I used a Neat & Tangled Box Die and folded it up to form the open topped box that the kitty could sit in.


To create the slider mechanism, I used an X-Acto blade and just cut a slit in the back side of the box as well as on the card front that was about 1.25" long and .25" wide (wide enough to fit a foam dot). I wasn't too worried about the cleanness of the slit because the cat covers the whole area. Then in order from front to back here are the pieces: (a) box front; (b) kitty; (c) foam dot connecting kitty through the slit to the slider pull; (d) box back (with slit); (e) card front (with slit); slider pull with fun foam sheets on either side to support the card front with space for the slider pull to easily slide up and down; and card base.


For the sentiment, I used the Neat & Tangled Out of the Box Stamp Set to heat emboss "Just popping up to say..." and I used an old Whimsy Speech Bubble Border Die to make it appear as though the cat was saying that phrase. Then on the inside of the card I simply stamped "Hello!" So this card can be sent any time for any occasion.


Thanks for joining me today on the Topflight Blog. If you'd like to know more about the products I used or watch a tutorial video for creating this card, please check out my blog post HERE.

Wednesday, May 16, 2018

Topflight, For the love of stamps and Climb Aboard


 Today for Topflight Stamps, an Art Journal page made with stamps

For the love of Stamps


I used to create the background  PaperArtsy Infusions
and the new Spray Resist by Tim Holtz


 Infusions
In The Navy
Olive Tree
Frankly Scarlet
Magenta

My stencils:
TCW "Mini Art Is"
Tim Holtz "Ringer THS056"


Nathalie Fournier/Topflightstamps


Tuesday, May 15, 2018

You're a Classic - With Darkroom Door

Hi everyone and welcome to the Topflight Stamps blog.  It's Jenny here, and today I have a fun card for you  showcasing an image from the Darkroom Door Classic Cars set.  It makes a great birthday card or Father's Day card which is coming up soon. 


The stamp set is super high quality red rubber, with three large, detailed images, and lots of co-ordinating sentiments.  A great one to up your stash for masculine projects!


To create my card, I first created the wall of the road 'tunnel'.  I trimmed a watercolor cardstock panel to A2 (4.25" x 5.5") and ink blended Distress Ink in Fired Brick all over it.  I then ran it through my die-cutting machine with a brick embossing folder from my stash. To create some more dimension between the bricks, I also used Walnut Stain and Vintage Photo which I gently blended over the top so that it only adhered to the raised areas.  To create the tunnel, I used a circle die and die cut it from the brick wall, and trimmed off the bottom 1.5". I then re-inked round all of the edges. 


On a card base, I adhered a panel of black cardstock, and a strip of dark grey cardstock along the bottom.  I then popped the brick tunnel up on the front with foam tape.  I added some hand trimmed gold glitter cardstock to look like the central road markings.

For the car, I stamped it in copic friendly ink, coloured it with a variety of grey and blue copics. I added clear Wink of Stella to the metal trim and headlights, and white gel pen for highlights, then trimmed it out and popped it up on foam tape in the centre.  I added Limoncello Nuvo Drops to the headlights to make them pop.   


The sentiment was stamped in embossing ink and embossed with white embossing powder, trimmed out and popped up on foam tape.  

I hope you like it! Any questions, please let me know, and you can find a full list of supplies over on my blog

Jenny 
01 09 10