Thursday, February 28, 2019

Texture Plate Tags

Hello Topflight fans! Ericka here today with two tags I made using the gel press and a texture plate from Carabelle Studio.

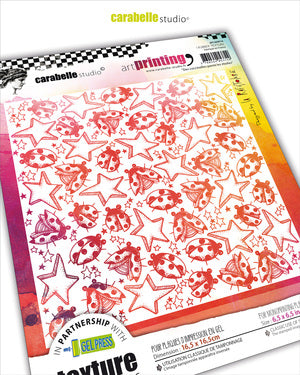
I'm still relatively new at using the gel plate and this was my first time using a texture plate but it was so fun to play with the designs. I used the Carabelle Studio Texture Plate with the gel press.


The texture these plates leave behind are so detailed and I love the look. For this tag I pressed the tag into the gel plate after I used the texture plate so the paint was darker.


For this tag I pressed the tag onto the plate after I had used it to pick on the ink.

I love the look and textures these plates give to a tag or card. I'll definitely be playing with them some more.

For more information on how I created these tags, feel free to stop by my blog Strangely Creative.
Thanks for stopping by and I hope you have a wonderful rest of the week!


Wednesday, February 27, 2019

Happy Dancing


Hi, Topflighters!  Toni with you today!  I want to talk about crafter's block. We all have had it and, if not, please tell me your secret.  I had to admit I had a tough time deciding what I wanted to do with the Carabelle Studio Ladybugs Among the Stars


Cool, huh?  Didn't matter to my brain tho. I hemmed and hawed and experimented and finally decided to use it with red as a background. Once I determined that, the rest of the card came together in a snap.  Whew!


Ladybugs make me think of summer and stars make me think of the 4th of July, so I went with a red, white and blue palette. I used the Visible Image Meshing Around stencil to add some blue and a Tim Holtz stencil to add more red. 


I'm quite smitten with the results. Now the background as you can see is quite busy so I used the rather bold Visible Image Choose Happiness stamped in Versafine Onyx Black.  Notice I used a white pigment to add stars and ladybug details to it?


I added one of the whimsical  Katzelkraft Aviator images as though he were dancing on the sentiment. I left him uncolored to draw more attention to him. He's so fun!

Katzelkraft Aviator


If you'd like to take a look at some of my other creations, you can visit my blog, Frankie Helps Craft, or check me out on Instagram.  Have a great rest of your week!

Tuesday, February 26, 2019

Gel Press Texture Plates!

Good morning, Lisa Hoel here with a card to share with you today. I've been having more fun with my Gel Press and the Texture Plates! ;-)


I used a Gel Press Plate and Texture Plate to print the card base.You can see more info and photos on my blog post but here's a peek:


I inked the plate with Distress Oxide Inks and gently pressed the Texture Plate into the ink to remove some of it. Then I pulled a print and got a cool background! You can also use the inked Texture Plate to make a print. It's a 2 for 1 deal!

Topflight Stamps products used are:
Thanks for stopping by and have a great rest of the week! 

Monday, February 25, 2019

Carabelle Studio Texture Plates with No-Line Watercolor


Hi everyone and welcome to the Topflight Stamps blog!  It's Jenny here, and today I am doing something a little different - I'm using a texture plate from Carabelle Studio with my Gel Press to create a lacy mixed media style background.  I paired it with IndigoBlu florals for a little bit of no line watercoloring.  I'm using the Lovely Lace Texture Plate today. 


To create my card, I first coated my Gel Press with Paperartsy acrylic paint in Wisteria and Amethyst (keeping one on the top and one on the bottom and blending them together) using a brayer.  I then inked up the texture plate with dark purple dye ink (I used Grape Crush by Catherine Pooler Designs) and pushed the texture plate into the gel press.  I then laid over some copy paper and lifted the print.


I trimmed down the print and backed it onto white cardstock and added it to a white note card with a thin strip of gold mirror cardstock. I also flicked some gold shimmer spray onto the background.

I stamped the three florals from the gorgeous IndioBlu Nature III set in Seedless Preserves Distress Ink onto hot press watercolor cardstock and then coloured them with my Umiko watercolors


I trimmed them out and went back round the edges with Seedless Preserves with an ink blending tool. I popped them up on foam tape onto my card.


The sentiment is also from same Nature III set which I stamped on vellum and heat embossed in white and then adhered it to the card.  To finish I added some Fairy Wings Dream Drops and purple sequins.

You can see more detail on the supplies I used over on my blog.  Have a wonderful week everyone!


Saturday, February 23, 2019

PaperArtsy Tag with Lisa Hoel

Good morning, Lisa Hoel here with a tag to share with you today. I love the Lynne Perrella stamps from PaperArtsy and always welcome a chance to get them inky. ;-)


The stamped image is embossed with Vintage Beeswax Baked Texture Embossing Powder and I used a Gel Press Plate and Texture Plate to print on the tag base.You can see more info and photos of this tag on my blog post

Topflight Stamps products used are:
Thanks for stopping by and have a great rest of weekend! 

Friday, February 22, 2019

Best Wishes...


YAY it is Friday... Annette Allen here with you today to share a card I created using IndigoBlu: Mindfulness stamp set. I love this stamp set it has some great sayings and the butterfly and wings in this set is just gorgeous. Totally fun to create with.

I did a simple background on today's card. I used Ranger Alcohol inks. I kind of just pick some colors and went wild with it. I also used a straw to blow the color around. That is the good thing about alcohol inks you can really just keep layering color.  


I colored these pretty butterflies with Copic sketch markers and then I hand cut them leaving a hint of white. Adhere the butteries using foam adhesives. Finish up with stamping a simple sentiment on the card. 

Totally simple card to create.


Thanks for stopping by!

Thursday, February 21, 2019

Colorful Stenciling

Hello Topflight fans! Ericka here with a colorful stenciled card using Distress Oxides and photo-paper.
The stencil is from That's Crafty and can be found here. It is perfect for ATCoins but I used mine a little differently this time.

https://topflightstamps.com/products/thats-crafty-stencil-funky-flower-tc121

I love the bright colors the oxides leave on the photo-paper.


The sentiment if from Visible Image and is perfect for a busy background.

https://topflightstamps.com/products/visible-image-no-regrets-clear-polymer-stamp-set

For more information on how I created my card feel free to stop over at my blog Strangely Creative. Have a wonderful day and thanks for stopping by!


Wednesday, February 20, 2019

There's No Place Like Home


Hi, everyone!  Toni here with you today. I was so excited when these Visible Image Wizard of Oz stamps arrived in the shop. I am a huge WOZ fan--read all of the books, seen all of the movies, have the soundtracks even. Yeah. Total fan-girl. So, you will be seeing more WOZ projects from me in the future.  But, let's talk about this one where I'm using the Dorothy and Toto set.

https://cdn.shopify.com/s/files/1/1968/0877/products/VIS-OZD-01-OZ-Dorothy-And-Toto-stamp-set-Visible-Image_2400x.jpg?v=1548716006

I was struck by the Visible Image Time Tunnel stencil used for the background of the product photo. Total tornado, right?


But rather than sponging the Visible Image Time Tunnel stencil, I used it to trace the lines lightly in pencil so I could follow the spiral pattern for the sentiment. I first stamped the ruby slippers since you can't make it home without those, of course. I stamped the house a few times in Versafine Onyx Black so it would really pop.


I  colored up the Dorothy and Toto image using Copics. Note she is popped up on foam tape and an outline done in black beneath.


Finally, I added Clear Wink of Stella to her slippers and gold glitter washi as the yellow brick road.


Feel free to stop by my blog, Frankie Helps Craft, to see my other creations including some upcoming WOZ projects.  Have a great day!

Monday, February 18, 2019

Paper Rose | Heat Embossing Three Ways

Hi Everyone!

Welcome to the Topflight Stamps blog ! 


It's Jenny here, and today I'm playing with the gorgeous Paper Rose Bouquet of Flowers stamp with heat embossing.  I've created three cards with similar color schemes to show case the versatility of the technique and the stamp!


In my first card, I stamped the image multiple times with embossing ink,  and then heat embossed in pink embossing powder on cream cardstock.


I then blended co-ordinating ink (I used Distress Ink in Picked Raspberry) around the edges, mixed it with water and added a few spatters with a paintbrush, and also a few spatters of clean water to distress the ink a little.   The sentiment is from AALL & Create's Birthday Animals, stamped in black ink.  As a finishing touch I added some clear and pink sequins.


For my next card I use die cutting to spot light the heat embossed image.  I heat embossed the Paper Rose stamp on grey cardstock in metallic silver embossing powder. I then die cut the image using an heart die and edged the die cut in Black Soot Distress Ink.


I die cut some sticky back pink fun foam with the same heart die and adhered it to the heat embossed heart, slightly shifted so it peeped out and then adhered the entire piece to a white card base.  I added a sentiment from the Penelope Dee You Are Amazing stamp set in black ink and some pink sequins to finish.


My final card uses watercolor resist.  I stamped the image all over a panel of hot press watercolor cardstock (which is smoother, and better for heat embossing) and heat embossed in white embossing powder.


I taped the panel down to a board and spritzed liberally with water. I then used PaperArtsy Infusions in Raspberry and taped the powder over the panel in four or five places.  I tipped the board and let the color bleed out and added a little more water to blend. I then let it dry naturally.  When dry, I die cut it with a stitched rectangle die and adhered to a white card base.


The sentiment (from the Penelope Dee set) was heat embossed on grey cardstock in white and die cut with a stitched rectangle die. I then backed it with the pink fun foam and adhered to the centre of the card.  I added pink sequins again as a finishing touch!

Hope this gave you some inspiration for different ways to use heat embossing and your stamps!  You can head on over to my blog to see the additional supplies I used.   Have a great day!

01 09 10