Sunday, September 30, 2018

Here Comes Santi-Paws!

Today's card design came to me when I realized that the spotted Dachshund from the Katzelkraft Dogs Stamp Set looked like the sweet pup, Max, from "The Grinch Who Stole Christmas." I thought that with the sleigh from the Katzelkraft Sleigh Stamp Set and a pile of presents that I could make from the presents under the tree from the Katzelkraft Sleigh Stamp Set and the presents from the Katzelkraft Funny Accessories Stamp Set, I could create a fun slider assembly. 


I first Copic colored all the images and fussy cut out all the pieces I wanted to include. Then with a bit of doodling for the faux reindeer antler and a little craft surgery to foreshorten Max's body and keep his ears flapping free, I put together Max riding in a sleigh filled with Christmas presents. 


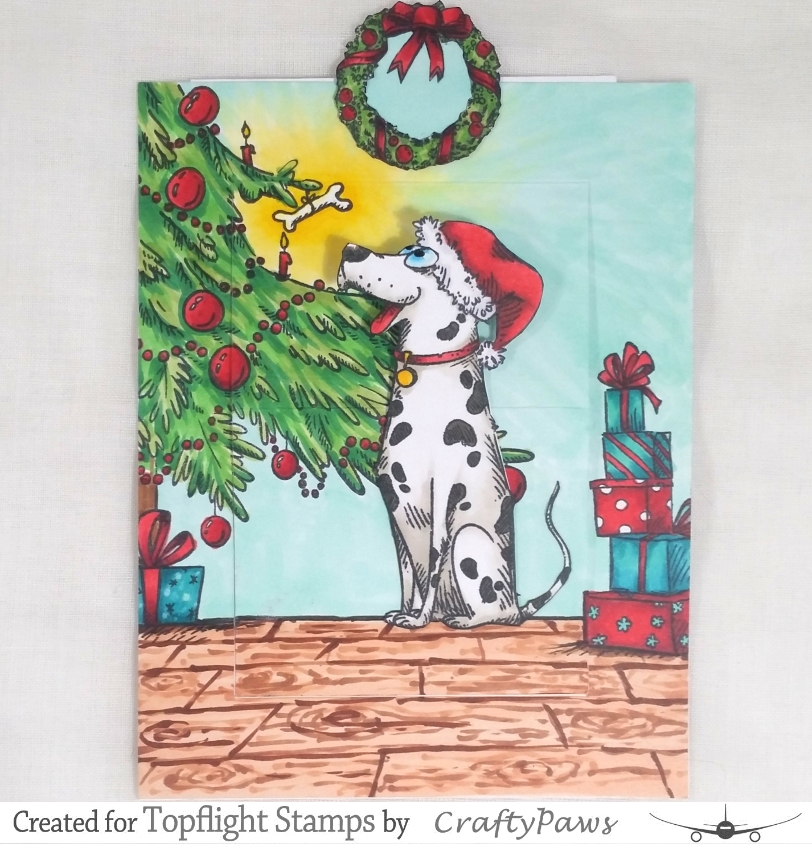
I wanted to keep the card background simple so as not to distract from the main puppy act so I simply blended on some Distress Ink in Tumbled Glass and Broken China and then punched out some clouds using some Fiskars punches. The slider mechanism was easy too. I used some Lawn Fawn Stitched Hillside dies to create one long wavy snowy hillside on some heavy weight card stock. Because the slider assembly was so large, I wanted the sliding distance long enough to appreciate the interactive element so I made the card 4" x 8.5".


I used a metal ruler and an X-Acto blade to cut out a slider opening almost the full length of the hillside. I then attached small, but thick, foam dots to a scrap of heavy weight cardstock and lined it up so that the foam dots would come through the slider opening. Then I popped up the entire outside edges of the snowy hillside piece with thick foam dots (if you only have fun foam or thinner foam dots, you can double them up). Then I attached the doggy sleigh assembly to the small foam dots from the front of the slider opening.

As often happens to me, I forgot to stamp my sentiment onto the snowy hillside before putting the whole card together. Because now the hillside was too unevenly popped up to stamp on, I simply wrote out with a Distress Marker in Black Soot, "Here comes Santi-Paws!" in the lower left corner. 


The slider mechanism works perfectly, and I think the Grinch-loving recipient will really enjoy this fun, interactive card. If you're interested in more details about the products used to create this card or to watch a process video, please check out my blog post HERE. Thanks for joining me today for my last Topflight Stamps - Katzelkraft Stamps guest designer post!

Saturday, September 29, 2018

National Coffee Day - Coffee Lovers Blog Hop

Welcome to the Topflight Stamps Blog!

Today is National Coffee Day and we're on the Coffee Loving Card Makers National Coffee Day Blog Hop!  Be sure to leave a comment on this post. One of the commenters on this post will win a $20 gift certificate to the Topflight Stamps store. Winner will be announced here on Monday, October 8. 


I wanted to spotlight one of our favorite new Coffee Stamps from Magenta Stamps. I love how different and fun this little Coffee House stamp is. This card was quick and fun to make. I just stamped the image with Memento ink and colored it in with Copic Markers. Then I matted it with papers from a Studio Light paper pad. The size of the card is 5 x 5 inches. 


Magenta Coffee House

Paper Pad 79

Click the links below to find the blog hop order. Be sure to visit all the blogs on the hop for tons of crafty coffee inspiration!


Friday, September 28, 2018

No Regrets

Ericka here with a couple of simple cards using the Visible Image No Regrets set.
https://topflightstamps.com/products/visible-image-no-regrets-clear-polymer-stamp-set

I love these sentiments and wanted to make a simple card with them since there were so many great messages.


I created a simple watercolor background using three colors and mixied them in the middle to get orange and purple.


The second card I used Infusions for the background.
https://topflightstamps.com/products/paperartsy-infusions-dye-cs08-cerise

I love the color of this Cersie Infusion and it paired well with the Picked Rasberry Distress Oxide I also used on the background.

 For more information on how I created these cards, feel free to stop by my blog. Have a wonderful weekend and thanks for stopping by!


Wednesday, September 26, 2018

Hola, Amigas!


Hola, everyone!  Toni with you today sharing a cute card set using Carabelle Studio Cactus. I love this set so, don't you? It was really easy to stamp the cacti in the pot with a bit of masking and guestimating placement by eye. Voila!


Originally I had planned a sketchy look with rather messy watercoloring with Zigs for these cards but as I was getting ready to color the first, I realized it reminded me of a mama holding her baby or of a couple dancing. How could I not then add word bubbles and glasses?!


This one reminded me of Madge from Monster's Inc.


Well, next thing you know I'm designing an entire family of cacti. The one immediately below is my kid sister who's really tall and the very last is one of my nieces who's really short. LOL.


Wasn't that fun? For the full list of ingredients visit my blog, Frankie Helps Craft. See you next week!

Tuesday, September 25, 2018

Katzelkraft Birthday Card

Hello, Lisa Hoel here again! Hopefully you've seen the news about Topflight Stamps carrying two 
exclusive Katzelkraft stamp sets. They are here just in time for the holidays and the possibilities are endless; especially when you pair them with the funny animal sets! You don't even need to necessarily use them for holiday cards. ;-) Scroll on…

Check these out!!

I used the package from the Christmas Accessories for a birthday card!


You can see how I made this card on my blog post

Topflight products used are:


Thanks for stopping by and have a great week! 

Monday, September 24, 2018

AALL & Create and Studio Light - 'Coloring' with Glossy Accents

Hi Everyone and welcome to the Topflight Stamps blog!  It's Jenny here, and today I'm showing you a technique that is super quick, and can be used to create pretty, clean and simple cards.  


It uses a fun and sketchy stamp by AALL & Create, an awesome brand Topflight carries.  While this one isn't currently in stock, there's some others that are very similar, and perfect for this technique.


To create my card, I trimmed down some patterned paper from a selection by Studio Light - this paper has subtle colors and texture throughout and is great for quick backgrounds.   I arranged the stamps from the set on my stamp positioner and then stamped them directly onto the patterned paper panel in Versamark clear embossing ink.


I heat embossed the hearts with with Rose Gold embossing powder and then colored them in with a clear Wink of Stella. I adhered the panel to a white notecard and then coated the hearts with Glossy Accents. This really magnifies the sparkle underneath as well as any pattern on the paper.   

Finally, I stamped the sentiment in Versamark onto black cardstock, heat embossed in white and popped up on foam tape over the card panel.

Hope you like it!  Be sure to check out the full AALL & Create range and Studio Light patterned paper over at Topflight, they're unusual and fun! 

Jenny 


Sunday, September 23, 2018

Doggy Christmas Pop-Up Slider Card

Hey Topflight fans! Today I'm sharing a doggy-themed Christmas slider pop-up card using stamps from Katzelkraft Dogs, Katzelkraft Funny Accessories, and Katzelkraft Sleigh Stamps.


I chose the Dalmatian from the Dogs Stamp Set as the focal point of my card. I Copic colored him and fussy cut him out, taking care to also fussy cut around his eyes about halfway down so that I could position the Santa hat from the Funny Accessories Stamp Set fully onto his head.


For the card front background, I used the Christmas tree base from the Sleigh Stamp Set and using a 0.1 pt Copic Mulit-liner Pen I doodled a bit more of the decorated Christmas tree in order to extend the height of the tree. I also doodled a dog bone hanging from a tree branch as a special doggy-themed Christmas decoration. To fill out a little more of the background scene I added a stack of presents to the right side of the panel from the Funny Accessories Stamp Set, and then Copic colored/drew in a wood floor and the rest of the scene.


Pop-Up Mechanism: Cut the A2 (4.25" x 5.5") card front as follows:

  • Use an X-Acto blade and cut 0.75" from the left, bottom and right sides of the card; be sure to leave the top 0.75" at the top side uncut. 
  • Turn the card with the top of the card toward the left and using a score board, score at 0.75", 2.5" and 4.25" between the cut lines (which were on the left and right sides of the card front but are, now that the card is turned, at the top and bottom of the card).
  • Burnish the scored lines so that it forms a valley at the 4.25" line, a hill at the 2.5" line and a valley at the 0.75" line.


Slider Mechanism

  • Cut a smaller slider piece of cardstock to 3.25" 4.75"
  • Use Scor-Tape (glue works too) on the back of the bottom smallest section of the Pop-Up Mechanism; from the 4.25" line to the cut edge.
  • Attach the smaller slider piece of cardstock, centered and lined up to the edge of the bottom smallest section of the Pop-Up Mechanism.
  • Now use Scor-Tape (glue works too) on the back of the card front around the left, bottom and right sides, beyond the cut pop-up mechanism area and attach this to an A2 sized card base.
  • Optional: You can cut out a thumb window at the top of the cardfront and/or add a pull tab to the top of the smaller slider piece of cardstock. I did both and took the opportunity to create a pull tab using the Christmas wreath from the Katzelkraft Sleigh Stamp Set

I hand wrote and used a couple of other stamps from my stash to add a sentiment on the top half of the slider piece that says: "Have you been naughty or nice?" and stamped on the bottom half of the slider piece: "Merry Christmas". For a bit more embellishment inside the card, I also stamped a box full of bones from another old stamp from my stash, and I colored it up to match the stack of presents on the right side of the card.


If you're interested in more details about the products used or a process tutorial video on how to make this card, please check out my blog post HERE. Thanks for joining me today!

Wednesday, September 19, 2018

Accio, Embossing Powder!


Hi, all!  Toni here today with an interactive non-card project.  When I started playing around with the Rita Bakarat Emerald Creek Magical Mysteries Dragon's Egg embossing powder, I was struck by how very thick and lustrous it turned after some time with the heat gun.  Check out the close up below. Fab, right?


It reminds me a bit of UTEE but with much more wow factor. If I'm remembering correctly UTEE stands for ultra thick embossing something? 


Btw, these wands are simply a dowel rod with hot glue applied in whatever way caught my fancy.  I then painted on Versamark from a reinker and went to embossing town. I used some other embossing powder on top (including glow-in-the-dark tips) to distinguish the two wands since they're going to siblings who might try to Avada Kedavra each other otherwise.


Check out my blog, Frankie Helps Craft, for a full list of ingredients.  See you next time!

Monday, September 17, 2018

Creating Embellishments with Rita Barakat Embossing Powder

Hi Everyone and welcome to the Topflight Stamps blog!  It's Jenny here, and this week the team have been playing with the absolutely gorgeous Rita Barakat embossing powders from Emerald Creek.  

These embossing powders come in some beautiful colors, and some have some gorgeous glitter and sparkle.  They're slightly chunkier than normal embossing powder and absolutely perfect for using on die cuts or chip board to create embellishments, which is part of the focus of my project today. 


The embossing powders I used today are Kiss of the Fairy and Mermaid Fin. Both have gorgeous shimmer and the Mermaid Fin has pretty blue glitter.


I also used this gorgeous Paper Rose Mandala stamp.  I inked it up with Versamark embossing ink and heat embossed with Kiss of the Fairy powder onto a bright blue shimmer cardstock (by Tonic Studios).  The embossing powder is opaque and turns a beautiful purple.  


I die cut a Hello die, also by Paper Rose, from black cardstock. I then coated it completely with Versamark ink, covered it with Mermaid Fin embossing powder and heat embossed. 


I repeated this three more times to build up the embossing powder, until I had a sparkly Hello embellishment, which I then adhered with liquid glue to the centre of the mandala.


As a finishing touch, I heat embossed a sentiment from Visible Image Go To Words set, in white embossing powder on black cardstock. I fussy cut it out and popped it up on foam squares underneath the Hello. 

Hope you like it! I'm a huge fan of these powders, I need them all !!

Jenny 

Sunday, September 16, 2018

Thanksgiving Double Slider Card ft. Katzelkraft Dogs

Hi Topflight fans! Kristina CraftyPaws here today sharing how to make a double slider card (with no special dies) for double the fun with Katzelkraft Dogs dressed in a Pilgrim bonnet and top hat from the Katzelkraft Pilgrim stamp set


I first Copic colored the Husky and the Basset Hound as well as the Pilgrim bonnet and top hat. Then I fussy cut them and set them aside. Then I prepped the various panels to create the double slider card structure as follows:
  • Front Panel, Slider Mechanism Panel and Back Panel: 4.25" x 5.25"
  • Slider Mechanism Panel (positioned horizontally) is then cut with top to bottom slits 0.25" away from either side, and 0.75" away from the top and bottom
  • Left Slider Panel is cut 3.25" x 4 5/8"
  • Right Slider Panel is cut 3.25" x 5 1/8"
  • Then a strip of heavy duty plastic is cut to 2.5" x 11", this is looped through the slits of the Slider Mechanism Panel and secured with strong double sided tape like Scor-Tape

Before everything is assembled together, I had fun decorating. The front panel was cut from black cardstock and layered with kraft corrugated cardstock and then a lemon yellow cardstock and then embellished with Autumn-themed Jolee's Boutique stickers. The corners of the plain yellow cardstock were further decorated with Pixie Press metal flourish corners (I love mixing the ornate with the simple like this).


The left and right slider panels were decorated to create simple scenes by blending on a light, cloudy sky using a handmade scallop-edge mask and Tim Holtz Distress Ink in Tumbled Glass. The ground was made with more blending using Tim Holtz Distress Ink in Twisted Citron and Mowed Lawn. Then I put the right facing Basset Hound with the bonnet on the left panel and the left facing Husky with the top hat on the right panel. To complete the scenes and add a sentiment, I printed from my computer two speech bubbles. The Basset Hound says, "HAPPY," and the Husky says, "THANKSGIVING."


The assembly at this point is easy. The right panel is adhered to the plastic loop on the left most side of the loop before it goes through the slit. The left panel, facing forward, is adhered on the back of the slider mechanism panel on the plastic loop on the right most side of the loop. Then for some clearance I added double sided foam adhesive to the top and bottom of the slider mechanism panel before adding the decorated front panel over top. I repeated this on the back of the slider mechanism panel before adding the plain back panel (where I'll write my message to the card recipient).


It was so much fun to craft this doggy bountiful double slider card. Thanks for joining me today! If you're interested in more product details or in watching a process tutorial video of creating this card, please check out my blog post HERE.


01 09 10