Friday, September 30, 2022

Halloween with Craft Emotions

Hi Everyone,

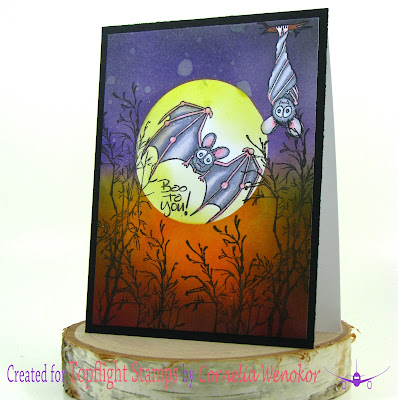
Cornelia here today. This week we are celebrating Halloween at the Topflight blog. It's just so much fun to create cards for this holiday!

I first stamped the bats and colored them with Copics. I masked the hanging one. Used a die cut circle to mask the other one. I brushed the background. Stamped the branches on it. Brushed the inside of my moon a bit.  Added the sentiment. Trimmed the card and mounted it onto black card stock.


I hope you liked this. Thanks for visiting. 
See you next week with more Topflight Stamps inspiration.

And here are the stamp supplies I used: 


Thursday, September 29, 2022

2022 National Coffee Day


Happy National Coffee Day! Topflight Stamps is excited to participate in the 2022 National Coffee Day Hop organized by the Coffee Loving Cardmakers. Click the link to check out the other participants in the Blog Hop and read below for some fun prize information.

I made two cards for the hop using the AALL& Create Hot Drinks set along with other Topflight Stamp supplies.


I love the grungy details on this set and paired it with a gel press background using PaperArtsy Fresco paints.


For more information on how I created my card, stop by my blog at Stangely Creative.


GIVEAWAY DETAILS:

HOP WITH US UNTIL October 4th!
To celebrate National Coffee Day, Topflight will be giving away one $25 gift cards to a lucky winner selected from the comments below.
** Leave comments by11:59 pm EST on October 4th to qualify.
** Winner will be announced on The Coffee Loving Cardmaker's blog on Friday, October 7th.
 
Don't forget to check out our store for more coffee inspiration!

*** Check out the following participants here:  


You are invited to the Inlinkz link party!

Click here to enter

Wednesday, September 28, 2022

Get lost in a good book - AALL&Create


Good morning!!! 
I have a sweet little card today using a stamp set from AALL & Create today. I hope you like her immersing herself in another world of wonder.

I created my my own colored cardstock using Distress Oxide. I stamped the books multiple times, also with Distress Oxide. Die cut a circle in the middle.


Stamp and color your sweet girl on another A2 card base.


Stamp her again with Versafine Onyx ink for a crisp outline.


Next, create a mask of the girl and create a background for her. Stamp the "read" image multiple times again. 
Finish your card by adding the sentiment and mounting it on dimensional tape.

I hope you liked today's card!!
Charmaine


Tuesday, September 27, 2022

Enjoy the Owl Witch's Magic

 It's Tuesday so you've got Kathi here to share a project with you! I'm firmly in Halloween mode and just received some seriously cool Halloween stamps by Pink Ink Designs®. I heartily recommend you pop over to Topflight Stamps and check them out all and all the other great new products!


The owl from the Odette Owl Clear Photopolymer Stamp Set by Pink Ink Designs (which has fourteen stamps, including two sentiments) was stamped onto a 5.5" x 8.5" piece of white cardstock with Copic friendly ink. It was also stamped onto repositionable label paper, which was fussy-cut to be used as a mask. 

Since I wanted the witch hat from the set to be perched on her head with the brim over her forehead, I cut off the top of the mask, then adhered the mask over her image.

The witch hat from the set was positioned and stamped over the masked image and again onto repositionable label paper, which was fussy-cut, and used to mask the witch hat.

Two colors of Distress Ink were brushed over the image panel to start the background. This ink was used because I wanted to use my Copic markers. If I had opted to use watercolors as a colorant, I probably would have selected by beloved Elements Inks by Lavinia Stamps.

The masks were removed and reserved for another use then the images were colored with Copic markers.

Blue Distress ink was somewhat randomly brushed over the Divine 8x8 Stencil by Lavinia Stamps to add some interest to the background.

The image panel was trimmed to 4.75" x 6.75" and edged with black ink. The strip that was left was used for the sentiment.

A Post-It Note was used to cover "Happy Holidays" from the Holiday Sentiment Duos Clear Stamp Set by Heffy DoodleOnyx Black VersaFine Ink by Tsukineko was used to ink the stamp, the PostIt Note was removed, the sentiment was stamped onto the leftover strip, die-cut, trimmed, and edged with black ink.

The sentiment die-cut was adhered to the image panel as shown, then the image panel was adhered to a black 5" x 7" card.

Please pop over to my blog, Kat's Tales of Stamping, for detailed instructions and complete supply lists.

Topflight Stamps Products Used:


Thanks for visiting!

Monday, September 26, 2022

Cutesy Halloween with Polkadoodles

 It's clear to see that the Halloween creations are taking over this week! This is Rachel from rwkrafts.com and today I'm sharing a super cute card using stamps by Polkadoodles.


I was super inspired by the latest Halloween color combo that's been floating around the craft community... pale pink and pale orange. So adorable! I just had to color this sweet trick-or-treater in those colors.


I created the background by inking the cardstock panel pink, then went over the Stamperia Compass stencil in a darker pink. The ground was created by just tearing some cardstock and inking it green.


Every image used is from the Polkadoodles Happy Howl-oween stamp set, colored with Copics, and then fussy cut. The derpy little bat is my favorite :)


To finish off the card, the cute sentiment was stamped inside...


Thanks for stopping by! Have a wonderful final week of September!

Topflight Stamps Supplies Used:


Sunday, September 25, 2022

A Purrfect Witch Card

You've got Kathi here today to share another Halloween card created! This time I opted to use the purrfect Hocus Pocus Clear Stamp Set #570 by Bipasha BK for AALL and Create for the focal image on a slimline card. The background was created with the Reverse Stars Clear Stamp Set #485 by Bipasha BK for AALL and Create, an Acetate Circle Mask, and an Acetate Hills Mask with Elements Inks by Lavinia Stamps.

Here's the card!


The cat and the witch hat from the Hocus Pocus Clear Stamp Set #570 by Bipasha BK for AALL and Create onto Copic friendly cardstock. Both images were fussy-cut,  colored with Copic markers, and edged with a black pen. They were set aside while I created the background.

Mixed Media cardstock was cut twice with a slimline die. One piece was used to create a night sky background using one of the Acetate Circle Masks withViolet ChalkBlue Lagoon,  and Graphite Elements Inks by Lavinia Stamps.

The other slimline die-cut was trimmed. A grassy lawn was created with Lime Punch and Pine Elements and the flat hills mask from the Acetate Hills Masks 

The grass die-cut was adhered to the night sky die-cut, then the fussy-cut and colored cat was adhered to the background as shown.

Because the background type, lines, and blots from the witch hat stamp were removed when I fussy-cut the hat, I wanted to add them to the background. Some judicious masking and stamping were involved in that process, which worked relatively well. 

Once that was complete, the witch hat was adhered atop the cat's head.

Stars were randomly stamped onto the background using the Reverse Stars Clear Stamp Set #485 by Bipasha BK for AALL and Create and Onyx Black VersaFine Ink.

The image panel was edged with Onyx Black VersaFine Ink, thoroughly heat set, matted with orange cardstock, and adhered to a black slimline card.

Gelly Roll Bold Line Stardust® Clear Glittering Ink by Sakura was added to the rim of the moon to finish the card.

Please pop over to my blog, Kat's Tales of Stamping, for more detailed instructions and complete supply lists. 

Topflight Stamps Products Used:


Thanks for visiting today!

Friday, September 23, 2022

Lavinia Birthday Wishes


Hello friends! Ericka from Strangely Creative here with a birthday card using Lavinia products. I love this pretty Tall Dandelion stamp and thought it would go perfectly with the Heartfelt Wishes


I started by applying a thin mask on my Bristol Smooth background. I then used the Lavinia Lattice stencil along with the Pinkella Mystical Mists and Midnight Blue Acrylic spray. I then removed the mask and again sprayed the Pinkella Mystical Mists along with the Bright White Acrylic spray. Once my background was dry, I did some ink blending with Mulberry Elements ink along the edges.

I stamped the Tall Dandelion in Versafine Clair in Twilight and heat embossed it with WOW!Embossing in Earl Grey which adds a pretty sparkle to my dandelion. I stamped the Heartfelt Wishes in Versafine Clair Nocturne to finish my card.


Thank you for stopping by and I hope you have a wonderful weekend.


Topflight Stamps Supplies Used


01 09 10