Friday, June 30, 2023

Using Leftovers with Darkroom Door


Hello crafty friends, Ericka from Strangely Creative here and today I created a card using some paper leftovers I had in my stash. I might be guilty of saving too many scraps but I had leftover gel press paper that was too pretty to throw out.


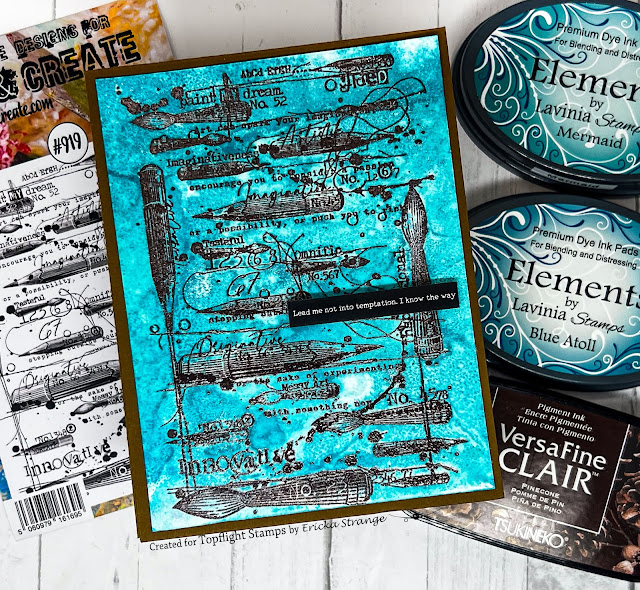
I used the Darkroom Door Arty Pods and stamped and clear embossed them all over the paper. I got out my scissors and cut up the pieces to figure out which ones I wanted to use for my card.

I used the Darkroom Door Arty Pods coordinating stencil and traced it on another gel press leftover. I then pieced together and glues down the pods.

I love the random colors and textures these pods have. I used a white chalk pen to highlight around a part of the pods and created a frame. I added the sentiment from the AALL & Create Sharp Tongues Black Ephemera.

I bent the sentiment strip a little to make it look like it was distressed from construction lol. Thank you for stopping by and I hope you have a great week!


Topflight Stamp Supplies Used


Thursday, June 29, 2023

Visible Image Stencil Card

  Hi Everyone,

Cornelia here today. This week the theme is "anything goes" at the Topflight blog. And there is a stencil sale still going on until the last day of the month - perfect timing! No coupon is needed.
 I used an old background that I had used as splatter guard for sprays, but it looked too pretty to throw it out. I used the pretty flower stencil from Visible Image and sponged in three different distress inks colors (green, blue and purple). I shifted the stencil a bit and brushed again. Added white splatters and some Stickles to the center. The sentiment is heat embossed.
I hope you liked this. Thanks for visiting. 
See you next week with more Topflight Stamps inspiration.

And here are the stamp supplies I used: 

Wednesday, June 28, 2023

"Sorry I'm late"

 Hello Crafty Friends! Mary Key here with today's "Anything Goes". I wanted to make a funny and cute card so I am using Craft Emotions - Funny Animals 3 and for the background I paired with Visible Image Round in Circles.

I did some ink blending two shades of colors and stamped Visible Image Round in Circles stamped with WOW! Opaque Bright White embossing powder. I then cut the inside to look wonky and then used watercolor paper - stamped, watercolor and fussy cut the cute donkey and guinea pig along with the sentiments that came with Craft Emotions Funny Animals 3 and put it all together.

I hope you like what I created and Thank you for visiting!

Topflight Stamps supplies used:


Tuesday, June 27, 2023

Soar - A Steampunk Card!

 It's Tuesday so you've got Kathi here today to share a project for with you. First off, a PSA! Take advantage of the wonderful stencil sale at Topflight Stamps this week!


Now onto my project!

This week our theme on the store blog is "Anything Goes", so I've gone Steampunk and created a card with two fabulous cling rubber stamp sets by Tracy Scott for PaperArtsyTS074 and TS053

Here's the card.


Use Copic-friendly black ink to stamp the butterfly from the Tracy Scott 74 (TS074) Rubber Cling Mounted Stamp Set for PaperArtsy twice: once onto a 6.75" x 4.75" panel of white cardstock and again onto repositionable sticker paper. Fussy-cut the butterfly and place it over its counterpart on the image panel as a mask.

Use the same ink to stamp the cogs from the Tracy Scott 74 (TS074) Rubber Cling Mounted Stamp Set around the butterfly on the image panel and onto repositionable sticker paper. Work one cog at a time, being sure to thoroughly clean the cog stamps between impressions as you don't want to create an inky mess. Fussy-cut all of the cogs and place them over their counterparts on the image panel as masks.

Brush Copic-friendly blue dye inks over the masks onto the image panel to add color to the background. Place the Swirls Pattern Thick Stencil from the Magic Forest Collection by Stamperia over the image panel and brush the same blue dye inks over the stencil onto the image panel to add some visual interest.

Remove the stencil. Ink the flowers from the Tracy Scott 53 (TS0530 Rubber Cling Mounted Stamp Sefor PaperArtsy with blue ink and stamp them into the large cogs and onto the image panel as desired. You can see where I messed up and tried to fix it. Imperfection adds charm.

Remove all of the masks and color the cogs and butterflies with Copic markers. 

Use Nocturne VersaFine Clair Ink by Imagine/Tsukineko to stamp the "Soar" sentiment from the Tracy Scott 53 (TS0530 Rubber Cling Mounted Stamp Set onto the image panel as shown.

Add a flight trail, then adhere the card front to a white 7" x 5" card.

Please pop over to my blog, Kat's Tales of Stamping,  for step by step instructions and complete supply lists.

Topflight Stamps Products Used:


Swirls Pattern Thick Stencil from the Magic Forest Collection by Stamperia


Thanks for visiting today!


Monday, June 26, 2023

You are a limited edition

Hi MEL PILLING  here today with a card which encourages the recipient to be proud of who they are. This card features the wonderful Katzelkraft Stamps.


. '.


I used Washi tape to mask below the horizon, then stencilled the sky around  the sun using a round mask. I used Elements Ink  in Blue Lagoon I then remomoved the mask and used a stencil brush and Sundance to fill in some colour in the sun and around it.

I then moved the mask to above the horizon. I also at this time added a curving line with Washi tape to mask off the sand.  I stamped my inks onto my craft surface and painted in the water with a flat brush. I used Blue Atoll , Blue LagoonMermaid and Dark Denim.  Once this was completely dry, I gently removed the horizon mask and filled in any flaws at the horizon.  

I used the stencil brush to blend in the sand.  Then I removed the sand Washi mask. I dabbed some white acrylic paint to the water randomly to create sea foam on the waves.  

I drew the palm tree on clean Bristol card. Water coloured it, fussy cut and glued onto the card.  I drew and fussy cut the grass skirt also.  Both birds were fussy cut and stuck on also, then I attached the grass skirt on top of our star.  

Stamps Used

.


This fabulous Katzelkraft set (We’re all mad here) designed by DAINIUS PASAKOS , is so much fun to play with. The stories practically right themselves.


Thanks for joining me today on the Topflight Stamps blog. See you soon. 

Saturday, June 24, 2023

A Shimmer Inked Background

 Hi friends. Alanna here and I'm super excited to share my card with you today. Not because it is anything fancy or super special but because I absolutely love the background stamp I used and the price point of it. I used the Floral Butterfly image from Studio Light. And get this - the price is just $7.99. What a steal! 

I started by stamping the Floral Butterfly stamp with the Frosty Shimmer Pearl Ink from Spectrum Noir. The photo didn't pick any of the shimmer up but it is absolutely there and looks so pretty in real life. 

After my panel was dry, I trimmed it down and it measures about 4.5 inches square. I added it to a black piece of card stock and then added everything to a white square notecard.

I then got to work on the rest of the card. The small black butterflies are from an amazing stamp/die combo from Love in the Moon called Butterflies. All the butterflies are on one stamp and then there is a one piece die that cuts out all of the butterflies at once. I stamped them using Versafine Claire Nocturne ink, my favorite black ink ever. There were several more that were cut out that I didn't use. I also die cut them another time from white card stock to stack behind my stamped butterflies for a bit of dimension. 

To finish off the card, I added a stamped sentiment from my stash and added it with some thin foam tape. I hope you've been inspired today.


Products used from Topflight Stamps are linked and listed below. Crafty hugs! ~ Alanna

Friday, June 23, 2023

AALL & Create Inking Gears


Hello crafty friends! Ericka from Strangely Creative here and today I am playing with the AALL & Create Bipasha BK Inking Gears stamps. I love all the details on Bipaha BK designs and this one is no different. I don't know about you, but I also love all my art supplies including my pencils and brushes so I thought that this sentiment from the AALL & Create Ephemera Bite Me was perfect for my supply purchasing "habit".


 I stamped this large stamp with Versafine Clair Pinecone ink and clear heat embossed it. I then used my brayer on my gel press plate and inked it up with the Lavinia Elements ink in Blue Atoll and Mermaid.


Thank you for stopping by and I hope you have a wonderful weekend.

Topflight Stamp Supplies Used


Thursday, June 22, 2023

AALL&Create - The Persistence of Memory

  Hi Everyone,

Cornelia here today. This week we are featuring AALL&Create stamps on the Topflight blog. Janet Klein came out with a whole series of artists and I fell for Salvador Dali. I tried to recreate his famous painting "The Persistence of Memory". Unfortunately the set only has one melting clock in it.....Should have also had some tiny ants....Room for improvement! 
I first created the background, using masking and brushes. I drew in the  coastline by hand. I stamped Salvador and the clock-tree onto scrap paper, colored them with alcohol ink markers and cut them out. Added them to my card. Stamped the sentiment.

I hope you liked this. Thanks for visiting. 
See you next week with more Topflight Stamps inspiration.

And here are the stamp supplies I used: 

Wednesday, June 21, 2023

Life is all about balance

Hi there! Mary Key here and Happy Wednesday! Today I have a card using AALL & Create. I used #617 Flamazing, #457 Background Voices and for the background used stencil #100 Nodes

I watercolored the background using watercolor paper, some turquoise and yellow colors using a watercolor brush and left some white areas to give it interest with some splatters of turquoise. I used the stencil #100 Nodes, blending some turquoise on top and then used #457 Background Voices with black ink and some black splatters. 

I then cut out two different sizes of circles colored with some brown ink and stamped with Background Voices. Next, the cutest flamingos from #617 Flamazing, colored them with some turquoise, purple and some orange with brush markers along with some hedgehogs and fussy cut them. Put it all together and added the sentiments that came in Flamazing stamp set. 


I hope you like this and Thanks for visiting. 

Topflight Stamps supplies used:


Tuesday, June 20, 2023

Miss Dee's Crazy Cat Lady Journal Page

 It's Tuesday so you have Kathi here to share a project with you  This week my teammates and I are showcasing AALL and Create's wonderful products. It's no secret that I love and identify with Janet Klein's Miss Dee character. Nor is it a secret that I'm a crazy cat lady. Therefore, I had to have the Cat Lady Dee Clear Stamp Set 777 and created an art journal page with it.

Here it is!


I started the page by stamping Cat Lady Dee twice with Copic-friendly black ink. I stamped it once onto white cardstock and once onto repositionable label paper. The label paper was fussy-cut and placed over its counterpart as a mask.

True confessions: since I wanted to stamp the cats separately, I cut the two-eat stamp from the Cat Lady Dee Clear Stamp Set 777 apart. I stamped the cats onto the image panel and onto label paper. fussy-cut the label paper versions, placed the masks atop their counterparts, and Stamped.Tthe next cat was cleaned, dried, positioned, and stamped. Thank heavens for stamping platforms!

When Miss Dee and the cats were all masked, a ruler was placed horizontally across the cats and Miss Dee's paws, and Graphite Elements Ink by Lavinia Stamps was brushed over the ruler onto the image panel.

The ruler was reversed to cover the bottom part of the image panel and Violet Chalk Elements Ink was brushed over the image panel to add color to the background.

With the ruler still in place, the Mosaic Stencil #54 by AALL and Create was placed over the image panel. Della Blue Elements Ink was brushed over the stencil onto the image panel to add visual interest. 

The stencil, ruler, and all the masks were lifted and all images were colored with Copic markers. A white gel pen was used to add highlights to the eyes and Miss Dee's earrings.

Medieval Blue VersaFine Clair Ink was used to stamp the sentiment from the Cat Lady Dee Clear Stamp Set 777 onto the image panel then heat set.

The image panel was trimmed, corner-rounded, and edged with Violet Chalk and Graphite Elements Inks.

Patterned paper was brushed with Violet Chalk Elements Ink, torn, and adhered to the journal page. The page was edged with Medieval Blue VersaFine Clair Ink then the  image panel was adhered.

Please pop over to my blog, Kat's Tales of Stamping, for more information.

Topflight Stamps Products Used:


Thanks for visiting today!

Monday, June 19, 2023

You’ve got this!!

Hi MEL PILLING here today with a positive message card. This week,  my team and I are spotlighting Aall&Create Stamps A wonderful Company with many artistic stamps to choose from. 


I began by applying Elements Ink in Della Blue  and Olive  for the background, using a Stencil Brush and torn copy paper hill mask. I then stamped my stack of squirrels and branches with Versafine Clair Nocturne.     I coloured the squirrels with watercolour pencils, and added some extra hairs with a black pen.  I masked off the squirrels with washy tape, then stamped the trees in the background.

I added a little holographic glitter to the tree line for a little extra bling.


Stamps Used


This was a fun quick card to make and I love these cheeky Aall&Create. squirrels designed by
Olga Heldwein .

 Thanks for stopping by the Topflight Stamps block today. See you soon.


'


01 09 10