Friday, July 31, 2020

Something Different

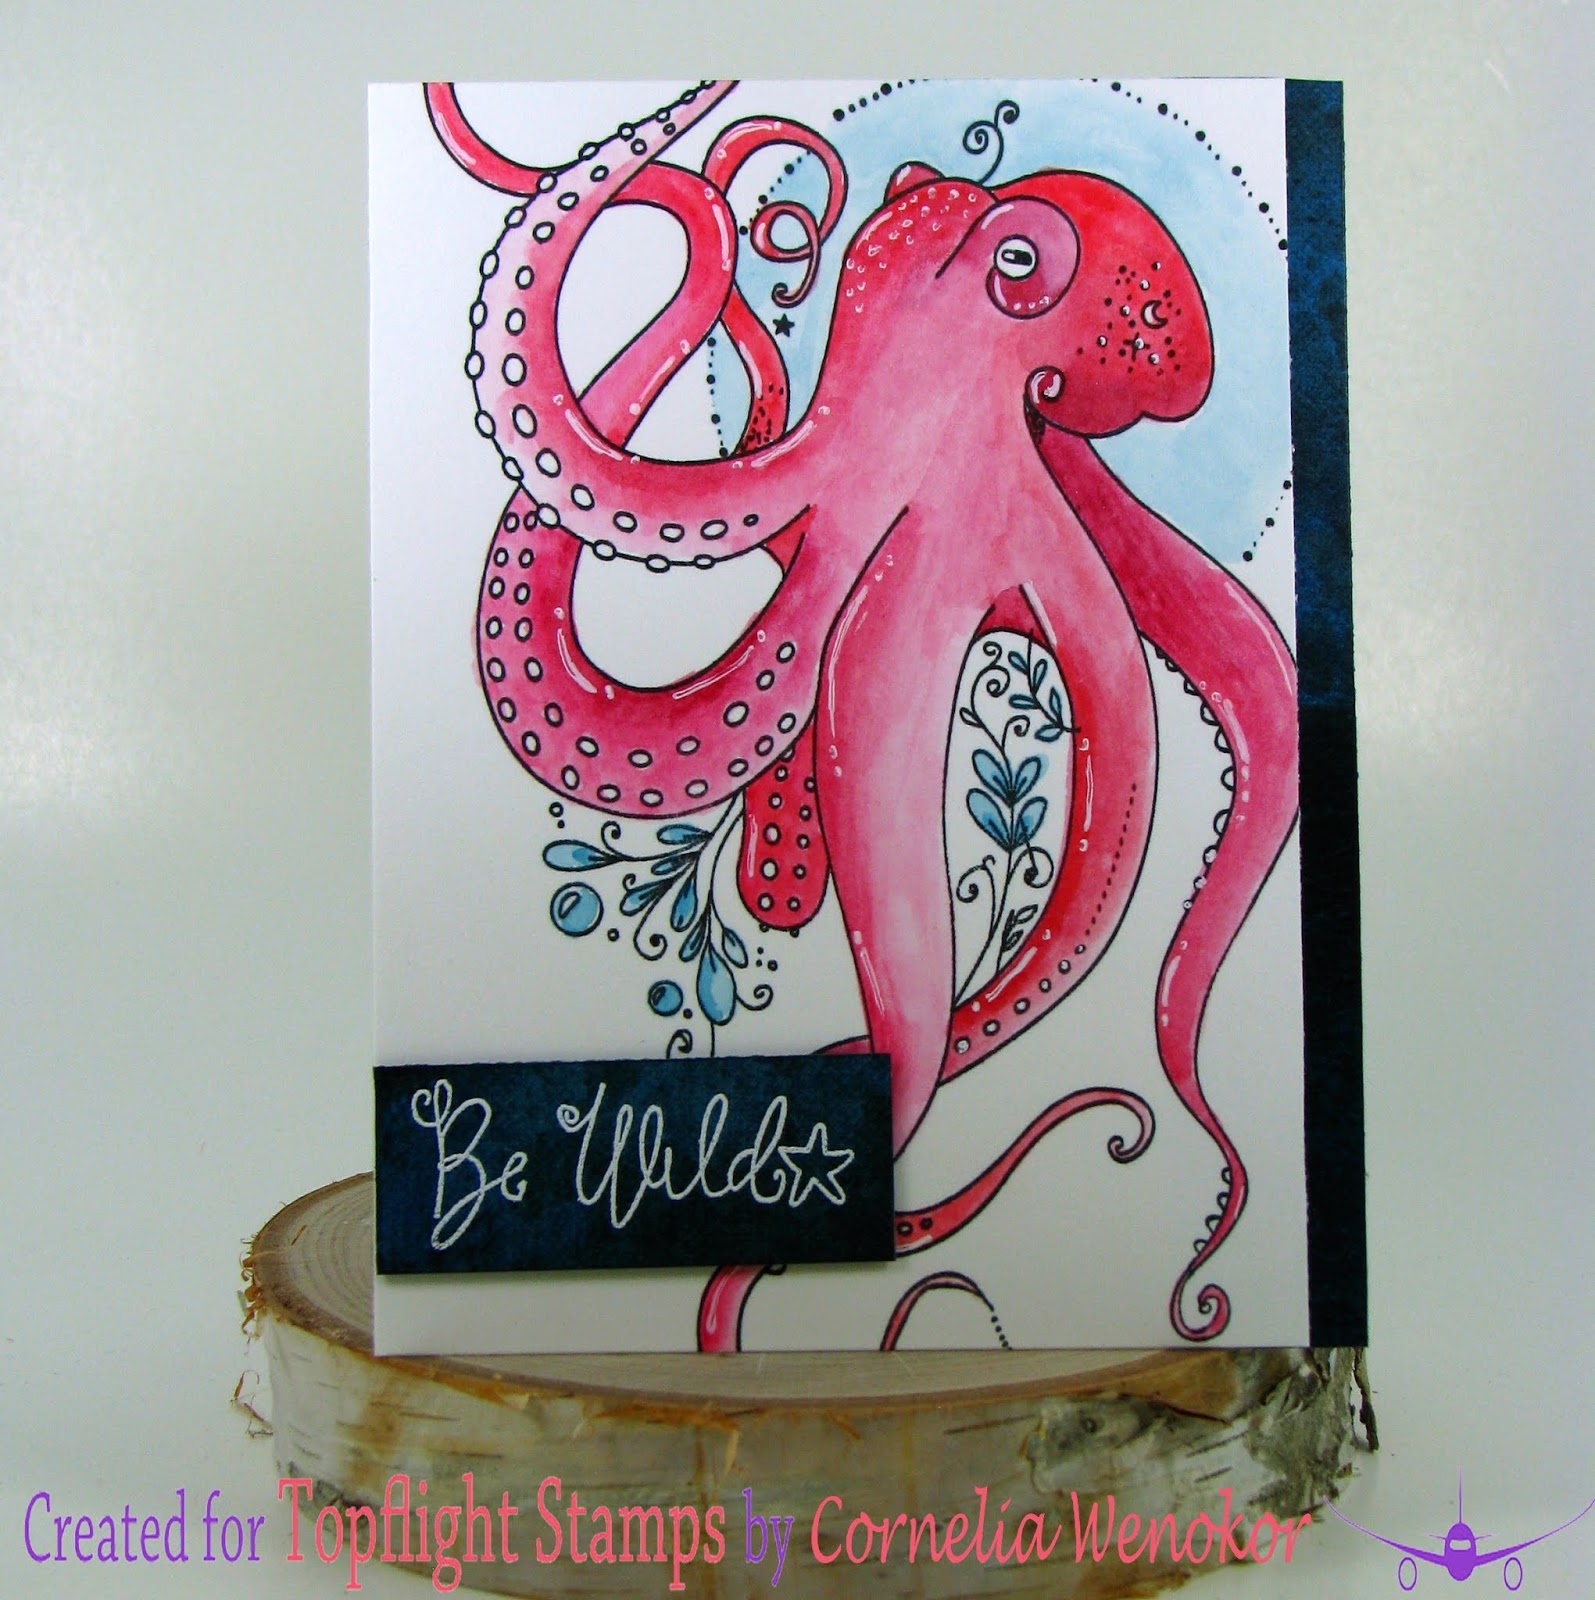
Happy Friday! Ericka here with a panel I made using a variety of supplies including this beautiful set from Stamperia called Sea World Lady.

I had a panel I had made using my gel plate with some paints and thought it would make an beautiful background for an embossed  Sea World Lady 


As you can see it is a rather large stamp and I used WOW Embossing ink and powders to give her a unique look against the texture plate background.


I added several layers of embossing powder to give the panel different textures and then used black paint around the silhouette.


For more information on how I created my card, stop by my blog, Strangely Creative. Thanks for stopping by and have a beautiful weekend!

Thursday, July 30, 2020

Pinky Inky

Hi Everyone,

Cornelia here today!

For some background information on why I used this stamp and why I colored it this way you may go to my blog post, if you are interested.


I used watercolor paper and stamped the huge octopus fro Pink Ink Designon it. It really is enormous! It did not quite fit on my A2 card. But most of it did. Good enough. I colored it with water colors. I used a little strip of designer paper on the side and used the same paper to heat emboss the sentiment.


Here are the stamp supplies I used:
Use code FUNSTAMPING to get 12% discount at Topflight Stamps.


Wednesday, July 29, 2020

How Jawsome


Hi hi, Topflight fans!  It's soooo hot here in the Pacific Northwest and I'm very envious of these underwater critters.  Mmm...I bet they're so cool.


I started my card by stamping and stencilling the background scene.  I used Prism Ink Arctic Mist and Ocean Spray and Periwinkle with the Visible Image Fibres stencil for the wavy water.


I then stamped a variety of underwater elements using Prism Ink Rainforest Green, Red Chili, Blue Lagoon, and Spring Meadow.

I stamped the Visible Image Mesh-Ellaneous netting with Wild Mushroom.


Next I colored up the Craft Emotions Ocean 5 critters using Copics. I love these and other kooky images from Craft Emotions.  LOVE THEM.


I'll be back with you next week. Until then, why don't you check out the new products that have come into the TFS shop!  You can shop your heart out using this 12% off coupon!

You can also check out my other creations by visiting my blog, Frankie Helps Craft, my Instagram, or my Pinterest Board.

Tuesday, July 28, 2020

He's Simply Elegant!

It's Tuesday, which means that it's Kathi here to share a card with you. As you might know, I love cats and have made it my top priority to collect all the cat-themed stamps, dies, and stencils in the world. They've said that "she, who has the most cat stamps, wins!" So clearly I needed this dapper cat from the Simple Elegance Cling Rubber Stamp Set by Carabelle Studio.

I think he's so classy that he needed to be framed! So I did just that using the Regal Frame Red Rubber Cling Stamp by Darkroom Door.

Here's my card:


Using Memento in, the elegant cat from the Simple Elegance Cling Rubber Stamp Set was stamped onto white cardstock and onto mask paper, which was fussy cut and set aside. A stamp platform was used to position the Regal Frame, which was also stamped with Memento ink. A hand-held stamp positioner was used to position the sentiment, which was stamped with Archival ink.

The dapper dude was colored with Copic markers, then the pre-cut mask was placed over him and Post-It Notes were placed over the frame, so I could add a touch of stenciling to the interior of the frame.

I kept the mask on the cat and placed the image panel back into the stamping platform. The  Regal Frame was inked with silvery black metallic ink and stamped. Clear embossing powder was heat set. A gold colored Copic marker was used to color the white bits on the embossed frame, then an embossing pen was used to go over the entire frame and the cat's glasses. Clear embossing powder was heat set. This process was repeated several times to build up layers of clear dimension on the frame and the cat's glasses. 

After some misadventures trying to get a straight rectangular border around the frame (I would swear that my vision has gotten wonky lately or maybe I'm just unbalanced), I ended up fussy-cutting the frame, which then needed to be edged with a dark marker and blasted with a heat gun to seal those edges. 

The image panel was adhered to some really old, but beloved patterned paper and onto a bluish card.

If you'd like to know more about this card, pop over to my blog, Kat's Tales of Stamping!

BTW, if you'd like to get 12% off your order at Topflight Stamps use THIS LINK!

Topflight Products Used:


PSA: You only have a few days left to take advantage of the Christmas/Winter in July Sale going on at Topflight Stamps! The sale ends July 31st!


Monday, July 27, 2020

Darkroom Door Stencils & Script Vintage Journal Page


Hi friends!  Happy Mixed Media Monday from the TFS gang!  Autumn Clark from SewPaperPaint with you today to share a vintage style mixed media collaged journal page featuring exquisite products by Darkroom Door.  This page comes towards the end of an upcycled address book that I've used as a journal and shared on my blog for the past couple of years.  You can find a link to the other spreads HERE.  A general theme has been to build a collage around a Tim Holtz found relative photo that visually reminds me of a part of my own past.  My pages are cutout chipboard that I've gessoed and added spray inks onto.


I used the Handwritten Script small stencil and texture paste and sprayed with inks while the paste was still wet.  This way it soaks up the color and adds contrast to the page.  I then layered vintage papers and more Tim Holtz ephemera, with some stamping using my FAVORITE Darkroom Door Abstract dots stamp #7.  I made a fun little flap to add journaling with by folding a large tea bag in half.  Inside I adhered an old experiment with the Wildflowers small stencil.  I shared that post HERE for Stamps & Stencil a few years ago.


Here's a shot of the opened tea bag flap...


I used a piece of brown paper packaging to stamp the Dreams Quote stamp onto to coordinate with the tea bag.  The circle piece was from the above mentioned tutorial and can be made with the Circles stencil.


I hope these journal pages have inspired you to play with your stamps and stencils today and make something you love.  Enjoy your week!  - Autumn


Find these awesome Darkroom Door products
at Topflight Stamps today!


Friday, July 24, 2020

Darkroom Door Fun Flowers


Happy Friday! Ericka here with a Fun Flower background card using Darkroom Door.


I love these whimsical flowers and all the fun ways you can use this background.


I created the background by first using the Hunkydory Prism Powders which are bright color powders with beautiful shimmer.


I then used the WOW! Embossing Powder in Gold Pearl for a soft gold embossing.


I also love the Darkroom Door Sentiment Strip Dream Big and all the different ways you can use these great sentiments.


For more information on how I created my card, check out my blog Strangely Creative. Also don't forget to check out the sale this month. Have a wonderful weekend!

https://topflightstamps.com/collections/christmas-winter?ref=xuzipf8pid

Thursday, July 23, 2020

Darkroom Door Background Stamps

Hi Everyone,

Cornelia here today! 
This week's focus is on Darkroom Door Background Stamps.


I used this wonderful butterfly background by Darkroom Door stamps. I used the iron-off ink resist technique. I used watercolor paper. I inked the stamp with Versamark and heat embossed it with clear embossing powder. Sponged ink in rainbow colors over the butterflies. The heat embossing resists the ink. I took a second piece of cardstock and placed it onto the inked up one and used my iron, to iron off the embossing powder and transfer it to the second cardstock. There is a wonderful video by Jennifer McGuire that you can watch HERE. She explains it much better than I do....


Added the big butterfly and the sentiment.


And here is the second card I got out of this: 


You can see a bit of the rainbow colors, that transferred over. Used black soot distress ink to sponge  over the background. Again, you see that the embossing powder acts as a resists. I finished it off with the big butterfly and some sparkly gemstones.


I hope you liked this! See you next week with more Topflight Stamps inspiration.

Here are the stamp supplies I used:
Use code FUNSTAMPING to get 12% discount at Topflight Stamps.


Butterfly Background,                    Butterfly,                                  Thank You


Wednesday, July 22, 2020

Delicate Flower Indeed


Hi, Topflight Stamps fans! Toni here with you today.  The shop has a bunch of Darkroom Door background stamps that are new (to me anyway!). As well as using the Darkroom Door Fun Flowers Background today, I'll be using other DD background stamps in future posts so keep an eye out for that.


I paired this with one of the Katzelkraft Owls and, yes, she is indeed a delicate flower.  Can't you tell from the bow?!  Duh!


I stamped the owl and stone first then masked the images to stamp the background.  I stamped the flowers in Prism Ink Pink Jellybean and the Crafty Individuals Wild Flowers and Ferns Silhouette with Distress Oxide Peeled Paint.


I colored up the owl using markers from the Prism Markers Forest Walk set.  I printed the sentiment using my beloved label printer to finish off the card.


I'll be back with you next week. Until then, why don't you check out the new products that have come into the TFS shop!  You can shop your heart out using this 12% off coupon!

You can also check out my other creations by visiting my blog, Frankie Helps Craft, my Instagram, or my Pinterest Board.
01 09 10