Thursday, August 31, 2023

Fall Scene with Lavinia Stamps

Hi Everyone,

Cornelia here today. This week the theme is "fall/autumn" at the Topflight blog. And fall is all about mushrooms for me. Time to ink up those beautiful Lavinia stamps!
I made the background with distress inks. I brushed it with a variety of greens and brown at the bottom. I stamped my little scene onto the background. I then also stamped the center mushroom onto scrap paper and colored it. I then cut it out and added it.  I added white accents and some "grass" to the bottom with a fanned brush. 
I hope you liked this. Thanks for visiting. 
See you next week with more Topflight Stamps inspiration.

Wednesday, August 30, 2023

Feels like Autumn with Chou & Flowers

Hello Crafty Friends! Mary Key here and this week with my fellow Topflight Stamps team are featuring Fall/Autumn ideas. I am going to use Chou & Flowers clear stamps - In the Forest. I just love colors of the Fall, my favorite time. 

I will be using watercolor paper along with some black ink which is waterproof. I wanted the black ink not to stand out as much. Here I am fussy cutting to mask parts of the fox, log and boulders after stamping and used a stamp that is in the stamp set some wording. 


Then I started the background with some inks in yellow, orange and brown tones of ink pads, just watercoloring with a watercolor brush. For the fox and other images I used watercolor pencils (my favorite to watercolor and have fun, listening to some music). After watercoloring, I added Botanique word stamp in Versafine Black Onyx ink pad. I used kraft cardstock and distressed my card base (front) and added some copper glitter and black ink for some splatters and here is my completed card.


Thank you for visiting and keep creating!

Topflight Stamps Supplies Used:


Monday, August 28, 2023

Adventure Awaits

 Hi all.  MEL PILLING  here.  This week, the Topflight Stamps Team is focussing on fall/autumn.  For this project, I used all LAVINIA STAMPS.


I began by stamping all the trees, using Versafine Clair  in Acorn,  Fallen Leaves, and Nocturne .  I sketched the fence posts on wood grain paper, then cut them out and darkened the edges with watercolour markers.  

The background was done, using Dinkles in Lime Divine ,  Mustard Seed . Deep Yellow , Sepia , Burnt Orange , Magenta  and Chilli Jam.  Once I sprinkled all the Dinkles over they dry card stock, I sprayed with a water mist to wake them up.  Once completely dry, I used a Blender brush and Elements Ink  here and there to deepen the colours. For this I used Emperor Red,  PaprikaRusset OrangeSaharah and Sundance.  Once all this was completely dry,  I stamped my three crows in Versafine Clair Nocturne then glued on the fence posts.  I then drew in the wire for the fence.  I stamped in the berries below the fence and coloured them with Posca Pens. I highlighted the crows, and then added the sentiment.

LAVINIA STAMPS USED


.


These Dinkels are just a delight to use. The colours are so very vivid. I could seriously just sit in my art space and make one background after another all day long.

Thanks so much for joining me today on the Topflight Stamps blog

Thursday, August 24, 2023

Creative Expressions Rustic Thank You Card


Hello crafty friends! Ericka from Strangely Creative here and today I have a simple rustic thank you card using the Creative Expressions Worn & Weathered Paper Pad. I started by selecting a pattern and cutting it down to an A4 card. I then used the Darkroom Door You Are Everything set and stamped the flower with Lavinia Elements Ink in Henna

I then used the Visible Image Thank You set and stamped it in Versafine Clair Pine Cone ink.


I finished my card with some ink blending using the same Henna Elements ink and then added a little water splatter for additional texture. Thank you for stopping by and I hope you have a wonderful weekend. 

Topflight Stamp Supplies Used


Creative Expressions - Life is Beautiful

Hi Everyone,

Cornelia here today. This week we are featuring Creative Expressions on the Topflight blog
I used a circle mask that I made myself with a generic circle stamp and sponged first with squeezed lemonade distress ink. I then added a 1 inch circle as a mask and sponged around it with mustard seed, candied apple and lastly a bit of black soot distress inks. I stamped the Evergreen Horizon stamp onto my background and used a circle die to cut it out. Stamped and heat embossed the sentiment.
I hope you liked this. Thanks for visiting. 
See you next week with more Topflight Stamps inspiration.

And here are the stamp supplies I used: 

Wednesday, August 23, 2023

Papillon Dreams from Creative Expressions

 "Hello" Mary Key here! This week, Team Members are featuring Creative Expressions. I made a note card to use with any occassion. I am going to use Andy Skinner - Papillon Dreams stamp and Building Blocks Stencil

For my card, I did some ink blending with some blues and brown inks on my card base. Then used Building Blocks Stencil with darker blue tones of ink. After, I stamped the top, bottom and sides of my card with some black ink using Papillon Dreams stamp, then spritz some water to get some water spots and distressed my card using some scissors.

For Papillon Dreams stamp, I used some vellum paper and some black ink, then tore the vellum to look a little distressed and used some brown tone ink on the vellum paper. I did some fussy cutting on white cardstock of the butterfly and a little coloring. Put it together on some white cardstock and I really like how the white cardstock looks with blue and brown tones of colors.


Thank you for visiting and keep creating!

Topflight Stamps Supplies Used:


Tuesday, August 22, 2023

For You Sweet Friend Card

It's Tuesday which means you've got Kathi here to share a project with you. This week my TFS teammates and I are showcasing Creative Expressions' wonderful projects. 


Copic-friendly black ink was used to stamp the watering can from the Friendship Watering Can Clear Stamp Set twice, once onto white cardstock and once onto repositionable sticker paper. The sticker paper version was fussy-cut and placed atop its counterpart on the image panel as a mask.

A ruler was placed horizontally across the image panel along the bottom of the masked watering can. Dusky Rose Prism Ink was brushed over the top of the ruler over the masked image onto the image panel to create a colored background. 

The ruler was moved to cover the top part of the image. Slate Grey Prism Ink was brushed over the ruler onto the bottom of the image panel. 

The masks were removed and retained, then the image was colored with Copic markers. I resisted the urge to make the metallic pitcher rusty. I did add silver marker over the staples on the heart.

The heart from the watering can was stamped onto a scrap of plaid paper from A Gingham Christmas 8x8 Patterned Paper Pad. It was fussy-cut and the color was deepened with a Copic marker. A silver marker was used to highlight the staples on the heart. A black marker was used to edge the heart. The heart was pressed onto a VersaMark pad, heat embossed with Clear Matte Embossing Powder, then adhered over its counterpart on the image panel.

Silver and white paints were used to splatter the image panel to add visual interest.

White textured cardstock was die-cut with a scalloped frame and a scalloped border die.

The scalloped frame die was adhered over the image panel to frame it.

Using a stamping platform, Nocturne VersaFine Clair Ink was used to add a combined sentiments from the Friendship Watering Can Clear Stamp Set to the border die.

Pink plaid paper from A Gingham Christmas 8x8 Patterned Paper Pad was cut to 4.75" x 6.75", edged with a dark RV marker, and adhered to a white 5" x 7" card.

The framed image panel and the border die sentiment were adhered to the front of the card.

Please pop over to my blog, Kat's Tales of Stamping, for more information.

Topflight Stamps Products Used:


Thanks for visiting!

Monday, August 21, 2023

Life is better in flip-flops

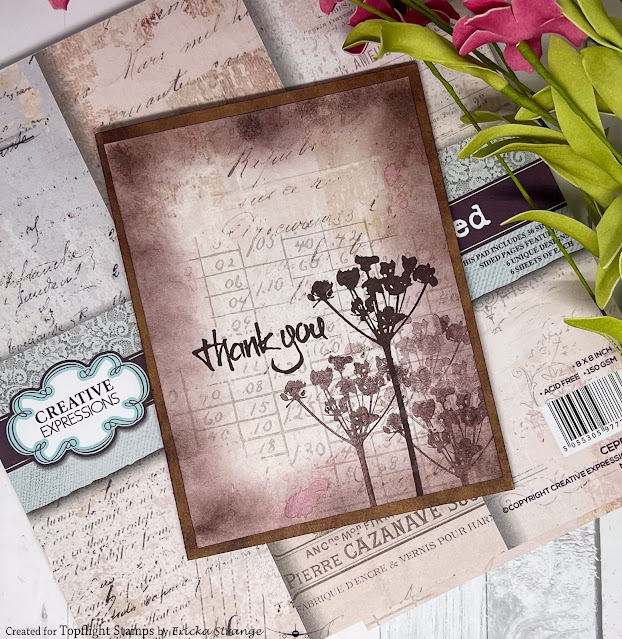
 Hi everyone,  MEL PILLING here.  This week the Topflight Stamps design team are highlighting CREATIVE EXPRESSIONS .  So we’re going to the Beach!!


I used Blender Brushes for the sky in gentle circular motions using Distressed Ink in Salty Ocean, and Elements Ink in Blue Lagoon.   I masked off the sky at the horizon from above with paper and washy tape.  I then used a blender brush that already had some mystery browns on it (not sure which ones) and filled in the sandy area to about a third of the card from the bottom.  Then I splattered it with black ink to make grit. 

Then using a paint brush, I painted the water.  For this, I used a valley shaped mask of torn paper at the bottom to mask off some of the shoreline. I painted the water in many blues, some of which mixed together on my mat to make different colours.  I used Distressed Ink in Blueprint Sketch, Sapphire and Prize Ribbon.  I used Elements Ink in Blue LagoonMermaid and Blue Atoll.  Once this was completely dry, I stamped my ladies directly onto the background using Versafine Clair Nocturne .  I then added the waves and highlights with white acrylic paint.

The foam on the waves was done with paint and white liquid pearls.  L l l 7 I added some holographic glitter to the water for shine, and painted in some grass using Elements Ink in Greensleeves, Pine and Olive.  Be sure to shade underneath the wavelets to make it dimensional. 

The bathing suits were stamped onto patterned paper and fussy cut out.  I stamped the girls again on clean card.  I coloured them with pencil crayons, skin and hair only.  Then I glued the patterned bathing suits to the girls, Paper Doll style.  I fussy cut the girls out with their new bathing suits glued on, then glued them onto the background. I just drew in the seagulls.


CREATIVE EXPRESSIONS STAMPS USED 


Using patterned paper to cut out clothing makes everything easier than colouring.  By snipping off the one piece suit bottom on the blue bathing suit, I was able to change the style of the bathing suit on the one girl. I really enjoyed using these creative expression stamps today. I hope you check them out on the Topflight Stamps website.


Thanks for joining me today on the Topflight Stamps blog. Using this paper doll technique takes me back to my childhood. You can even use this technique to put clothing on animals or fairies. It works really well. Hope you give it a try.

Saturday, August 19, 2023

A Trio of Birthday Cards

 Hi friends. Alanna here with a trio of quick and easy birthday cards for you today. If you know me and my style, you know that I love to create simple yet effective cards that can be mass produced when needed. 

To get started on these cards, I took the awesome Shadow Stamps set from Hobby Arts and stamped the small rectangle image three different times with the Lime Soda and Queen Bee colors of the Shimmer Pearl inks from Spectrum Noir.

I then stamped the sentiments into the center rectangle which are from the gorgeous Basic Wishes set from Studio Light. I love the larger scripty sentiments in the set and how many supporting smaller sentiments there are.

I then stamped three of the fairies from the Fairy Foragers set from Lavinia. I formed a visual triangle with my placement and that completes these cards. 

Find all the products I used on my cards linked below in the Topflight Stamps store.

Crafty hugs! ~ Alanna

Friday, August 18, 2023

Katzelkraft Thanks a Llama


Hello crafty friends! Ericka from Strangely Creative here and today I have a fun mixed media card using my gel press and the Katzelkraft Llamas. School is starting up, and as a teacher I can always use thank you cards. For my card today, I used a gel press print I had in my stash and stamped the Llama on a separate paper and cut it out.

I finished my card by stamping the Thanks sentiment from the Katzelkraft Enjoy Quotes set and clear embossed it. 


Thank you for stopping by and I hope you have a great weekend!

Topflight Stamp Supplies Used


01 09 10