Tuesday, January 29, 2019

Owl You Need is Love


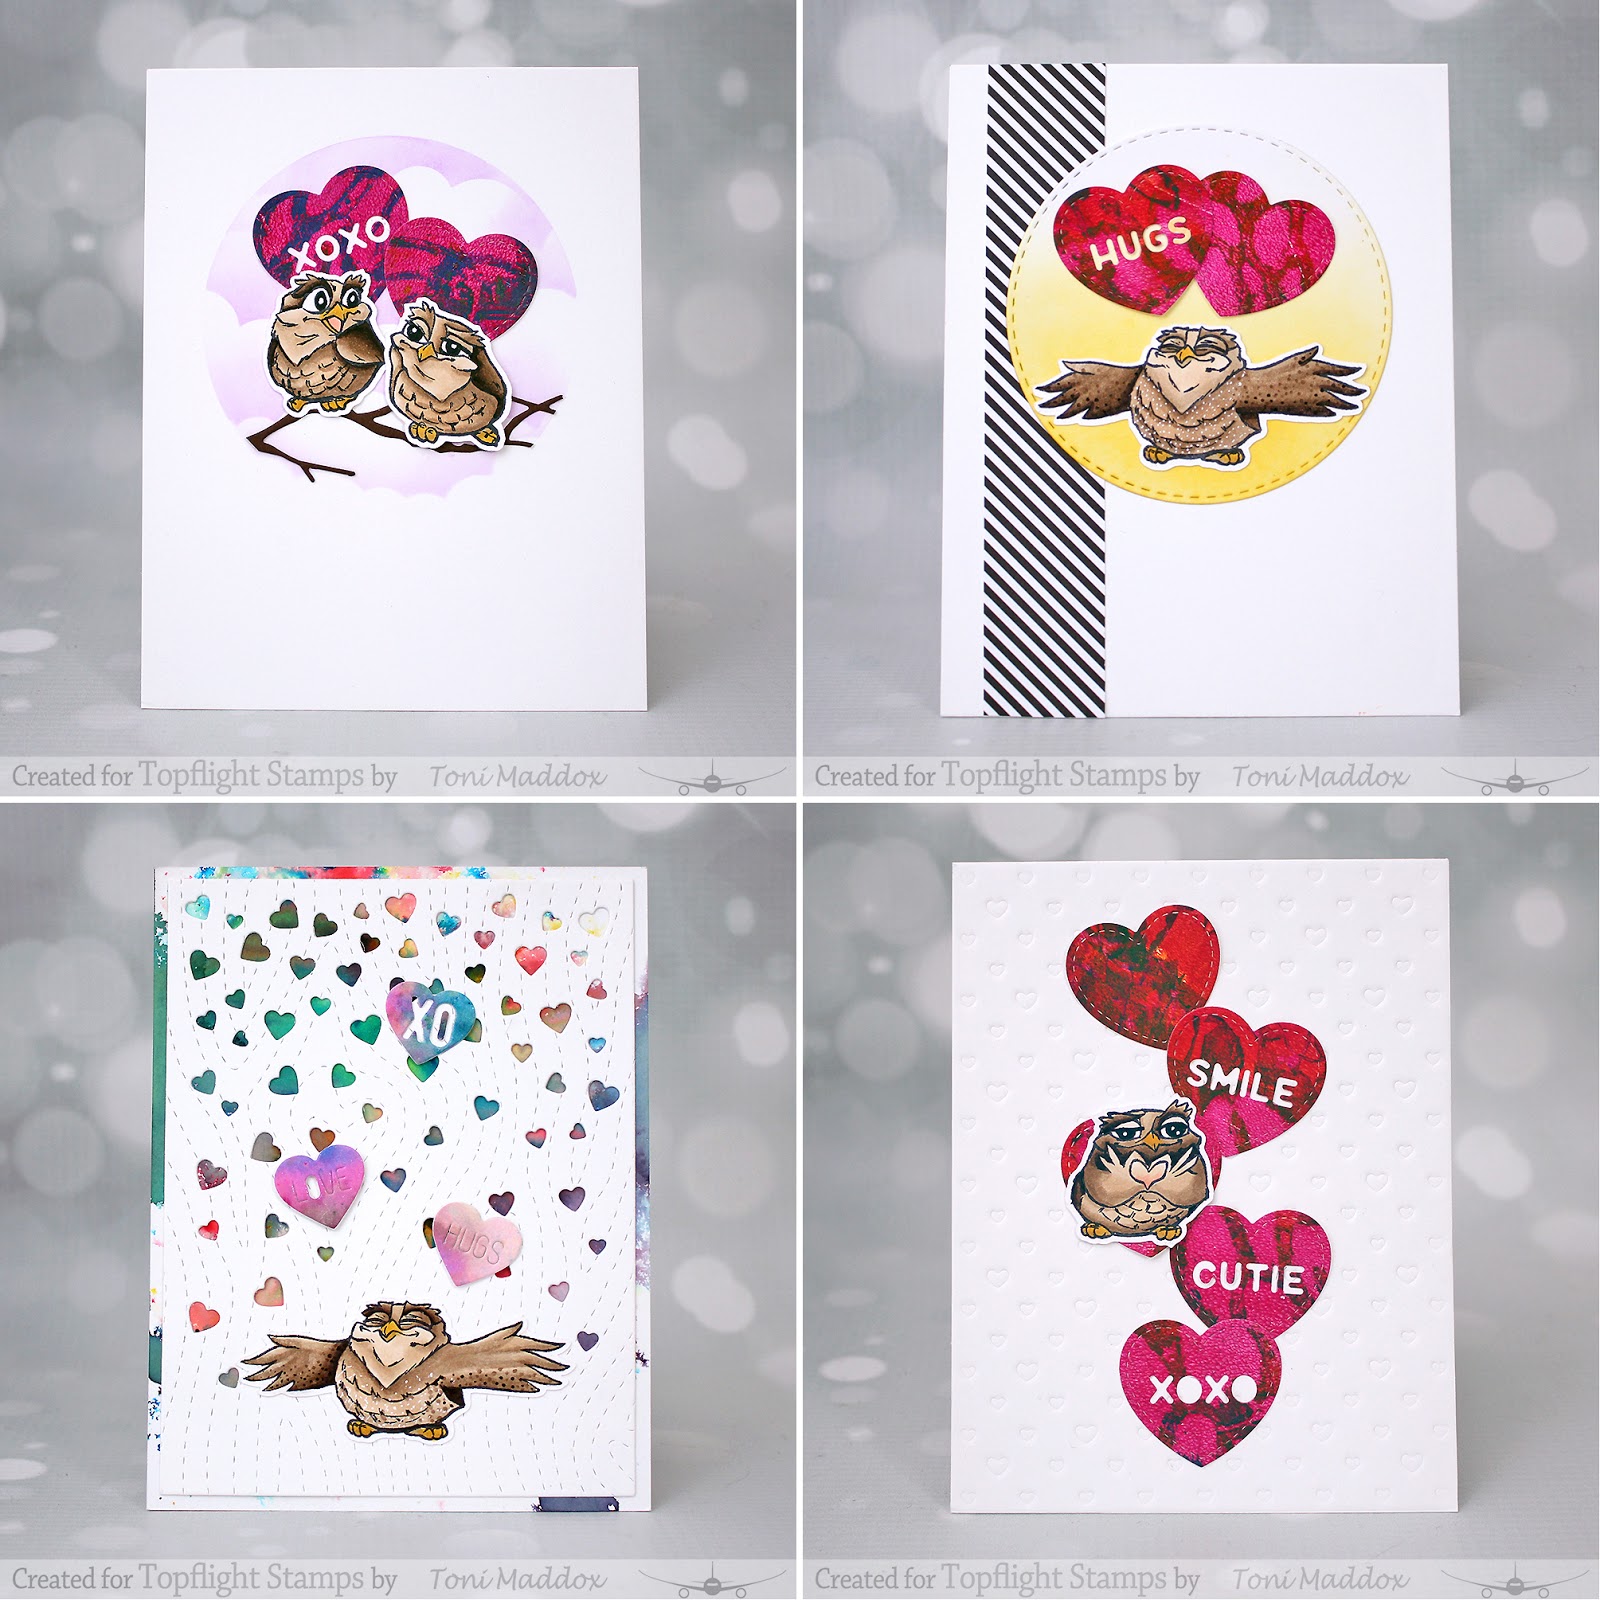
Oh my goodness!  I just cannot get enough of the Aall and Create Owl You Need is Love set so worked up these Valentines over the weekend.  They're my little bonus project for you in January and a bonus for me because I got 4 Valentines done lickity split!


Do you have a fav? Too hard to choose? My fav is the Smile Cutie one but I also like the more graphic Hugs with stripes one. But I'm a good card mom and won't tell any of them they're my fav. LOL

To see the full list of ingredients and to see more of my creations, check out my blog, Frankie Helps Craft.  See you next week!

Monday, January 28, 2019

That's Crafty | ATCoins Stamping

Hi everyone and welcome to the Topflight Stamps blog!  It's Jenny here, and this week I'm featuring the That's Crafty! AT Coins - these stamps co-ordinate with the MDF circles surface to create Artist's Trading Coins, and there are lots of different co-ordinating stamp sets.  

I didn't use the circles today, these will be featured in a future post, but instead I wanted to see what I could create using just the circular stamps.


For my first card I used the wood slice look stamp from the set and stamped it multiple times on kraft cardstock in green and brown inks.  

I then stamped the For the Love of Stamps Prickly Plants in black ink on a separate piece of kraft cardstock (I used simple masking on the planter with a post-it note) and colored them with Copics and a white gel pen, then fussy cut them out.


I popped the cactus onto the centre of the card with foam squares and then stamped the sentiment in dark brown ink directly onto the card base. I added a few Nuvo Jewel Drops in Key Lime to finish.


For my second card, I focused directly on the circle stamp itself and used a technique I recently saw my crafty friend Ardyth use.  I used my MISTI to stamp the circle mutiple times on a white panel of cardstock, shifting the panel up 1/2" each time.  I used a variety of blue and grey inks to create an ombre effect. 


The sentiment I stamped was from For the Love of Stamps - The Occasions Inserts set, stamped in black.  I then diecut the panel out with a stitched rectangle die and popped it up on a white card base using blue craft foam.  As a finishing touch, I added three different shades of Nuvo Drops. 

Hope you all have a wonderful day! Here are the other two stamp sets I used:


Friday, January 25, 2019

My Everything...


Happy Friday everyone.. Annette Allen back here with you this sweet Friday. I was at Creativation and I also got to take a fun PaperArtsy class with Donna. In this class we got this awesome new stamp set by Tracy Scott

Today I though I would show you just how fun it is. I just love all the flowers and cool designs that come in this set and really you could use it in so many ways. Today I am showing how you can use it in a card. 


I created the background with the 3x5 Gel Press and PaperArtsy Chalk Acrylics: Sherbet, Mermaid and Wisteria. I also used Stamperia: Optical Effect Circles Stencil. Very simple background to create. Did not take no time at all as you can see.  I went with a simple background. I did not want too much color but enough to blend with these pretty flowers.


For the sentiment I used 13@rts: Together stamp set. Today I am mixing it all up. Why not use as many as your crafty supplies as you can in one card.... Right?  

I stamped the flowers on a separate piece of card-stock and cut them out leaving a hint of white, use foam adhesives to give them some dimension and adhere to card. The sentiment I left for last and that was it. Totally easy card to create. 


Now it is time to shop...... get all your favorites at Topflight Stamps.
Thanks for stopping by.

Happy Crafting! 

Thursday, January 24, 2019

Valentine Lines

Hello Topflight fans, Ericka here with a quick Valentines Day card using some alcohol inks and a pretty sentiment from Craft Emotions.


I used some alcohol inks on yupo paper with a blender tool to get these fun bright lines.


This sentiment from Craft Emotions is the perfect addition to turn this into a Valentines Day card.


For more details on how I created this card feel free to check out by my blog Strangely Creative. Thanks for stopping by and have a wonderful rest of the week!


Wednesday, January 23, 2019

Layered Hearts


Hi, everyone!  Toni here with you today sharing a card that is an experiment in perspective.  I wanted to play around with using color to create visual depth, similar to what I do in my garden. Darker colors appear closer, lighter farther away.

I particularly love how the intense red really pops out, don't you?  I also love the interest added by masking and stenciling with the Aall and Create Quadrilaterals Stencil to create the hearts.  The design and transparency between layers is really cool.


Feel free to stop by my blog, Frankie Helps Craft, for a full list of ingredients and to see my other creations.  See you next week!

Monday, January 21, 2019

Overstamping Embossing Powder

Hi everyone and welcome to the Topflight Stamps blog.  It's Jenny here and today I'm joining you with a love themed card that uses some of my favorite brands from Topflight to create a monochromatic clean and simple look, featuring embossing powder overstamping.  


To create my card, I first stamped the Darkroom Door Love Word Block stamp onto white cardstock with embossing ink.  


I then heat embossed in Emerald Creek Rita Barakat Kiss of the Fairy embossing powder.  It's chunky so it really brings out the big sentiment letters well.  


I then die cut the stamp with a stitched rectangle die just slightly smaller than the image.  I also used the same die to cut some pink craft foam.  I love this foam - it's about 1/8" thick so you get some good dimension and it really lets the color of the foam peep out if you want it to. It's also self adhesive.  I adhered the panel onto a white card base.


I popped the entire card into my MISTI and arranged several of the butterflies from For the Love of Stamps Flutterby Wishes onto the embossed panel.  
I then picked them up with the MISTI door and stamped twice in black ink. The inked images overlay the cardstock between the embossing and while the embossing resists a little, with this black ink, it actually colors the EP a little. Even if it fully resists, your eyes will subconsciously fill in the gaps in the image!


My sentiment is by Studio Light (which comes in a set of three) die cut from gold mirror cardstock.  


I also die cut it again from the same pink fun foam and glued it together with liquid glue and then added it to the card.  As a finishing touch, I added some Catherine Pooler Inspiration Point sequins and a few dots of Nuvo Aztec Gold Glitter Accents to tie in the gold die cut.

I hope you'll give this overstamping technique a try!

Friday, January 18, 2019

Thanks...


Hi everyone.. Annette Allen here with you today to share a colorful and easy card. I created this card using a mix of three stamps sets.


I first stamped the background with the Carabelle Studio: Monoprinting Striped Lines Background using Tsukineko Radiant Neon 4 Trio. Normally I go for a perfectly stamped background but this time I did not because I wanted it to look faded. Next I stamped these gorgeous flowers from the AALL & Create: Blossomed Dreams by Tracy Evans stamp set. I used the same ink to color the images I just used a paint brush to pick the color off the ink pad. 

I splashed a bit of Copic opaque after I stamped this pretty sentiment from the Creative Expressions: Stylish Script stamp set. I felt like I need a little more so I added some NUVO Crystal drops to high light the black a little more and finished it up with a fun pattern border. 


All of these sets are available on the Topflight Stamps online store here.

Get creative and go wild with your stamps.
Thanks for stopping by.

Thursday, January 17, 2019

For You Rose

Hello Topflight Stamp fans! I hope your week has been a good one. It's Ericka here today with a bright watercolor card.


I used this floral stamp from 13@rts and white embossed it on some watercolor paper.

https://topflightstamps.com/products/13-rts-aida-domisiewicz-clear-stamp-set-time-flies

The flowers are so detailed and the scripty sentiment is so pretty. I masked part of it off so I could just use the top portion.


For more details on how I created my card feel free to check out my blog Strangely Creative. Have a wonderful Thursday and if you are traveling for Creativation I hope you have a safe journey and make lots of new friends!

Wednesday, January 16, 2019

Mondrian


Hello!  Toni here with a card inspired by the sentiment in 13@arts Aida Domisiewicz Numbers.  Paint your life happy indeed!


I considered how to illustrate that sentiment in an interesting way. I knew exactly what I wanted to do as soon as I spotted the Darkroom Door Mixed Boxes Stencil in my stash.  Can you see what I did to mimic Mondrian, sponging and masking Distress Ink (more intense than Oxides) then adding black dividing lines using a Copic Multiliner?


If you'd like to see a full list of ingredients or to see more of my creations, visit my blog, Frankie Helps Craft. See you next week!

Monday, January 14, 2019

13@arts | One Stamp Set, Four Cards

Hi everyone and welcome to the Topflight Stamps blog! 

It's Jenny here, and today I'm showcasing a stampset by Polish company 13@rts.  The set is called Flourish Garden, and has a shabby chic/mixed media feel.


I'll show you four different ways to use the set in different ways, to get very different looks.  I've created a video to see how I did it which you can view on YouTube:


Card 1 - Watercolor Rose
I took a panel of Arches Rough watercolor cardstock and put it into my MISTI. I placed the rose stamp in the centre of the panel and picked it up with my MISTI.  I then used a mini ink dauber to apply pink ink to the flowers.


I spritzed with water and then stamped onto the paper.  I dried it slightly with my heat tool and then repeated the step on the leaves with green ink.  I used my paintbrush to add more details with darker green ink and darker purple ink.  I heat embossed the sentiment in Antique Gold embossing powder over the top.


I die cut the piece with a stitched rectangle and popped it on craft foam onto a white card base.  I then added a few spatters with  black ink and dark green ink with a little water, letting the spatters go into the border.  I then decided I needed to add a bit more contrast, so I used my Faber Castell Polychromos and a white gel pen to add dimension to the leaves and flowers.

Card 2 - Heat Embossed Repeated Pattern

For my next card, I heat embossed the flourish from the set multiple times in embossing ink onto rustic cardstock using an acrylic block.


After each stamping, I heat embossed the image, re-applying the powder tool in between.  I alternated using WOW! embossing powder in Oyster Glintz and Rose Glintz.  I then trimmed the panel down to 4 1/8 x 5 3/8".


I took a strip of vellum and heat embossed the sentiment in WOW! Primary Ebony embossing powder.  I then wrapped the strip around the panel and secure it on the back with tape.  I also added a could of glue dots at the front.  The whole panel was added to a coordinating card base.

Card 3 - Layering Images

This card layers images to create the illusion of dimension. On a panel of white cardstock I stamped the scripty stamp a few times in pale grey ink.


I then layered the flourish image in embossing ink and heat embossed in WOW! Seaglass embossing glitter.  I stamped the sentiment in Versafine Onyx black ink and adhered the entire panel onto black cardstock and then a white card base.  As a finishing touch I added Nuvo Jewel Drops in Morning Dew and Sea Breeze.


Card 4 - Black and White

This card uses the rose cluster stamped multiple times in black and white and actually creates two cards for the price of one.  For this you need a panel of white and a panel of black cardstock of the same size.  Using a stamp positioner like the MISTI, stamp the rose image on the black cardstock in Versamark and then heat emboss - I used WOW! Opaque Bright White.  Don't remove the stamp - clean it off and then stamp a panel of white with black ink, and clean it off.   You can then move the stamp around and alternate in this manner.  You'lll then end up with two panels with the exact same pattern in black and white.


To finish the card, I trimmed the panel down diagonally in the exact same place on both panels.  I then adhered them onto a white card base, switching one piece so that the card is half white and black!  I stamped the sentiment in Be Mine pink ink for a pop of colour, and added some pastel sequins.


I hope I managed to show you the versatility of this stamp set - as you can see in the video, I had lots of other ideas!

01 09 10