Monday, February 28, 2022

Self Portrait - The Crafter

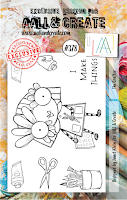
  It's time for a self portrait! This is Rachel from rkwrafts sharing this cute Polaroid Pop. I even have a quick process video to share at the end of this post. I used "The Crafter" stamp from AALL & Create to put this cutie together.


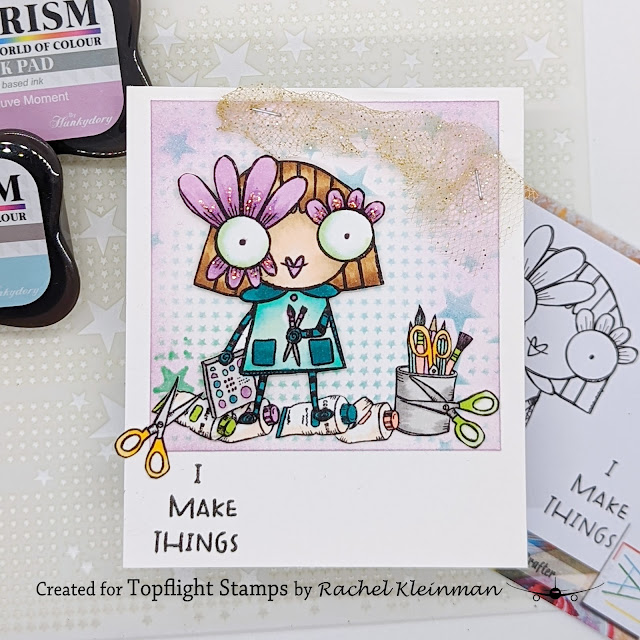
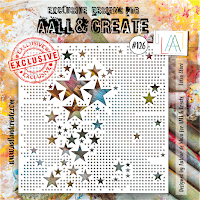
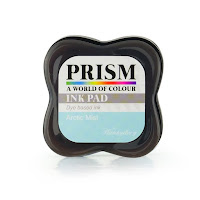
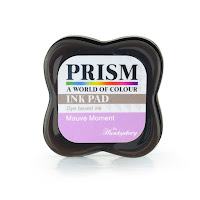
I colored the images from The Crafter stamp set with Copic markers and fussy cut with my Cutter Bees. The background was created with AALL & Create "Lotza Starz" stencil using Prism Ink in Arctic Mist. I then blended the edges with Prism Ink in Mauve Moment.


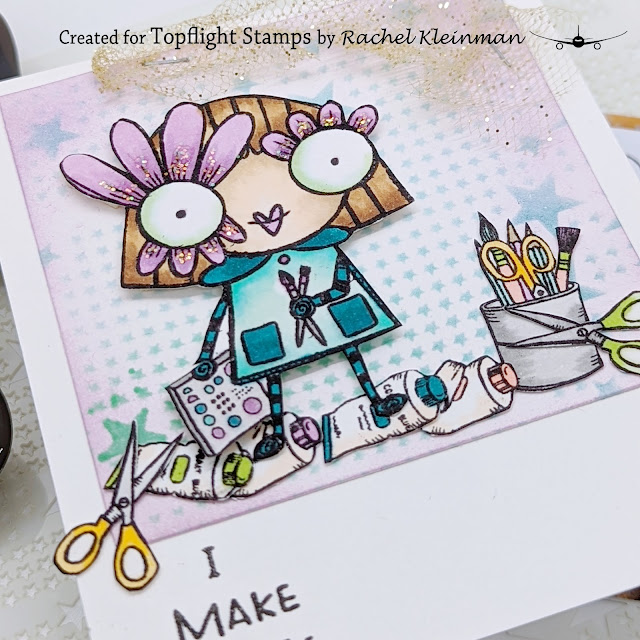
I added some gold tulle to the top, popped up the little girl with foam adhesive, and glued the images. Lastly, I made her eyes sparkle with Icicle Stickles.

I also have a short process video of how it all came together! Watch the video here!

TOPFLIGHT STAMPS SUPPLIES USED


Prism Ink - Arctic Mist


Sunday, February 27, 2022

Butterfly Slimline Card

 Greetings! It's Kathi here to share a project with you today. When I first saw the new Butterfly Illuminate Rubber Cling Stamp Set by Soraya Hemming for Carabelle Studio and the Illumination Stencil Mask by Soraya Hemming for Carabelle Studio, I knew that I had to have them soonest since they have such a cool Steampunk vibe to them. 

Here's my slimline card!


Onyx Black VersaFine Ink by Tsukineko was used to stamp all three of the gorgeous butterflies onto mixed media cardstock and onto repositionable label paper. The label paper butterflies were fussy-cut and placed atop their counterparts on the image panel as masks.

Periwinkle Prism Ink by Hunkydory Crafts was brushed over the masked butterflies, then brushed again over the Illumination Stencil Mask by Soraya HemmingSilver Dollar Prism Mist by Hunkydory Crafts was sprayed over the image panel to add shimmery silver splotches and splashes. Sadly, you'll have to take my word for it since it's not showing up as well as I'd like. 

The image panel was heat set and die-cut using a plain slimline cutting die.

The masks were removed and reserved for another use. The butterflies were colored with Zig Clean Color markers. I definitely need to improve my skill set with those markers. 

Silver glitter marker was used to add flight trails. Silver cardstock was die-cut with another slimline die and used to mat the image panel.

Please pop over to my blog, Kat's Tales of Stamping, for detailed instructions and complete supply lists.

Saturday, February 26, 2022

Hobby Art Goldfinch and Teasel Mixed Media Tag


Hi everyone!  It's Autumn Clark from SewPaperPaint with you today to share a lusciously inky tag featuring an absolutely incredible stamp set by Hobby Art, Goldfinch & Teasels.  Now you may remember my Christmas cards with the Jenny Wren stamp set I shared HERE and HERE.  If so, you will know just how much I adore Hobby Art's bird stamps.  I've taken liberty, yet again, to color them bird in my own way to coordinate with  my background...
 

I've been totally smitten with my new Lavinia Element dye ink pads, particularly the Merlot color.  I started by dipping my watercolor paper tag in Merlot, spritzed with plenty of water, then did a second dipping in Sahara.  Next I used those two colors, along with Russet Orange and Truffle to watercolor my "goldfinch".  I then stamped the various teasel stamps in first, second and third generation stamping in Merlot along the bottom of my tag.  I sponged the edges with Merlot and Sahara, then decided to add a little more dipping in Russet Orange to balance the colors.  I found some yellow bias binding in my stash and dipped it in watered Sahara to make it darker and attached a loopy bow to my panel.  I mounted the bird over a Tim Holtz die cut, to which I added crackle paste and Distress Crayon to age.  I liked the shape of it as a faux branch.  I hope this project has inspired you to get inky today!  Visit us on the @topflightstamps Instagram page for a fun video tutorial coordinating with this project.  You can also find the video on YouTube HERE.  xx, Autumn


 Visit Topflight Stamps today!


Friday, February 25, 2022

Katzelkraft Journal Page


Happy Friday and I hope you are all doing well. Ericka from Strangely Creative here with a mixed media journal page using Katzelkraft stamps. I've been playing around with my mixed media journal and having fun with the Katzelkraft Flowers and Nature and the Flowers set.

I started my page with a gel press print I created using PaperArtsy Fresco Paints in Aquamarine, Beach Hut, Mud Splat, and Truffle. I then started stamping the beautiful stamps in the Flowers and Nature set randomly on my paper with both white and Versamark ink and heat embossing it with WOW! Embossing Powder in Glassy Ocean.

I then added the butterfly image from the same set as well as a flower image from the Katzelkraft Flower set. I stamped them on an old book page and used distressed crayons to add color to them.

I added some more texture to my page with white splatters as well as some torn page strips.


Thank you so much for stopping by and I hope you have a chance to get crafty this weekend.


Topflight Stamps Supplies Used:


Thursday, February 24, 2022

Katzelkraft Nature Card

       Hi Everyone,

Cornelia here today! 
This week we are featuring stamps by Katzelkraft. 
I figured instead of my usual funny card I go with something more serene this time. Katzelkraft has a nature stamp line - but you probably know that. 
I made a smooshed background with an acrylic block and distress oxide inks (Mermaid lagoon, peeled paint, wild honey). I stamped the dill and butterflies on it. Added the word stamps in similar colored inks. 
I also stamped the butterflies again on heat resistant acetate and heat embossed them in black. Colored their backside with alcohol inks and cut them out. I colored the butterflies on the card with orange Inktense pencils. I glued the bodies of the cut out butterflied to the stamped ones and bent them a bit, so you can see the dimension. It's also nice when the light falls through the acetate. Added some white enamel accents to the wings. Also added some splatters.

I hope you liked this. Thanks for visiting. 
See you next week with more Topflight Stamps inspiration.
And here are the stamp supplies I used: 
       Versafine ink pad,                 Prism Dye Ink Pads


Wednesday, February 23, 2022

Katzelkraft Hilarity commence!

 Good morning!!!

The team is focusing on stamps from KatzelKraft this week.
Here are three cards using one Biter stamp set and a large sentiment
 set that are available for sale at TopFlight Stamps


Katzelkraft - A5 - KTZ241 - Unmounted Red Rubber Stamp Set - The Biters - JAB Collection

Katzelkraft - A5 - KTZ276 - Unmounted Red Rubber Stamp Set - WHATCHAMACALLIT


These stamps are unmounted meaning that you will need cling mounting
 foam if you use a stamp positioner, like a Misti.
 It is very easy to use, and you just need regular scissors to cut the stamp to size.

All three cards have a piece of an old gel print I made probably last year,
 and I incorporated them with coordinating colors of The Biters!


First card is this cat-thing. I stamped it with Copic friendly ink and then
 colored with Copic markers. Fussy cut it and adhere to the edge of the gel
print. Use dimensional foam
 tape to "lift" the cat and print from the card base.
Stamp a sentiment in Versafine Black Onyx and cut out each line.
 Adhere these strips to black card stock and cut that out. Use liquid glue to
adhere them to the gel print.


The next card is very similar, but I added a black frame die around these two friends.
For some silliness, I scribbled and doodled with a pencil all over the page.


I must admit, I had a blast making these! 
Now for the grand finale, these two dogs!!!!


I stamped the dogs, colored them and hand drew the border. I then glued a
 piece of the gel print, added another sentiment and laughed out loud!


So much fun! These stamps are so not my style, but
I think I convinced myself otherwise!

Please leave me a comment and let me know which one tickled your fancy!

Talk soon,
Charmaine


Tuesday, February 22, 2022

You Look a Little Flat

 Greetings! It's Tuesday, which means it's Kathi here to share a project with you. This week my teammates and I are showcasing Katzelkraft's wonderful stamps. When we received our upcoming assignments a while back, I had decided to make a get well card with the supine elephant from Les Jungles (Jungle Animals) Unmounted Rubber Stamp Set and the Sherlock Pabo from Les Pabos Series 1 Sherlock Holmes Unmounted Rubber Stamp Set. I must have been prescient since I was knocked flat by pneumonia, which was diagnosed a week ago and why I missed last Tuesday's post. Thankfully, the talented and gracious Lisa Hoel filled in for me. I'm on the mend and feeling well enough to craft again!

Here's my slimline get well card.


I started the card by stamping the elephant from Les Jungles (Jungle Animals) Unmounted Rubber Stamp Set onto white cardstock with Copic friendly ink and onto repositionable label paper. I used a Post-It note to cover the footprints part of the Sherlock stamp from the Les Pabos Series 1 Sherlock Holmes Unmounted Rubber Stamp Set, then inked the stamp, removed the Post-It Note, and stamped Sherlock so that the magnifying glass was over the elephant's trunk. I also stamped Sherlock onto repositionable label paper.

Both the elephant and Sherlock images that had been stamped onto label paper were fussy-cut and adhered over their counterparts on the image panel.

A slimline die was used to cut the image panel. The panel was left in the die, a piece of repositionable Scotch tape was placed horizontally across the image panel, and light green ink was brushed overtop to create a light green background with a white border. The Elegance Stencil by Lavinia Stamps was placed over the image panel (still in the die with the images masked) and slightly darker ink was brushed over the stencil onto the image panel to add a subtle jungle-leafy vibe. When I was happy with the result, I moved the tape to cover the top part of the image and brushed dark green ink along the bottom of the panel to ground the images.

The image panel was removed from the cutting die, the tape was saved for another day, and the masks were removed and reserved. 

Copic markers were used to color the elephant and Sherlock, then chalk pencils were used to add shadows below the images.

The top sentiment was computer generated and die-cut with a speech bubble die. The white cardstock was kept in the cutting die and green ink was brushed onto the die-cut.

Onyx Black VersaFine Ink by Tsukineko was used to stamp the "Get Well" sentiment from the More Classic Sentiments Clear Stamp Set by Heffy Doodle onto white cardstock and heat set. The sentiment was die-cut with a tag die. The white cardstock was kept in the cutting die and green ink was brushed onto the die-cut.

Larger slimline dies were used to cut patterned papers, the card was assembled, and the sentiments were added to finish the card.

Please pop over to my blog, Kat's Tales of Stamping, for step-by-step instructions and complete supply lists.

01 09 10