Happy Monday friends! It's Autumn Clark from SewPaperPaint with you to share some fun ideas using PaperArtsy Infusions pigment powder. If you know me, you can testify that I am a terrible procrastinator. Sometimes I just hate that about myself, but sometimes with art projects I procrastinate and let ideas sort of "marinade" in my mind and then go wild when the time comes to get things done. This was the case today and I am so glad it was! I kept trying and trying to think of a new idea for Infusions powders and I think I have come up with one, a way to use them for embossing resist. For my pair of tags, I've used opposite colors to show you how you can achieve a layering effect. Because these pigment powders are extremely water reactive, they need to be sealed somehow if you want to add any wet medium on top. My solution was this:

I used Versamark reinker and a
brayer, spreading a thin layer of reinker onto my
gel press printing plate. I like using the plate for stamping with paints because it is a little soft, so I figured it would work well with Infusions too. I used seven drops of reinker and several shakes of
Raspberry Infusions. I sprayed just a couple of drops of water as needed to help the pigment spread. I used it as an "ink pad", brayering smooth between stamping. I embossed my images with clear powder, which stuck beautifully to the Infused Versamark ink. I ended up having a ton of pigment left on my gel press, so I spritzed with water and made all of the other backgrounds shown here, as not to waste the pigment. I didn't emboss them for time sake. The trick was continued spritzing and brayering between stamping. I washed my brayer and gel press with soap and water and a little brush because they got a little sticky from the Versamark ink drying out while I stamped, so don't do this if you've built up a lot of good paint on your plate that you want to use for a paint pull because it will get washed off.
*Update: Instagram video tutorial
HERE
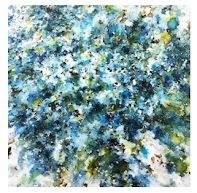
The moment of truth cane to see if my embossed pigment bled: I spritzed my embossed tags with water then sprinkled on A Bit Jaded Infusions and let the colors run around. They did NOT mix with my embossed portions and I was so happy! I truly cannot wait to try this technique again.
I pulled out my Prism Ink Pad color chart and found a perfect match to A Bit Jaded, the
Peacock Green Prism ink pad. I made another panel of dyed Raspberry and then embossed the flower by Tracy Scott in Peacock and clear EP. So far we have, embossing, stamping, spritzing, now we have dipping and watercolor. I used a Sizzix die and a water brush for the foliage and added some contrast to my flower with a white Posca pen.
I decided to let my tags flatten under some books and moved onto another panel to play. This time I used my stamped and spritzed background with another of Tracy's dotty mini stamps. I mixed in a stamp set by Sara Naumann for the foliage this time.
To get this fluffy flower, I simply spritzed the stamp while positioned on my stamp platform with water. I spritzed the brayer too, then sprinkled on Infusions and moved the pigment around with the brayer and stamped onto three sheets of copy paper. I then lined up the three sheets and cut them all out as one, easy peasy. I glued the centers together and crinkled the layers. It was a very effective way to stamp and left the most beautiful watery effect on the images.
Finally, I soaked a whole sheet of copy paper in water and added a little more A Bit Jaded Infusions, folding the paper over and wrinkling it to help the color blend out. I cut a long strip folded it into thirds to cut out the fabulous
First Edition Doily Die. (Die cutting thin paper requires layers, so double or triple up!) I was inspired to try this by my latest adventures in making tea stained paper. Oh the possibilities!
I love the doilies tucked into my tags for texture! So let's recap. Take some time to play with your PaperArtsy Infusions powder and try the following. I hope you're inspired! Hugs, Autumn
Embossing
Stamping
Spritzing
Dipping
Watercolor
Brayering
"Tea staining"
Check out the assortment of PaperArtsy Infusions at Topflight Stamps today!!


