Monday, January 31, 2022

Lovebirds for Valentine's Day

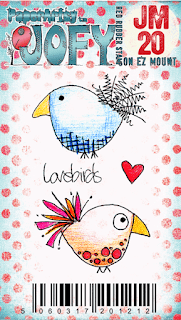
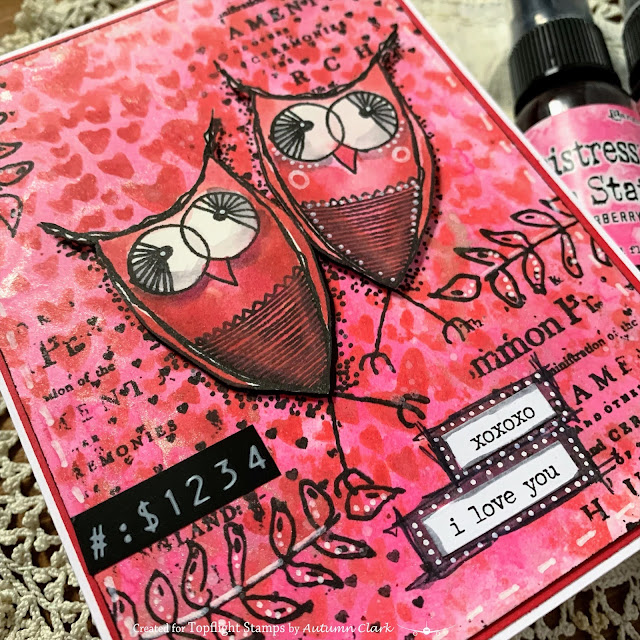
 Happy Monday everyone! This is Rachel today sharing another sweet (or should I say "tweet"?) Valentine card with you. This card features a darling mini stamp from JOFY. I love adding mini stamps to my stash because they're affordable, versatile, and always super cute!


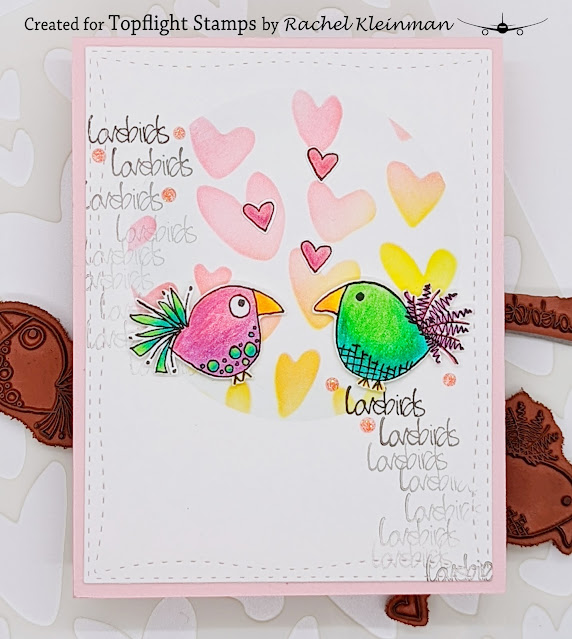
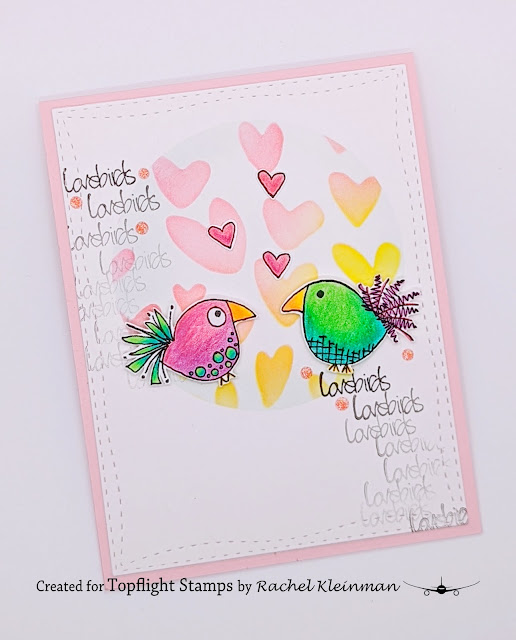
I really enjoyed coloring a variety of birds in funky colors, and I picked my two favorites for the card. The stamp is JOFY Mini Stamp #20 and I colored the birds with Faber Castell Polychromos pencils. When you receive the stamp, it is all connected as one piece. I cut the images apart so I could use them more freely... I promise no stamps were harmed in the making of this card!


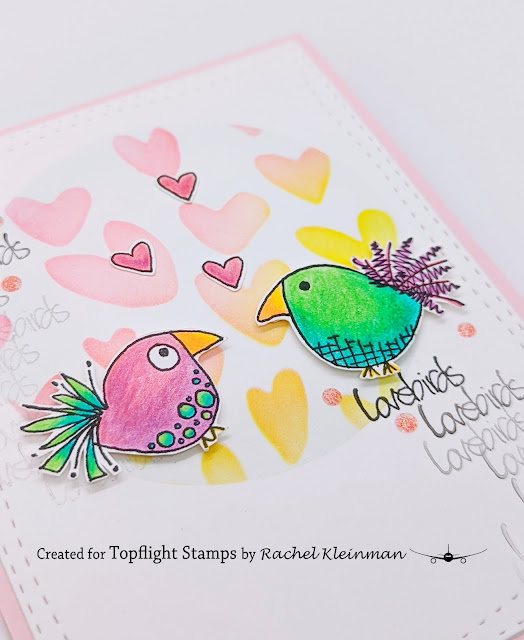
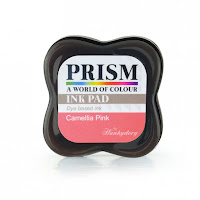
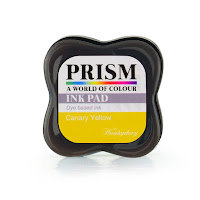
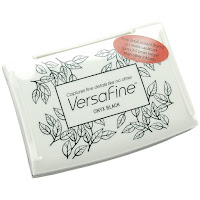
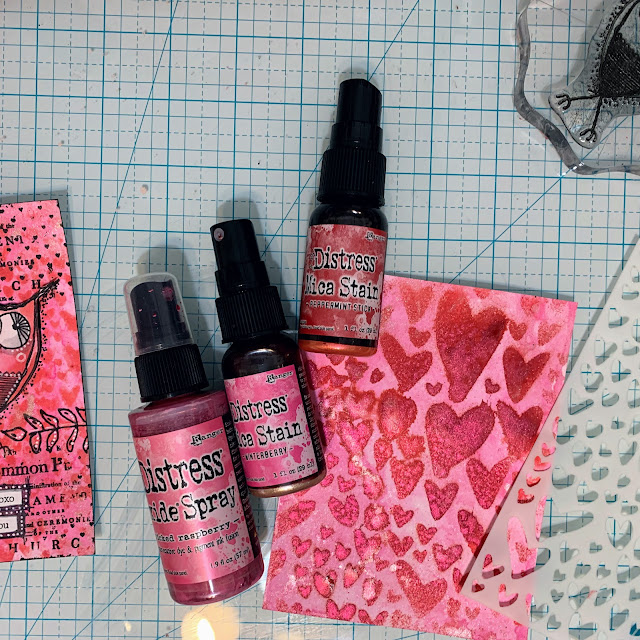
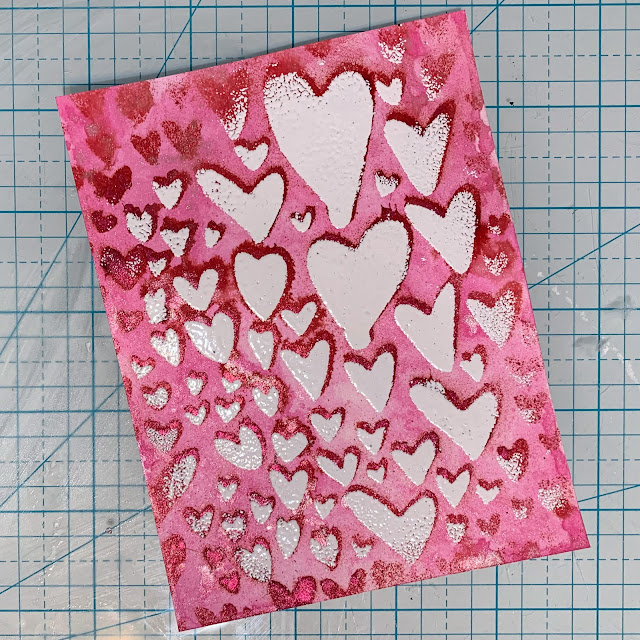
The background was created by first making my own circle mask using a large circle die. I placed the circle mask on top of my card panel, then place the AALL + Create Hung Up on Hearts stencil on top. I blended over the stencil using Prism Inks in Canary Yellow and Camelia Pink. I was sure to overlap some of the ink to mix a subtle orange color in the center. I then removed the AALL + Create stencil and lightly blended the edge of the circle mask with Prism Ink Arctic Mist to make the shape more defined. Finally, I stamped the sentiment multiple times using Versafine Onyx Black ink.


Thanks for stopping in! I hope you have a very creative week ahead!

Topflight Stamps Supplies Used:


Sunday, January 30, 2022

AALL & Create Owl & Heart Valentine Cards


Hi friends!  It's Autumn Clark from SewPaperPaint with you today to share some fun mixed media Valentine inspiration featuring gorgeous AALL & Create stamps from Topflight Stamps.  For this set of cards, I focused on using the fun Owl stamp set by Tracy Evans.  I LOVE owls and knew that these stamps would make fun Valentine cards.  

For my first card, I made an inky background and then stamped the Reverse Hearts repeatedly along the edges, along with an older stamp set by Tracy (#304: Heartfelt).  I stamped the Scripted hearts and added some watercolor detail for contrast.  Then I stamped the owl onto the panel and again onto another panel, which I fussy cut and mounted above the first stamping.  This way the details along the edge of the owl weren't lost and I was able to add dimension and a pop of color.  I stamped the word owl and then finished the sentiment by punching out some old school label tape.  I used a credit card dipped in my black ink pad to make the cross hatched lines along the edges.  (Honestly, I did this because I smeared the black ink I used to edge the panel and needed to camouflage it somehow.  We all make mistakes with stamping sometimes and it's best to find a way to work past it, rather than get frustrated and throwing our work in the bin!  ;0 )  In the end it looks intentional and I like how it frames the piece. 


Next, I made a pink inky panel and stamped the Reverse hearts again with more of the Heartfelt background stamp.  This time I stamped two owls and layered them.  I added some white Posca marker details to one to make it more feminine.  I added some stickers by Tim Holtz and then stamped that gorgeous leafy border from the Owl set, finishing with more white paint pen details. 


For my last card I used my Distress Mica Spray through the Hung Up On Hearts stencil.  The red was a little much for me!  The spray feathered out too much and I didn't like how dark it was, so I set it aside and then later had the idea to do the "Stencil Bumping" technique by PaperArtsy, but I used embossing ink and embossed with white powder instead of using paints.  I really liked how this turned out!  I slightly offset the stencil over the inky pattern and smooshed my Versamark pad through the stencil.  I brushed away the embossing powder where there were any harsh lines and the result was a beautiful white center with some of the red showing along the edge. 


I remembered one of Tracy's very old lives from her FB group where she used the packaging from embellishments to make a little shaker.  I had saved some for ages since seeing her do that.  And I thought it would work great with this background since it was large and wouldn't cover up any of that cool stencil work.  I wanted to repeat the layered stamping, so I used Staz-On ink and put an acrylic block inside the packaging to make it into a sturdy, stampable surface.  I was able to stamp the owl and layer a separate fussy cut and I added another label tape sentiment.  I used Beacon 3-1 glue to adhere the shaker, filled with heart sequins, to the card panel.  I'll share a video on Instagram so you can see it in action.  :)  I hope these cards have made you smile today!  xx, Autumn

Shop AALL & Create at Topflight Stamps!


(#304 is discontinued)

Friday, January 28, 2022

Jane's Doodles Whales Birthday Tag


Happy Friday! Ericka here from Strangely Creative and I'm continuing the Design Team theme using Jane's Doodles stamps. I decided to make a mixed media tag using the Whales set along with some Hunkydory Prism Glimmer Mists and Brushmarkers in Lagoon. 

I started by spraying the Prism Glimmer Mists in Glamour Gold, Boy Blue, and Midnight Black on my large media tag. I also used the mists on some cheesecloth and set it aside to dry.  I stamped some of the whales and plants and cut them out using my Brother Scan and Cut. I then used the Brushmarkers in a variety of blues to color them up.

I used Multi Medium Matte to adhere the colored cheesecloth to the tag. At the bottom of the tag I used the WOW! Embossing Mixed Media Brush to apply Sparkling Sand and Oiled Slate embossing powder for a sandy look. I then used foam tape to adhere my whales and plants to the tag. I stamped the birthday sentiment in black ink and then used a blending tool to add black ink around the edges of the tag.

Thanks for stopping by and I hope you have a wonderful weekend filled with some fun craft time.


Topflight Stamps Supplies Used:


Thursday, January 27, 2022

Jane's Doodles - Thanks a Chameleon

     Hi Everyone,

Cornelia here today! 
This week we are featuring stamps by Jane's Doodles. 

I first stamped the Chameleons and colored them with Copics. Stenciled the background. Added the sentiment. Also added some leaves, some of which I cut out and others I just stamped onto the card. Trimmed the card and added a strip of designer paper at the bottom.
I hope you liked this. Thanks for visiting. 
See you next week with more Topflight Stamps inspiration.
And here are the stamp supplies I used: 

Chameleon            Elegance
 
Blender Brushes                  Prism Dye Ink Pads


Wednesday, January 26, 2022

Jane's Doodles ~ New Adventures by Charmaine Canham

 Happy Wednesday

This is my second card using the same stamp set, Jane's Doodles Happy Camper, that I used on Wednesday this week. I used an easy repeat stamping with masking technique to make this cozy forest. 

New adventure by Charmaine Canham for TopFlight Stamps


Start by stamping 4 trees and the tent on masking paper. Fussy cut these. Plan your card before you put ink to paper. Make sure you want the trees in the front, in the front. 


I then added the tent in the middle. I wanted the tent to be in-between the trees. So I stamped the tree first, then added a tree mask. Then I stamped the tent and masked the tent. 


Now for color!!  I gave all the trees an overall YG Copic color. Added darker greens to the shadows and under the branches. 


Now for my magic trick!! Use a white gel pen and a black fine marker to highlight the edges of the branches and darker the outlines of the trees and tent. I also added the ground and sky colors. 


I added a whimsical border
  and stamped the sentiment with Verafine. 

New adventure by Charmaine Canham for TopFlight Stamps


I want to go camping now!!!! 

Also, try to stretch your stamps! This was Wednesday's card👇 Check out that blog.


I hope you liked this card and will give masking a try!!!

Talk soon,

Charmaine 

Tuesday, January 25, 2022

Penguin Birthday Card!

Greetings! It's Tuesday so you've got Kathi here to share a project with you. This week my teammates and I are showcasing Jane's Doodles Clear Stamps, which are absolutely wonderful.

I love penguins, so I was delighted to find that there were two sets in the range. I decided to use the absolutely adorable Sweater Weather Clear Stamp Set to create a shaker card.

Here it is!


To create a scene with the penguins holding hands while skating, I stamped the middle penguin onto a white cardstock panel and onto repositionable label paper, which was fussy-cut, then placed over him. The penguins on the right and left were stamped onto the image panel and onto repositionable label paper, which was fussy-cut and used to mask them.

I cut a wavy border onto copy paper, then brushed Periwinkle Prism Ink by Hunkydory Crafts overtop.

A grey Copic marker was used to trace the outside of an elongated oval die to create the skating rink.

The masks were lifted and retained for later use and the images were colored with Copic markers. Grey Copic markers were used to add detail and dimension to the snow and ice, then Frost Shimmer dauber was applied to the ice rink using a paint brush. More glittery accents were added with a clear glitter pen, then the image panel was set aside.

VersaMark ink was used to stamp the Snowflakes Background Stamp by Darkroom Door onto blue cardstock, then white and sparkly white embossing powder was heat set. 

The snowflake background panel was trimmed, die-cut, then the aperture and the panel's edges were sponged with VersaMark, then the same embossing powder was heat set.

The Frost Shimmer Dauber was applied to a white cardstock banner and heat set. The sentiment was stamped using Paradise VersaFine Clair Ink by Tsukineko, heat set, and adhered to the image panel with dimensional foam in the center, and glue at the ends.

Acetate was adhered to the back of the background panel to cover the aperture. 3D Adhesive Foam Roll by Hunkydory Crafts was applied to the perimeter of the window to create a well for the shaker contents, which were added.

The image panel was adhered to the background panel to seal the aperture, then added to an A6 card.

Please pop over to my blog, Kat's Tales of Stamping, for more detailed instructions and complete supply lists. 

01 09 10