Showing posts with label tags. Show all posts

Thursday, April 30, 2026

Strawberry Tag with PaperArtsy

Hello all!  This week at Topflight Stamps we are focusing on the PaperArtsy brand.  It's a vast category, they have so many products in our store!  For my tag, I began with a couple of Fresco Chalk Paint in two colors:  Spring and Winter Green and paired them with PaperArtsy Alison Bomber PS487 and PS472 Large Stencils.  After the background was dry, I carefully glued down some petite strawberry plants, courtesy of PaperArtsy Alison Bomber Strawberry Edition stamp set.  They'd been stamped with VersaFine Onyx Black ink on scrap white cardstock, colored and fussy-cut.  I also stamped and cut out the words that come with that stamp set:  botanical, medicinal, floral and herbal, and added them on here individually.  There's a round label that comes with the set too, and I used that, plus a postage stamp image from the PaperArtsy Alison Bomber Rosehips Edition stamp set.  They decorate a piece of abaca ribbon I've had for decades.

Hope you have a beautiful day! ~ Colleen


Supplies Used From Topflight Stamps:


Monday, May 24, 2021

Trio of Tags with IndigoBlu

 Hello Topflight Stamp Fans, Karen Bearse here to start the week off with all things IndigoBlu. This UK family owned, small business makes stunning, high quality red rubber stamps. Another craft session happened with me making multiple projects at the same time. To see what else I made during this session come back on June 12th for a bonus blog post.  Join me in the FUN!!! 


Let's start with some tag toppers. After my last play session with the Sideways Waterfall, I wanted to continue on with that thought so the stamped tag toppers were born. Just love using these images in such a different way. For a full tutorial & list of stamps used with links you can see my blog post here.


 Look at all the great images from just a few of the IndigoBlu sets. So many more are available in the shop here.  


 All the images were stamped & embossed with Burmese Jade powder. 


 The main tag was covered with Art by Marlene collage paper. There are quite a few packs to choose from. 

The leaf topper was colored with Infusions- in A Bit of Jade & Emerald Isle. They were used as a watercolor element which was a different way to utilize these wonderful pots of color.


 Of course you need an embossing ink. The stamp pad by Wow really increases the chances of embossing success. That is it for this week mixed media shenanigans. I hope you have an awesome week of inkiness.

Monday, January 25, 2021

Embossing Resist with PaperArtsy Infusions Powder


Happy Monday friends!  It's Autumn Clark from SewPaperPaint with you to share some fun ideas using PaperArtsy Infusions pigment powder.  If you know me, you can testify that I am a terrible procrastinator.  Sometimes I just hate that about myself, but sometimes with art projects I procrastinate and let ideas sort of "marinade" in my mind and then go wild when the time comes to get things done.  This was the case today and I am so glad it was!  I kept trying and trying to think of a new idea for Infusions powders and I think I have come up with one, a way to use them for embossing resist.  For my pair of tags, I've used opposite colors to show you how you can achieve a layering effect.  Because these pigment powders are extremely water reactive, they need to be sealed somehow if you want to add any wet medium on top.  My solution was this:


I used Versamark reinker and a brayer, spreading a thin layer of reinker onto my gel press printing plate.  I like using the plate for stamping with paints because it is a little soft, so I figured it would work well with Infusions too.  I used seven drops of reinker and several shakes of Raspberry Infusions.  I sprayed just a couple of drops of water as needed to help the pigment spread.  I used it as an "ink pad", brayering smooth between stamping.  I embossed my images with clear powder, which stuck beautifully to the Infused Versamark ink.  I ended up having a ton of pigment left on my gel press, so I spritzed with water and made all of the other backgrounds shown here, as not to waste the pigment.  I didn't emboss them for time sake.  The trick was continued spritzing and brayering between stamping.  I washed my brayer and gel press with soap and water and a little brush because they got a little sticky from the Versamark ink drying out while I stamped, so don't do this if you've built up a lot of good paint on your plate that you want to use for a paint pull because it will get washed off.  
 
*Update: Instagram video tutorial HERE


The moment of truth cane to see if my embossed pigment bled: I spritzed my embossed tags with water then sprinkled on A Bit Jaded Infusions and let the colors run around.  They did NOT mix with my embossed portions and I was so happy!  I truly cannot wait to try this technique again.


I pulled out my Prism Ink Pad color chart and found a perfect match to A Bit Jaded, the Peacock Green Prism ink pad.  I made another panel of dyed Raspberry and then embossed the flower by Tracy Scott in Peacock and clear EP.  So far we have, embossing, stamping, spritzing, now we have dipping and watercolor.  I used a Sizzix die and a water brush for the foliage and added some contrast to my flower with a white Posca pen.


I decided to let my tags flatten under some books and moved onto another panel to play.  This time I used my stamped and spritzed background with another of Tracy's dotty mini stamps.  I mixed in a stamp set by Sara Naumann for the foliage this time.


To get this fluffy flower, I simply spritzed the stamp while positioned on my stamp platform with water.  I spritzed the brayer too, then sprinkled on Infusions and moved the pigment around with the brayer and stamped onto three sheets of copy paper.  I then lined up the three sheets and cut them all out as one, easy peasy.  I glued the centers together and crinkled the layers.  It was a very effective way to stamp and left the most beautiful watery effect on the images.


Finally, I soaked a whole sheet of copy paper in water and added a little more A Bit Jaded Infusions, folding the paper over and wrinkling it to help the color blend out.  I cut a long strip folded it into thirds to cut out the fabulous First Edition Doily Die.  (Die cutting thin paper requires layers, so double or triple up!)  I was inspired to try this by my latest adventures in making tea stained paper.  Oh the possibilities!


I love the doilies tucked into my tags for texture!  So let's recap.  Take some time to play with your PaperArtsy Infusions powder and try the following.  I hope you're inspired!  Hugs, Autumn

Embossing
Stamping
Spritzing
Dipping
Watercolor
Brayering
"Tea staining"

Check out the assortment of PaperArtsy Infusions at Topflight Stamps today!!


Monday, September 21, 2020

Tracy Scott Floral Feather Stamp Mixed Media Tag


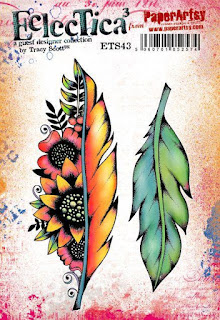
Happy Monday stampers!  It's Autumn Clark from SewPaperPaint with you today to share a couple of mixed media projects based around the new PaperArtsy mixed media feather stamp set by Tracy Scott, ETS43.  This stamp is wildly popular, so if you find it is unavailable on the Topflight Stamps website, make sure to sign up to be notified when it comes in.  


I had an idea of a cascading tag book with the feather as the bottom, leading up to one of Tracy's butterfly stamp.  I chose ETS22 and used the flowers from the set to fill in my middle layers.  I stamped each design on a sheet of gel printed paper (I used my 8x10" plate for these prints).   I taped a tag die in place and cut to the point of each stamp design where I thought it would cascade nicely.  I used leftovers to stamp portions of the images to pop out.  I will share a flip through video on my Instagram (@sewpaperpaint).  I used some of Tracy's mini stamps to add more pattern to the tops of each tag.


This is the card I made for you the week before last, but didn't get a chance to post it here to the TFS blog because we were on a last minute vacation.  I used the same stamp set by Tracy, this time using both feathers, layered for a boho look.


I know we all face the problem when playing with our prints that some portions of our prints are just better than others.  Here you can see how I took a variety of pieces and layered them together to make my card background.  The end result is filled with texture!  So save those scraps and do piecework when you can.  Thanks so much for joining me today.  Have a creative week!  Hugs, Autumn


Topflight Stamps Goodies (Click to shop)


Monday, October 14, 2019

Mixed Media Monday Making Tags!

Karen Bearse here for Mixed Media Monday & we are making tags! I had so much fun playing with inky products and lots of nummy stamps. There is a tutorial on my blog, a 3 step way to make quick & fun tags. You can check it out here. 


Lot's of great products were used to create these pretties, like stamps:


Autumn Nights by Indigo Blu, Gothic Crow by Crafty Individuals, Live Life Now by Visible Image. 


Shine Bright by Indigo Blu
Inks by Prism in colors like Fire Coral, Cinnamon Swirl, Ocean Spray, Canary Yellow, French Navy, & Blue Lagoon, Slate Grey & Thundercloud.


Premier Stamping Press by Hunkydory. 

Seth Apter embossing powder by Emerald Creek in Lime and Crimson. These can also be bought in kits.


 Diamond Sparkles by Hunkydory in Festive .

These tags were so much fun to make I hope you get the chance to make some! You can also use these techniques to make cards, ATC's or Art Journal pages. Thanks so much for joining me today!!!

01 09 10