Showing posts with label paper rose. Show all posts

Thursday, November 6, 2025

Say "Thanks" in Style!

Hello, Lisa Hoel here. This week at Topflight Stamps our focus is on making thank you cards. You can never have too big a stash of those on hand!


Lisa Hoel for Topflight Stamps #creativejuicefreshsqueezed #topflightstamps

I found a beautiful new stamp in the store – "William Morris Strawberry Thief" by IndigoBlu and I knew I wanted to make good use of it. I tried a few different colorways and these two are my favorites! I paired it with a bold "thanks" sentiment cut using the Paper Rose Layered Thanks die set.

Thanks for stopping by and be sure to check out the Topflight Stamps store for a wide selection of different and hard to find stamps, stencils and other paper crafting supplies from all around the world! Also keep an eye here on the Topflight Stamps blog. There is new inspiration posted often!

Topflight Stamps Supplies Used:

IndigoBlu stamp - William Morris Strawberry Thief

Paper Rose die set - Layered Thanks


Wednesday, August 6, 2025

IndigoBlu Steampunk Cottage Card

Hello, Lisa Hoel here. This week at Topflight Stamps our brand focus is on IndigoBlu. I created a Steampunk themed card set using the new Steam Cottage stamp for the focal image. It has such great detail!


Lisa Hoel for Topflight Stamps #creativejuicefreshsqueezed #topflightstamps

I cut the card base using the Counting Circles die set and added some gears I cut with a Paper Rose set. I raided my handy stash of Gel Press prints to use as a bottom layer on the front.

Thanks for stopping by and be sure to check out the Topflight Stamps store for a wide selection of different and hard to find stamps, stencils and other paper crafting supplies from all around the world! Also keep an eye here on the Topflight Stamps blog. There is new inspiration posted often!

Topflight Stamps Supplies Used:

IndigoBlu Stamp Set - Steam Cottage

IndigoBlu Stamp Set - Wrapped

IndigoBlu Stamp Set - Fly High

AALL & Create Die Set - Counting Circles

Paper Rose Die Set  - Cog Frame
Gel Press print
watercolors


Thursday, July 18, 2024

A Clean and Simple Christmas Card + a 25% off Sale

 Hi friends. Alanna back again on the blog with another Christmas card. Make sure to scroll to the end of this post to see how you can save 25% on all Christmas and winter themed products. Sale is valid until July 21st.

For this card, I started by stamping the Hanging Ornaments stamp set from Paper Rose with alcohol marker friendly black ink. I then colored the ornaments with my Olo markers. I then restamped the image using my Versafine Claire Nocturne ink. I stamped the sentiment and then trimmed down my white panel.

I decided to take my scoring board and I added some score lines to the top and bottom of the card. I also added in some sparkly silver twine. I added foam tape to the back of this panel and popped it up onto a red A2 notecard and that finishes off this card.

Find these products used in the Topflight Stamps store below.


Saturday, November 11, 2023

A Pair of Congrats Cards with Dinkles Ink Powders

 Hi friends. Alanna back on the blog today with a pair of cards featuring the Butterfly Garden collage stamp from Darkroom Door. I love the detail on this image.

To get started, I took some Dinkles Ink Powders from Lavinia Stamps in the Sea Blue color and sprinkled just a little bit onto my card panels. I then sprayed the panels with some water to activate the powder and get the color to move. When I was happy, I sat these aside to dry. I got to work stamping the Butterfly Garden image with Versafine Claire Nocturne ink onto white card stock. I trimmed my images down so that there was no white border. 

I glued my backgrounds to white A2 notecards and then added my stamped focal image on top with foam tape for added dimension. I finished off the cards by adding in a die cut sentiment, the Layered Congrats die from Paper Rose (currently on sale) as well as some pearls from my stash.

Purchase the products I used on my cards today below in the Topflight Stamps online store.

Crafty hugs! ~ Alanna

Sunday, November 13, 2022

Coffee Lovers Blog Hop


Topflight Stamps is one of the super sponsors of the Fall Winter Coffee Lovers Blog Hop. It wouldn't be a blog hop without a chance to win great prizes. Click the link above for information on the hop and how you can enter to win $25 gift card to the Topflight Store and other great prizes. The hop ends on November 18th! Enjoy the hop!

My name is Kathi and I am a coffee addict! I decided to participate in the blog hop and created a shaker card using the Perfect Blend Clear Stamp Set by Heffy Doodle, the coffee patterned paper from the Travel Light 6x6 Patterned Paper Pad by Paper Favourites, the Scalloped Rectangles Frame Die Set by Paper Rose, and six  Prism  Inks by Hunkydory Crafts.

Here's my card!


The to-go cup from the Perfect Blend Clear Stamp Set by Heffy Doodle was stamped onto white cardstock, colored it with Copic markers, fussy-cut, and edged with a dark marker. Red Brick Prism Ink by Hunkydory Crafts was used to stamp the tiny heart from the You Go Gull Clear Stamp Set by Heffy Doodle onto the cup sleeve.

Dusky RosePink Jelly BeanFlamingo ParadiseCamelia Pink,  Red ChiliRed Brick,  Prism  Inks by Hunkydory Crafts were brushed onto a piece of white Bristol paper, misted with water, and heat set.

The smaller frame die from the Scalloped Rectangles Frame Die Set by Paper Rose was used to cut the inked paper. The center part of the frame was removed and reserved to use for the sentiment. The aperture of the frame and the frame's scalloped edges were sponged with Red Brick Prism Ink.

Acetate was adhered to the back of the die-cut covering the aperture. Foam tape and shaker contents were added, then coffee-cup patterned paper from the Travel Light 6x6 Patterned Paper Pad by Paper Favourites was used to seal the the shaker.

 The sentiment was stamped with Monarch VersaFine Clair Ink by Tsukineko onto white paper, heat set, and die-cut with a circle die. Little sparkly hearts were adhered around the sentiment. The inked paper, from the inside of the frame, was die-cut a the scalloped circle die.

Another piece of the same coffee-cup patterned paper was trimmed to 5.25" square and adhered to a 5.5" square card. The shaker frame and sentiment were adhered to the card. The fussy-cut coffee-cup was adhered to finish the card. 

Please pop over to my blog, Kat's Tales of Stamping, for instructions and complete supply lists. 

Topflight Stamps Products Used: 


Thanks for visiting!

Thursday, November 3, 2022

Simple Christmas Cards with DIY&Cie Die Cuts

 Hi Everyone,

Cornelia here today. This week it's anything goes at the Topflight blog
So I decided to make some more Christmas cards. I have a feeling I fell behind - for sure not going to
be enough - AGAIN!
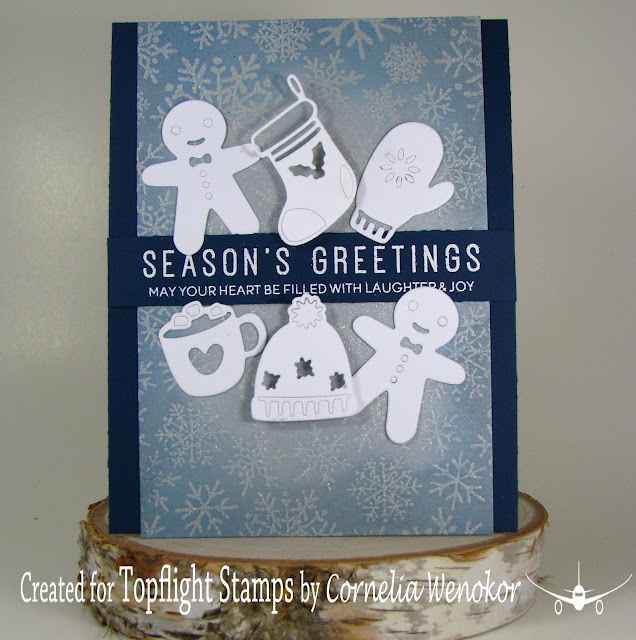
I discovered this cute little die cut set in the store. I liked it so much that I made two cards! For my first card I created the background with the Snowflake background stamp form Darkroom Door. I heat embossed it and sponged around it, using more color on the outside and left a lighter center. Added teh die cuts and the het embossed sentiment.
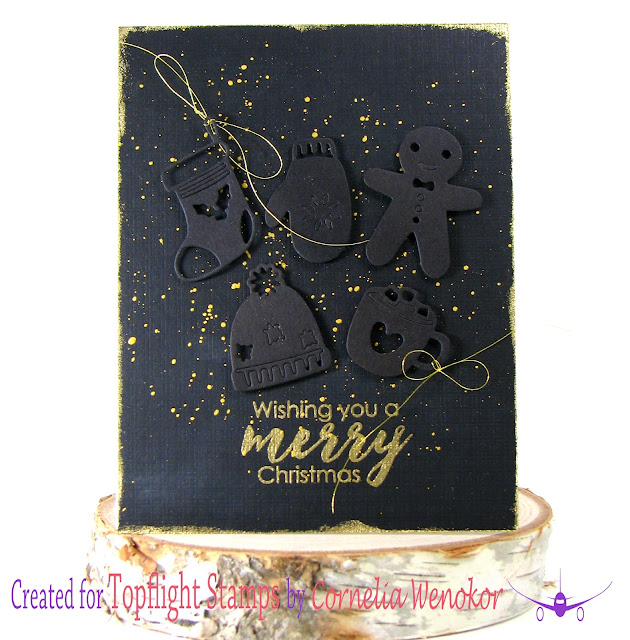
I used black card stock for the second card. I used foam tape to add the die cuts. Heat embossed the sentiment and borders in gold and added gold splatters, as well as a little gold thread to some of the die cuts. 

I hope you liked this. Thanks for visiting. 
See you next week with more Topflight Stamps inspiration.

And here are the stamp supplies I used: 


Tuesday, September 20, 2022

The Most Wonderful Time of the Year -- Halloween!

Greetings! It's Tuesday so you've got Kathi here to share a project with you. I've created a Halloween card with the  Poe's Ravens Rubber Cling Stamp Set by Marty Crouz for Carabelle Studio and sentiments from the Miss Merry Clear Stamp Set 608 by Janet Klein for AALL and Create and the Classic Sentiments Clear Stamp Set by Heffy Doodle. The background was created with the Distressed Brick 6x6 Stencil  by Paper Rose.

Here it is!


A stamping platform was used to both position and stamp the ravens and the candle holder from  Poe's Ravens Rubber Cling Stamp Set by Marty Crouz for Carabelle Studio onto white cardstock and onto label paper that was fussy-cut to mask the images.

The bottom portion of the image panel was covered with a ruler and grey ink was brushed over the masked images to create a grey background.

Grey and a touch of reddish ink was brushed over the Distressed Brick 6x6 Stencil  by Paper Rose to create a brick wall behind the ravens.

The stencil was removed, the ruler was repositioned, and tan ink was brushed below the wall to create a wooden table top for the ravens.

All the masks were removed and the images and the wood table were colored with Copic markers.

Two speech bubbles were die-cut, then Onyx Black VersaFine Ink by Tsukineko was used to stamp the sentiments from the Miss Merry Clear Stamp Set 608 by Janet Klein for AALL and Create

The image panel was trimmed to 4.75" square and adhered to a white 5" square card. The sentiment die-cuts were adhered to finish the card.

Please pop over to my blog, Kat's Tales of Stamping, for step-by-step instructions and complete supply lists.

Topflight Stamps Products Used:


Thanks for visiting today!

Wednesday, August 31, 2022

A little Christmas - Paper Rose


Tomorrow is the first of September, and Christmas is right around the corner!! Here are three quick shaker cards that are guaranteed to wow your friends and family!

This is from Paper Rose 20613, Nativity Tree.
Start by die-cutting three A2-sized heavy cardstock bases. 


Apply tape to the back of the base and adhere the clear acetate , slightly cut smaller than A2. Then use double sided foam tape to make a "dam" for the shaker elements .


Place/adhere the glitter cardstock to "seal" the card in the back. Die cut the enclosed "O Holy Night" and adhere it to the front.


I did add three rhinestones to the right of the tree to off-balance the script.


Here is another Paper Rose die for Christmas, https://topflightstamps.com/products/paper-rose-christmas-scene-die
You better get to work on your Christmas cards!!! It will be here before you know it.

Talk soon,
Charmaine


Thursday, July 14, 2022

Christmas in July

  Hi Everyone,

Cornelia here today. This week it's Christmas in July on the Topflight blog. As you see I could not stop making Christmas cards.....Ended up with a little pile. I go this awesome stamp by Paper Rose and it's so easy for mass producing cards! That usually is not something I aim for, but when it comes to Christmas I make an exception, LOL!

I stamped the trees. Made myself a mask  for the ground and sponged above the mask on four of my cards.  
Added water, white and black splatters on some of the cards. Stamped the sentiment. this set conveniently comes with sentiments in all different sizes in a very pretty font. Added some gem stones onto two of my cards. 

I hope you liked this. Thanks for visiting. 
See you next week with more Topflight Stamps inspiration.

And here are the stamp supplies I used: 


Winter Trees                   Hunkydory Gems
Medieval Blue                                Versafine


01 09 10