Showing posts with label CraftyPaws. Show all posts

Sunday, September 30, 2018

Here Comes Santi-Paws!

Today's card design came to me when I realized that the spotted Dachshund from the Katzelkraft Dogs Stamp Set looked like the sweet pup, Max, from "The Grinch Who Stole Christmas." I thought that with the sleigh from the Katzelkraft Sleigh Stamp Set and a pile of presents that I could make from the presents under the tree from the Katzelkraft Sleigh Stamp Set and the presents from the Katzelkraft Funny Accessories Stamp Set, I could create a fun slider assembly. 


I first Copic colored all the images and fussy cut out all the pieces I wanted to include. Then with a bit of doodling for the faux reindeer antler and a little craft surgery to foreshorten Max's body and keep his ears flapping free, I put together Max riding in a sleigh filled with Christmas presents. 


I wanted to keep the card background simple so as not to distract from the main puppy act so I simply blended on some Distress Ink in Tumbled Glass and Broken China and then punched out some clouds using some Fiskars punches. The slider mechanism was easy too. I used some Lawn Fawn Stitched Hillside dies to create one long wavy snowy hillside on some heavy weight card stock. Because the slider assembly was so large, I wanted the sliding distance long enough to appreciate the interactive element so I made the card 4" x 8.5".


I used a metal ruler and an X-Acto blade to cut out a slider opening almost the full length of the hillside. I then attached small, but thick, foam dots to a scrap of heavy weight cardstock and lined it up so that the foam dots would come through the slider opening. Then I popped up the entire outside edges of the snowy hillside piece with thick foam dots (if you only have fun foam or thinner foam dots, you can double them up). Then I attached the doggy sleigh assembly to the small foam dots from the front of the slider opening.

As often happens to me, I forgot to stamp my sentiment onto the snowy hillside before putting the whole card together. Because now the hillside was too unevenly popped up to stamp on, I simply wrote out with a Distress Marker in Black Soot, "Here comes Santi-Paws!" in the lower left corner. 


The slider mechanism works perfectly, and I think the Grinch-loving recipient will really enjoy this fun, interactive card. If you're interested in more details about the products used to create this card or to watch a process video, please check out my blog post HERE. Thanks for joining me today for my last Topflight Stamps - Katzelkraft Stamps guest designer post!

Sunday, September 23, 2018

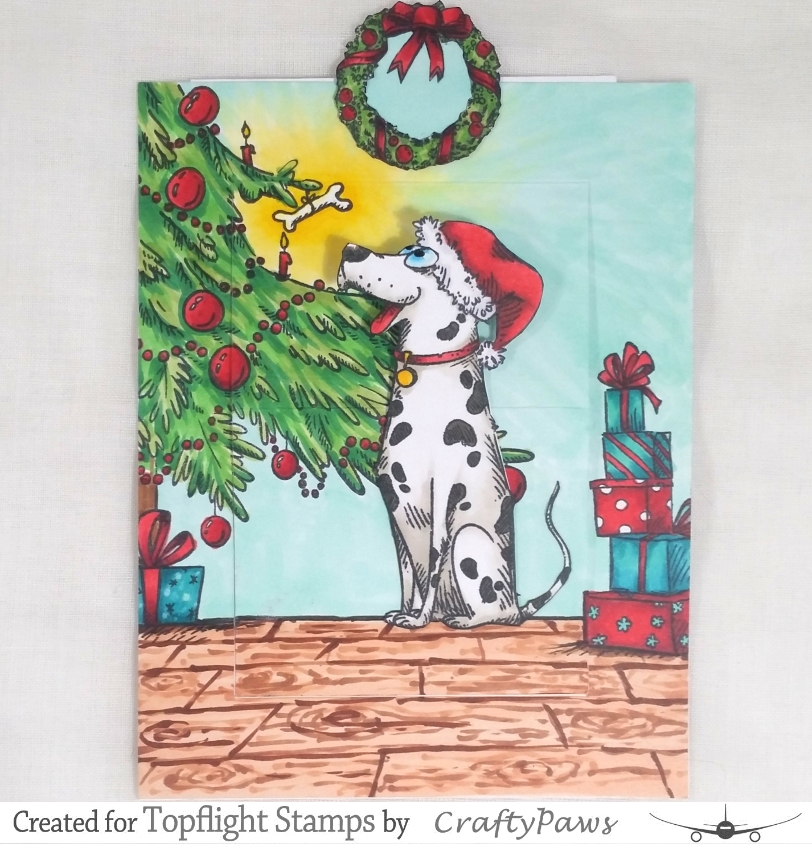
Doggy Christmas Pop-Up Slider Card

Hey Topflight fans! Today I'm sharing a doggy-themed Christmas slider pop-up card using stamps from Katzelkraft Dogs, Katzelkraft Funny Accessories, and Katzelkraft Sleigh Stamps.


I chose the Dalmatian from the Dogs Stamp Set as the focal point of my card. I Copic colored him and fussy cut him out, taking care to also fussy cut around his eyes about halfway down so that I could position the Santa hat from the Funny Accessories Stamp Set fully onto his head.


For the card front background, I used the Christmas tree base from the Sleigh Stamp Set and using a 0.1 pt Copic Mulit-liner Pen I doodled a bit more of the decorated Christmas tree in order to extend the height of the tree. I also doodled a dog bone hanging from a tree branch as a special doggy-themed Christmas decoration. To fill out a little more of the background scene I added a stack of presents to the right side of the panel from the Funny Accessories Stamp Set, and then Copic colored/drew in a wood floor and the rest of the scene.


Pop-Up Mechanism: Cut the A2 (4.25" x 5.5") card front as follows:

  • Use an X-Acto blade and cut 0.75" from the left, bottom and right sides of the card; be sure to leave the top 0.75" at the top side uncut. 
  • Turn the card with the top of the card toward the left and using a score board, score at 0.75", 2.5" and 4.25" between the cut lines (which were on the left and right sides of the card front but are, now that the card is turned, at the top and bottom of the card).
  • Burnish the scored lines so that it forms a valley at the 4.25" line, a hill at the 2.5" line and a valley at the 0.75" line.


Slider Mechanism

  • Cut a smaller slider piece of cardstock to 3.25" 4.75"
  • Use Scor-Tape (glue works too) on the back of the bottom smallest section of the Pop-Up Mechanism; from the 4.25" line to the cut edge.
  • Attach the smaller slider piece of cardstock, centered and lined up to the edge of the bottom smallest section of the Pop-Up Mechanism.
  • Now use Scor-Tape (glue works too) on the back of the card front around the left, bottom and right sides, beyond the cut pop-up mechanism area and attach this to an A2 sized card base.
  • Optional: You can cut out a thumb window at the top of the cardfront and/or add a pull tab to the top of the smaller slider piece of cardstock. I did both and took the opportunity to create a pull tab using the Christmas wreath from the Katzelkraft Sleigh Stamp Set

I hand wrote and used a couple of other stamps from my stash to add a sentiment on the top half of the slider piece that says: "Have you been naughty or nice?" and stamped on the bottom half of the slider piece: "Merry Christmas". For a bit more embellishment inside the card, I also stamped a box full of bones from another old stamp from my stash, and I colored it up to match the stack of presents on the right side of the card.


If you're interested in more details about the products used or a process tutorial video on how to make this card, please check out my blog post HERE. Thanks for joining me today!

Sunday, September 16, 2018

Thanksgiving Double Slider Card ft. Katzelkraft Dogs

Hi Topflight fans! Kristina CraftyPaws here today sharing how to make a double slider card (with no special dies) for double the fun with Katzelkraft Dogs dressed in a Pilgrim bonnet and top hat from the Katzelkraft Pilgrim stamp set


I first Copic colored the Husky and the Basset Hound as well as the Pilgrim bonnet and top hat. Then I fussy cut them and set them aside. Then I prepped the various panels to create the double slider card structure as follows:
  • Front Panel, Slider Mechanism Panel and Back Panel: 4.25" x 5.25"
  • Slider Mechanism Panel (positioned horizontally) is then cut with top to bottom slits 0.25" away from either side, and 0.75" away from the top and bottom
  • Left Slider Panel is cut 3.25" x 4 5/8"
  • Right Slider Panel is cut 3.25" x 5 1/8"
  • Then a strip of heavy duty plastic is cut to 2.5" x 11", this is looped through the slits of the Slider Mechanism Panel and secured with strong double sided tape like Scor-Tape

Before everything is assembled together, I had fun decorating. The front panel was cut from black cardstock and layered with kraft corrugated cardstock and then a lemon yellow cardstock and then embellished with Autumn-themed Jolee's Boutique stickers. The corners of the plain yellow cardstock were further decorated with Pixie Press metal flourish corners (I love mixing the ornate with the simple like this).


The left and right slider panels were decorated to create simple scenes by blending on a light, cloudy sky using a handmade scallop-edge mask and Tim Holtz Distress Ink in Tumbled Glass. The ground was made with more blending using Tim Holtz Distress Ink in Twisted Citron and Mowed Lawn. Then I put the right facing Basset Hound with the bonnet on the left panel and the left facing Husky with the top hat on the right panel. To complete the scenes and add a sentiment, I printed from my computer two speech bubbles. The Basset Hound says, "HAPPY," and the Husky says, "THANKSGIVING."


The assembly at this point is easy. The right panel is adhered to the plastic loop on the left most side of the loop before it goes through the slit. The left panel, facing forward, is adhered on the back of the slider mechanism panel on the plastic loop on the right most side of the loop. Then for some clearance I added double sided foam adhesive to the top and bottom of the slider mechanism panel before adding the decorated front panel over top. I repeated this on the back of the slider mechanism panel before adding the plain back panel (where I'll write my message to the card recipient).


It was so much fun to craft this doggy bountiful double slider card. Thanks for joining me today! If you're interested in more product details or in watching a process tutorial video of creating this card, please check out my blog post HERE.


Sunday, September 9, 2018

Happy HOWL-oween!

Hello Topflight fans! Kristina CraftyPaws back here as a guest designer each Sunday for the rest of September to help showcase the awesome latest Katzelkraft products. I am a huge fan of Katzelkraft stamps and I was thrilled to see that they came out with a lot of new stamp sets that would coordinate with existing sets that I already love and own.


For this HOWLoween interactive scene card, I used the Doberman and Beagle from my absolute favorite Dogs Stamp Set along with the witches hat from the Funny Accessories Stamp Set, the small witches hat and haunted mansion from the new Halloween Stamp Set, and the cape and broom from the Pilgrim Stamp Set


I Copic colored all the stamped images, except the haunted mansion, which I used as a silhouette for the background. I then fussy cut all the pieces out and combined the witches hat and the cape on the Doberman, cutting the pup's ears and re-attaching them behind and around the hat to make them more visible and slightly trimming the cape to fit the dog's body a bit better. I gave the beagle the smaller witches hat and tucked him around the broom so that he could be flying through the air.


For the background, I made a mask with a circle die and some thick cardstock and blended on some Distress Inks in Mustard Seed and Squeezed Lemonade to create a bright moon. I next used the cut out circle as a mask over the moon and blended on Distress Inks in Seedless Preserves, Dusty Concord and Chipped Sapphire to create a night sky. To soften the edges of the moon and give it a bit of dimension, I blended on a little Seedless Preserves around the edges. Lastly I stamped the haunted mansion so that the turrets would be silhouetted by the moon and add interest to the background.


To create the foreground, I used the Lawn Fawn Stitched Hillside Pop Up Die with extra heavy weight black cardstock and attached it to the card at the center fold. For an added bit of interactive fun I added a clear plastic piece (salvaged from some craft packaging) to the the back hill with a tiny brad and glued the bloom riding Beagle to the other end. The Beagle can now swing ... or fly through the air! I glued the witchy Doberman to the front hill, looking up to his flying buddy. As a finishing sentiment, I used a VersaMarker Pen and heat embossed "Happy Howloween" to the card base.


I had so much fun dreaming up and crafting this card. Thanks for stopping by for a "spell." If you'd like more detailed resources info or to watch a tutorial video of creating this card, please check out my blog post HERE.

Thursday, June 28, 2018

Simple Pug Dog Cards Loaded with Personality!

Hey Topflight fans! As my last design team project post, I wanted to share some doggy cards. The adorable Pug dog from the Carabelle-Studio "To Be Or Not To Be" stamp set has such personality, I knew the moment I saw it, that it would be perfect for a slew of occasions for any dog lover.


For my first card, the hipster glasses and the adorable wrinkles on the Pug's forehead, seemed to scream out for a partial, top-only stamping with a cute accompanying saying, "Just popping up to say..." with the inside of the card saying, "Happy Birthday!" (or it could be finished off with so many other sayings, like "Hello!" or "Surprise!") (the sentiments are from the Neat & Tangled "Out of the Box" stamp set). I kept the vast majority of the card front crisp white, and Copic colored the image, including reflection lines on the eye glasses with a Uniball Signo White Gel Pen. I also added Black Sakura Glaze pen for the eye glass frames and Ranger Glossy Accents for the eye glasses.


For the second card, I wanted to play off the concerned expression of the Pug so I used a sentiment from the Mama Elephant "In My Heart" stamp set that says: "MISS YOU more than just a little." Because I wanted to keep this card super simple, I used VersaMark Ink and Ranger Super Fine Black Embossing Powder to stamp the image and the sentiment. 


Then, to add a pop of color, I heat embossed a little heart by the sentiment and the eye glass frames with Ranger Adirondack Brights Watermelon Pigment Ink and clear embossing powder. This bit was somewhat tricky in that I had to hand fussy cut the inside and outside of the eye glass frames and then heat emboss this tiny, delicate piece; but it was well worth the extra effort for this added dimension and interest.


For the third and final card, again, compliments the Pug dog's worried expression. This time, I stamped the dog head at an angle at the lower right corner of the card front and doodled in the top part of his body with Copic Multiliner Pens in 0.1 pt and 0.03 pt. Then I Copic colored the full image, adding Uniball Signo White Gel Pen reflection marks on the glasses. Then I used the "So Sorry I Forgot!" sentiment from the Gerda Steiner Designs "Howl Are You?" stamp set. The inside card liner is stamped with "Happy  Birthday," and "BELATED" both also from the same Gerda Steiner set. For a bit of whimsy, I spaced out the words so that I could use a Red Ultra Fine Point Sharpie marker to add a red carrot to indicate the insertion of the "BELATED".


It's been an honor to be on the Topflight Stamps design team. I had such a wonderful time. I hope you've enjoyed my projects along the way as much as I've enjoyed creating and sharing them with you all. If you're interested in more details about the products I've used on these cards or a process video of crafting them, please check out my blog post HERE

Thursday, June 21, 2018

Doctor Who Anniversary Card

I can't believe it, but I'm actually ahead of schedule for my hubby's anniversary card! Our anniversary isn't until September, but when I picked up the Visible Image "Ahead of Our Time" stamp set, I knew I wanted to craft a special anniversary card for Mr. CraftyPaws with them, and I couldn't wait. The spiraling clock face, the falling people, and the open door stamps reminded me of the various scenes in "Doctor Who" where characters fall out of the Tardis time machine and adventures ensue with story options spanning all of time and space. My hubby is a huge Doctor Who fan, and I knew this theme would speak to him. 


To set the scene I created a galaxy background sprinkling and spritzing Ken Oliver Color Bursts in Ultramarine Blue and Indigo with water on Strathmore Bristol Paper. I blended Black Soot Tim Holtz Distress Ink along the edges to create a darker, more dramatic galaxy look. Then I splattered watered-down titanium white acrylic paint with an old toothbrush to add a starry look.


I wanted the stamped images to stand out from the background so I used VersaMark Ink and Ranger Black Embossing Powder to heat emboss them. I positioned the images so that it would look like the man and woman were falling out of the open door into a spiraling time warp. To connect the clock a bit more with the falling couple, I added more black splatter dots that start at the top of the time warp stamp with a Sakura Black Glaze Pen.


Now at this point, you may be thinking that this scene is not really appropriate for an anniversary card, but I think the sentiments (which I printed from my computer) bring it all together. I took a quote spoken by the Tenth Doctor: "People assume that time is a strict progression -- It's more like a big ball of wibbly wobbly timey wimey stuff." and combined it with another saying about true love: "You've found true love when you fall in love with the same person over and over." I cut apart the sentiments, inked the edges with more Black Soot Distress Ink and popped them all up on double sided foam adhesive for a bit of dimension.

I hope Mr. CraftyPaws enjoys this anniversary card as much as I enjoyed crafting it. If you'd like more information about the supplies I used or are interested in watching a process video of me crafting this card, please check out my blog post HERE. Thanks for joining me today!

Thursday, June 14, 2018

Zentangle and Copic Coloring a Butterfly

The Leane Creatief  "Doodle Butterfly 2" stamp is deceptively simple and yet so beautiful! And the open spaces in the sections of the butterfly are perfect for zentangle art as well as traditional Copic or color pencil coloring.


This is the first time I've tried zentangling (is that a verb?), and I am in love! It truly is very zen to sit and doodle and try different designs and patterns. Using Faber Castell Pitt Pens in XS, S and B point sizes, I had a blast making each butterfly I stamped onto a card front unique. 


Then to add some color, I used a Copic B00 to color the spaces between the butterflies and a couple of color pencils to add some depth of color in the nooks and crannies of the butterfly wings.


I separately Copic colored a butterfly with a few other blue markers, adding some dot details with a Signo Uniball White Gel Pen. Fussy cutting out this butterfly and adding some foam dots behind the wings, I popped this butterfly onto the card base that I first layered with a smaller sheet of vellum for some visual softness. I secured the vellum to the card base with glue just under the butterfly and under strategically placed sequins.


As this is a Fathers Day card for my dad, for the sentiment I heat embossed "Thank You" in Korean from the Altenew Oriental Orchid Stamp Set. I popped this up on foam dots for some dimension and took this opportunity to tack down the vellum in hidden spots again.


Although might not think of a butterfly stamp for a masculine card, I think the black and white graphic nature of the zentangling and limiting the actual coloring to blues, made this beautiful but totally appropriate for a Fathers Day card. If you'd like more details about the products I used or to watch the start-to-finish video of crafting this card, please check out my blog post HERE.


Thursday, June 7, 2018

Funny Punny Farm Animal Cards

Hi Topflight fans! Katzelkraft critter stamps have some of the best expressions, and the Katzelkraft Farm Animals Stamp Set does not disappoint. These animals are perfect for whimsical, punny cards. 


For my first card, I used the cow grinning from ear to ear under the sentiment, "My grandfather was a knight," which I printed from my computer. Inside, the card liner continues, "His name was Sir Loin." (yuk yuk). And under that sentiment, I stamped out the steak stamp from the Lawn Fawn "Let's BBQ" stamp set.


For the second card, I used the laughing donkey stamp along with the karate person kicking from the Diemond Dies Karate Die Set #1 to make a silly Fathers Day card. I printed from my computer the partial sentiment, "Hope your Father's Day is..." and then I added the kicking person plus the donkey to pictograph the words, "Kick Ass."


To maintain a CAS look, I first die cut the kicking person from white fun foam, but because I thought the dimension was not enough to give it enough visual weight to stand up to the donkey, I added a lemon yellow kicking person die cut over top. 

So that the karate person didn't look like he was floating, I used a Tim Holtz Shatter Stencil and Tumbled Glass Distress Ink to indicate where the kick had hit and shattered a background of glass. I masked off the donkey before blending on the ink through the stencil using a Clarity Stamp Stencil Brush, which enabled me to gradually soften the broken glass look to blend to the white of the card front.


Thanks for joining me today. I hope you enjoyed these cards as much as I enjoyed crafting them. If you're interested in more details about the products I used or to watch the crafting process video, please check out my blog post HERE

Thursday, May 31, 2018

Oceanic Fun!


Summertime means oceans and animals to this SoCal-at-heart girl (I no longer live there but I'll always be a beach girl). So when I got the Creative Expressions Whale of A Time Stamp Set, I knew I wanted to make fun summer CAS cards.


For all three cards, I used Tim Holtz Distress Oxide Inks in Broken China, Salty Ocean and Blueprint Sketch to create deep ocean ombre backgrounds. I varied the amount of the card front that was inked up but because the colors used were the same, there is a consistency to the card set. I also splattered water on them to create a splotchy, more watery effect.


Then for the first card, I used a scrap of Bristol Paper that I had inked up and sprayed with Ken Oliver Color Bursts to stamp out and fussy cut five jellyfish from the stamp set. The fussy cutting was a bit intricate, but it was well worth the dimension and detail. I doodled some black and white squiggles and swirls to give each jellyfish a slightly different look and to add some extra interest. I hand wrote the sentiment to simply say, "FLOAT ON" with a white gel pen and black ink pen for the shadow.


I only blended ink on about 1/3 of the second card front. I wanted it to look like this was a peek into a much larger ocean scene. I also used the Lawn Fawn Waves Die Set to die cut in some wave details into this inked area. This also gave me a place to tuck in the adorable whale from the stamp set, which I Copic colored and fussy cut (including around the fin so it could be tucked over the wave). For a little added interest I also added some water drops spurting out from the whale's blow hole and coated those drops with Glossy Accents. The sentiment, "Have a WHALE of a time" is also from the stamp set.


For the last card, I wanted to give the sense of an ocean teeming with animal life. I had blended ink on 3/4ths of the card front and stamped in the octopus and the schools of fish directly onto the ink blended area so that I could avoid fussy cutting all those thin arms and tiny fish. To color up those images, I used Sharpie Markers, which provided great opaque coverage over the Distress Oxide Inks.  I stamped the dolphin, some splash droplets, and the turtle on separate pieces of paper, colored them up with Sharpie and Copic Markers, and fussy cut them out. I popped both up on double sided foam adhesive to add a little dimension. The "Oceans of Love" sentiment is from the stamp set, and to add a bit of shine, I traced the stamped sentiment with a Black Sakura Glaze Marker.


These ocean critters were so fun to play with to create these cards. If you'd like more details about the products or would like to watch a process video, please check out my blog post HERE.
01 09 10