Showing posts with label zig clean color real brush markers. Show all posts

Friday, March 20, 2020

Carabelle Things With Wings

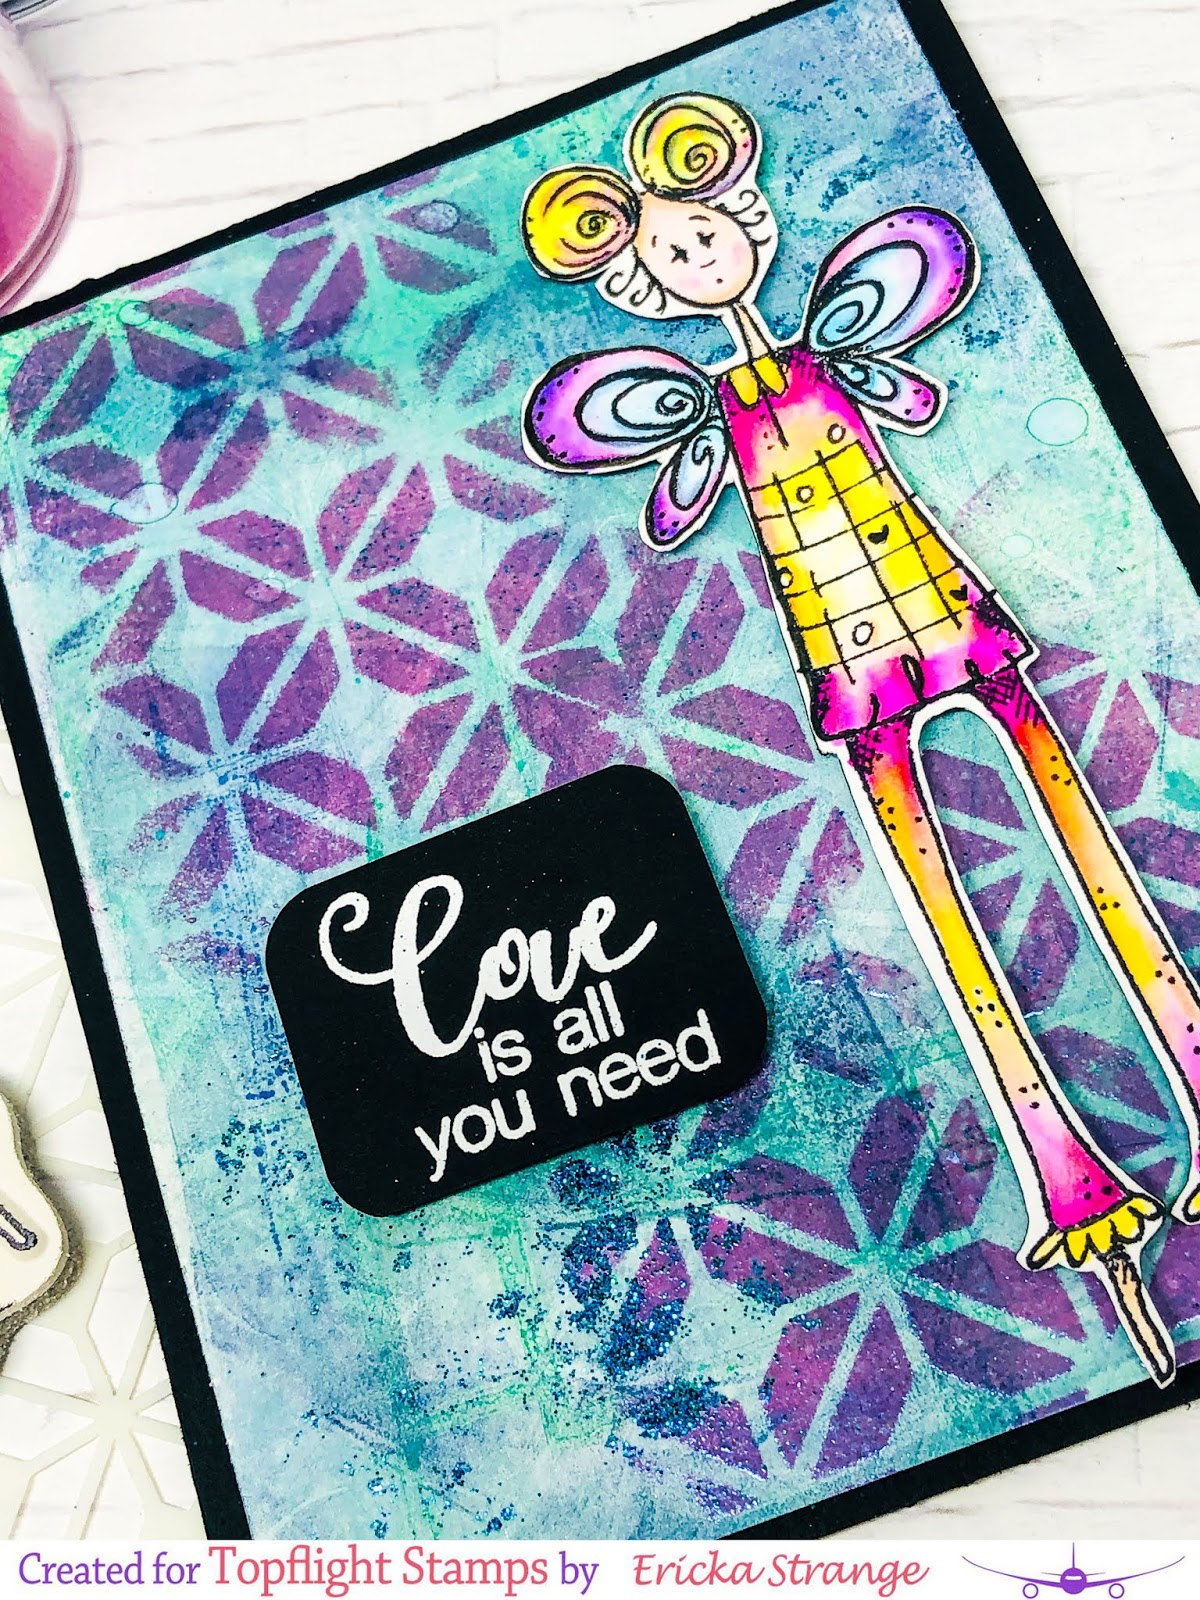
Happy Friday! Ericka here and I hope you are doing well and staying healthy and sane. The kids are home from school which, as most of you know, means a lot more hectic and not much time in the craft room. I did however have time to craft up a card using some Carabelle Studio supplies.


I love this fun Things With Wings set and the fun images.


https://topflightstamps.com/products/carabelle-studio-rubber-cling-stamp-set-a6-things-with-wings-kate-crane?_pos=3&_sid=b643d2345&_ss=r&ref=xuzipf8pid

I also used a foam blending tool and embossing ink to add the Carabelle stencil pattern to the background of gel press paper I had made previously. I then heat embossed the two patterns with Emerald Creek Kiss of the Fairy (for shine) and Mermaid Fin (for sparkle) Embossing powder to get a fun background.This stencil is great because it has two patterns that you can play around with.

https://topflightstamps.com/products/carabelle-studio-rubber-cling-stamp-set-a6-things-with-wings-kate-crane?_pos=3&_sid=b643d2345&_ss=r&ref=xuzipf8pid


I added the sentiment from Polkadoddle Sentimental set and finished my card by placing it all on a black card base.


Thanks for stopping by and for more information on how I created my card, check out my blog Strangely Creative. Have a wonderful day and I hope you get in some fun crafting time during this "social distancing" time. Cheers!

Friday, January 10, 2020

Birthday Giraffe

Happy Friday Topflight fans! Ericka here and today I have a fun giraffe card I made for my daughter's friend for her birthday.


 I love this Giraffe from Pink Ink Design and what is even more fun, she comes with sunglasses!

https://topflightstamps.com/products/pink-ink-designs-giraffe-clear-photopolymer-stamps?_pos=9&_sid=5e0abe2be&_ss=r&ref=xuzipf8pid


This giraffe was so fun to color up and I can't wait to play around with some other colors. I used the Polkadoodles Celebrations set for the sentiment and added some Hunkydory Diamond Sparkles.


For more information on how I created my card, stop by my blog Strangely Creative.


Thanks for stopping by and have a great weekend!

Friday, December 13, 2019

Christmas Winnie

Hello Topflight Fans! I hope you had a fantastic week! I'm not sure about you but I'm still in the middle of making Christmas cards and crossing my fingers that I'll get them mailed before the new year!

Today I have a fun image from Polkadoodle called Winnie Bauble. I love the Winnie girls and this one is no exception.

I love that this large stamp has room for coloring and also incorporates a sentiment.

https://topflightstamps.com/products/polkadoodles-clear-polymer-stamp-winnie-bauble?_pos=232&_sid=fa9d1da96&_ss=r&ref=xuzipf8pid

I also love her fun Christmas hat and used a Snow Marker with my heat tool to puff up the white portion.


For more details on how I made my card stop by my blog Strangely Creative. I'm off to make some more Christmas cards and crafts! Good luck with all your Christmas crafting.


Friday, December 6, 2019

Just a Note

Hello Topflight fans! Ericka here today with a clean and simple card using the Flowers in a Pot stamp from Magenta.


This small rubber stamp has so many pretty details and a great addition to make a variety of cards.

https://topflightstamps.com/products/magenta-flowers-in-pot-rubber-cling-stamp?_pos=54&_sid=3f5dc1cc9&_ss=r&ref=xuzipf8pid


For this card I paired it with a sentiment from Polkadoodles called Sentimental.


For more information on how I created my card, stop by my blog Strangely Creative.


Have a wonderful day and thanks for stopping by!

Friday, November 15, 2019

Christmas Baubles

Happy Friday! Our weather here in Houston, TX has finally turned chilly and its feeling a little more like winter. Today, I'm playing with this beautiful set called Baubles from Pink Ink Design.


This set has a variety of beautiful ornaments that are perfect for any type of Christmas card.


I chose the biggest stamp in the set which is large enough to cover an A2 card.


I can't wait to use this set to create more Christmas cards. For more details on how I created this card, stop by my blog Strangely Creative.


I hope you have a great weekend and thanks for stopping by!

Saturday, June 22, 2019

Dare to Dream

Happy Saturday! Ericka here with some fun coloring using this Beautiful Mandala set from Paper Rose.


This gorgeous mandala is almost the size of an A2 card and makes a beautiful centerpiece for any type of card. I especially love the beautiful sentiments that come with this set.

https://topflightstamps.com/collections/paper-rose-australia/products/paper-rose-beautiful-mandala-4-x-6-clear-stamp-set

I used rose gold embossing powder and Zig Clean Color Brush Markers to blend the colors of the mandala. I love how the colors came out by blending tow shades that were in different color families.


Thanks for stopping by and feel free to stop by my blog Strangely Creative for more details on how I created my card.


Monday, May 20, 2019

Spring Blooms | For the Love of Stamps


Hi everyone, and welcome to the Topflight Stamps blog!  It's Jenny here, and today I'm joining you with a pretty floral card, created with one of my favorite brands carried at Topflight - For the Love of Stamps (by Hunkydory).


The stamp set I'm using today is Spring Blooms, which is a giant set, all of the main florals will cover an A2 size card base! 
Image for For the Love of Stamps - Spring Blooms Edge It A4 Stamp Set
To create my card, I first stamped the beautiful floral stamp in black waterproof ink onto Bristol Smooth cardstock trimmed to 4.25 x 5.5".  I then colored it with Zig Clean Color Real Brush markers.  I used three shades of purple for the blooms, flesh and olive for the centres, and grey and blue grey for the leaves.


I added some splatters by scribbling some of the colors onto an acrylic block and adding a little water before pick it up with a brush and flicking it onto my card.  I dried it and then stamped one of the sentiments from the set in embossing ink and heat embossed in Platinum embossing powder. 


Be sure to check out For the Love of Stamps at Topflight - while this one is out of stock, there are some truly gorgeous sets available some of my faves include this one with butterflies, this one which is another huge set with birth flowers, and this one with lillies, which I've used in a previous post


I hope you have a wonderful day!

Monday, September 10, 2018

Art by Marlene - Chubby Chicks - Swimmer

Hi Everyone and welcome to the Topflight Stamps blog!  It's Jenny here, and this week I've been having a little fun with one of the new Studio Light Art by Marlene stamps.   This is a great collection, and the 'chubby chicks' range is so much fun.  I couldn't resist adding a little 'wobble to my project today.


My card today uses the Swimmer stamp from the set.   It's super big so I created a 5 x 5 inch card.  


To create my card, I first created the background, using Zig Clean Color Real Brush markers.  I swiped them across a 5 x 5 square of cold press watercolor cardstock, choosing colors that looked like the sea against a sunset.  I used a waterbrush to blend them together, then let them dry.   I then stamped the image over the top of the background in black watercolor ink, and colored in the headdress with gold gel pen, and the starfish and fish in Zigs.


I stamped the image a second time on another piece of watercolor cardstock, and colored it in with my Zigs and a waterbrush.  I also used some Sakura green glitter gel pen on the bikini.   When dry, I trimmed it out, and then edged round the outside with a black marker.   Before adhering it down, I added some more water and blue Zig to the water, to get clear water marks where the ripples are.  I also swiped the blue zig across the lady's legs as if they were in the water.    


I adhered a mini action wobbler to the back of the lady and then adhered her to the card panel, directly over the background stamped image .  When you flick it, it looks like she's shaking in the water !!  I couldn't resist.

I hope you like it, you can see more details on the supplies I used for this over on my blog.  Have a fun day!!

Jenny x

Monday, August 13, 2018

Visible Image - Tweedle Dum and Tweedle Dee

Hi Everyone, it' Jenny here with a card that showcases the new Alice in Wonderland range from Visible Image.  


I'm using the Visible Image Tweedledee and Tweedledum set from their new Alice in Wonderland collection.  It comes with interchangeable faces for the main image so you can stamp it twice for dee and dum!  


The background also uses the Gel Press printing plate carried by Topflight, along with the Alexandra Renke Hearts stencil and Darkroom Door Polka Dots stencil.   The acrylic paints I used are by Paperartsy also carried by Topflight.


I first created the background by using the Gel Press with acrylic paint and laying down the Polka Dot stencil to take a print.  When dry, I added more paint and laid down the Alexandra Renke stencil for a layered look, trimmed it down and set it aside to dry. 


I stamped the main image twice onto Bristol Smooth cardstock in Versafine Onyx Black ink, masking off the face the second time and stamping the other face included in the set instead so the lads look like they are looking at each other.  I also stamped the sentiments, and the hats.   I then colored them in using my Zig Clean Color real brush markers, which blend great on Bristol paper. 

I trimmed out the images and adhered them directly to the panel, with the hats popped up on foam tape.  I also outlined the sentiments in white gel pen so that they stood out more.  I hope you like it, something a little different from me - I can't wait to play with my Gel Press more!

I hope you like it - be sure to check out the Alice in Wonderland collection by Visible Image over on the Topflight Stamps shop, they're fab!  You can also see a full list of the supplies I used over on my blog.

Jenny 

Monday, August 6, 2018

Magda Polakow - Cute Baby Bear Hello

Hi Everyone and welcome to the Topflight Stamps blog!

It's Jenny here, and today I'm joining you with a card created using a super cute stencil and stamp set by Magda Polakow.


The stampset I'm using today is the Baby Bear and Friends set.


I'm also using the Lots of Bears 8 x 8 stencil, which is so cool, I've not seen anything like it before.
I'm also using this die set by Studio Light for my sentiment.


To create my card I first mixed some pink ink with some Glass Bead Gel (Faber Castell) and smoothed it over the Lots of Bears stencil onto thick cardstock, going about halfway up.  I then took some more of the clear gel and smoothed it up the rest of the way, to create an ombre look.  I set it aside to dry.


I stamped the baby bear, tree stump and clouds with waterproof black ink onto Bristol Smooth cardstock and used my Zig Clean Color Real Brush markers to color them in.  I then trimmed them out.  I also die cut the Hello sentiment from the Studio Light set in gold cardstock (I trimmed off the speech bubble).


When the stenciled background had dried, I adhered it to a white card base.  I then adhered the images with liquid adhesive and foam tape.  I embellished with some clear glitter Nuvo Drops and called it done!

That's it for today - I hope you enjoyed!  Be sure to check out this fantastic new range over at the Topflight Stamps store.  Have a wonderful day.

Jenny

Tuesday, May 29, 2018

Topflight Stamps / Crafty Individuals - By The Sea

Hi everyone and welcome to the Topflight Stamps blog!  It's Jenny here, joining you with a simple card to usher in the summer!


The stamp set I'm using today comes from Crafty Individuals - it's called By The Sea and is filled with fun seaside images.  
To create my card, I die cut a panel of Bristol Smooth cardstock - this cardstock is great for blending watercolor ink / paint - today I'm using Zig Clean Color Real Brush Markers.   I then stamped one of the deckchairs from the stamp set in black waterproof ink and heat set it.  


I then masked off a square panel with masking tape and used my brush markers to create a sunset over a sea, very simply, overlapping and blending each color into the next.  I didn't mask off the deck chair, I just colored round the edges. I held my hand over the deckchair and spritzed the background with shimmery spray lightly.  I then removed the masking tape and used some simple coloring to the chair, and some shadows underneath.   I stamped the sentiment in grey ink underneath and added a glitter heart so it says 'love' By the Sea.

I popped the entire panel up on foam tape onto a woodgrain panel card base.   Super simple but really fun to create!  I hope you like it! You can find more details on the supplies I used over on my blog.

Have a wonderful day.

Jenny 

Tuesday, January 30, 2018

Looking Sharp - Simple Coloring with For the Love of Stamps

Hi Everyone and welcome to the Topflight Stamps blog! 

It's Jenny here, with a clean and simple card using a super cute stamp set from For The Love of Stamps.  


For those of you who aren't familiar with this stamp company, they're made in the UK (where I'm from!) and are clear photopolymer.  Topflight carries a large selection of them and I highly recommend you check them out!  I used the Prickly Plants Cactus set for my card today.  

To create my card, I stamped the heart pot and the tall cactus using Versafine Onyx Black ink onto Bristol Smooth paper and coloured them using my Zig Clean Color Real Brush makers (I used three shades of green on the cactus itself).   I also added some prickles with a black fine liner.  I then trimmed it out. 


The background was created by dry embossing a stencil onto dark red cardstock, and then flicking a green shimmer spray over the top.  I then popped the cactus up on foam tape in the centre.    The sentiment was stamped in the same Onyx Black ink onto Bristol Smooth which was colored with co-ordinating green Zig markers, and popped up on foam tape. 

This card was so quick and simple to create - I love this stamp set and will be using it again in the near future - stay tuned!

Have a wonderful day, thanks for joining us!

01 09 10