Showing posts with label distress inks. Show all posts

Tuesday, May 15, 2018

You're a Classic - With Darkroom Door

Hi everyone and welcome to the Topflight Stamps blog.  It's Jenny here, and today I have a fun card for you  showcasing an image from the Darkroom Door Classic Cars set.  It makes a great birthday card or Father's Day card which is coming up soon. 


The stamp set is super high quality red rubber, with three large, detailed images, and lots of co-ordinating sentiments.  A great one to up your stash for masculine projects!


To create my card, I first created the wall of the road 'tunnel'.  I trimmed a watercolor cardstock panel to A2 (4.25" x 5.5") and ink blended Distress Ink in Fired Brick all over it.  I then ran it through my die-cutting machine with a brick embossing folder from my stash. To create some more dimension between the bricks, I also used Walnut Stain and Vintage Photo which I gently blended over the top so that it only adhered to the raised areas.  To create the tunnel, I used a circle die and die cut it from the brick wall, and trimmed off the bottom 1.5". I then re-inked round all of the edges. 


On a card base, I adhered a panel of black cardstock, and a strip of dark grey cardstock along the bottom.  I then popped the brick tunnel up on the front with foam tape.  I added some hand trimmed gold glitter cardstock to look like the central road markings.

For the car, I stamped it in copic friendly ink, coloured it with a variety of grey and blue copics. I added clear Wink of Stella to the metal trim and headlights, and white gel pen for highlights, then trimmed it out and popped it up on foam tape in the centre.  I added Limoncello Nuvo Drops to the headlights to make them pop.   


The sentiment was stamped in embossing ink and embossed with white embossing powder, trimmed out and popped up on foam tape.  

I hope you like it! Any questions, please let me know, and you can find a full list of supplies over on my blog

Jenny 

Tuesday, May 8, 2018

Unicorn Sparkle with Alexandra Renke

Hi Everyone and Welcome to the Topflight Stamps blog!   It's Jenny here, and today I'm joining you with a fun card created using one of my favourite stampsets carried by Topflight Stamps - the Unicorn set by Alexandra Renke.


Alexandra Renke is making waves right now in the cardmaking world and Topflight Stamps carries a great range of stamps, washi and stencils.  I love the modern feel of this set.

The card is very simple to make.  Using a 4x4" square of dark grey cardstock, I stamped the star flurry in the set with embossing ink, repeating to create a circle - (I used a special stencil to help me do this but you can also eyeball it).  I heat embossed with WOW! Embossing Powder in Frozen. I mounted this onto a lighter grey cardstock and then used foam tape to add it to a square card base.


I used Distress Ink in Peacock Feathers and Picked Raspberry and randomly painted it onto some coldpress watercolor paper, letting it blend, then heat drying it. I repeated this a couple of times. When fully dry, I heat embossed the Unicorn outline over the top in the same Frozen EP color and then fussy cut it out.  I popped it up on foam tape in the centre of the stars.  To finish, I scattered some iridescent crystals and coated the Unicorn in Clear Wink of Stella. 


You can find more details on other supplies I used over on my blog.  I hope you like it!

Jenny 

Tuesday, January 16, 2018

And Hippos Might Fly...

Hi Everyone and welcome to the Topflight Stamps blog!  It's Jenny here and today I have a card that uses three different stamp sets to create a scene. 


I used some cold press watercolor paper and stamped the Hippo from the Katzelkraft Jungle Animals set in Versafine Sepia.  Katzelkraft have some amazing stamps, I think they're all my favorite!   I then stamped the floral bouquet from Carabelle Studio's The Exotiks in the same ink along the bottom. 


I colored the image using Derwent Inktense pencils.  These are fantastic because you can colour directly onto the paper and then use an aqua brush to pull the colour out.  Once it dries it is set, and you can't move it again.  As a result I was able to overlay a wash of Distress Ink in Mermaid Lagoon over the top for the sky without any colour bleeding. 

The stamp sets I used are below.  The sentiment was from the Indigo Blu set heat embossed in white embossing powder. I added it in after all the colouring was completed. 


To create the splatters, I used the same colours of inktense I'd used to colour in the images, and used a water brush to flick the pencil 'lead' resulting in the spatters. 

For a finishing touch I added some clear wink of stella on to the hippo's wings and flowers, and glossy accents to his eyes, teeth and the sun, as well as a few drops on the petals and leaves to look like dew drops. 


And that's it !  Hop you enjoyed, let me know if you have any questions - you can see a detailed list of supplies over on my blog here.
Have a great week!
Jenny 

Tuesday, January 2, 2018

Fly Me to the Moon

Welcome to the Topflight Stamps Blog!

We are welcoming Jenny Colacicco to our Design Team this week. Here's a little more about Jenny.


Jenny is from the UK but has called New York home since 2010 where  she lives with her husband and daughter Ruby.  She started making cards at the same time, which gives her a welcome respite from working in the City.  Her style leans towards clean and layered, and she loves to watercolor. 


It's Jenny here joining you for my inaugural post as a member of the Design Team and I'm thrilled to be here!  For those of you who don't know me or my cards, let me tell you a little bit about myself.   I currently live in New York and work in the city at a bank.  When I can, I love to get inky and crafty making cards. My style is typically more towards the clean and layered style, however I also love to stretch my painting muscles, particularly watercoloring.   My project for today features watercoloring and ink smushing :) Hope you enjoy!   


My project today was created using the Carabelle Studio Little Girl with Balloon set.  For those of you not familiar with Carabelle Studio, the stamps are mounted, high quality rubber and they stamp perfectly - so crisp and detailed!


For my project, I started with coldpress watercolor paper by Strathmore (5" x 7").  I used my MISTI to position the stamp at an angle and stamped it three times with waterproof black ink (I used Versafine Onyx Black).  I then used masking fluid to mask off the girl, and a rough circle over the balloon.

I smushed Distress Oxide inks in Peacock Feathers and Wilted Violet onto a craft mat and spritzed with water and Distress Mica Spray in Brass.  When the masking fluid was dry, I smushed my piece into the ink and dried two or three times. I then inked over it with Distress ink in Black Soot, allowing some of the color to show through, and flicked white paint over the top with a paintbrush.   I trimmed the piece down to 4.25" x 6" and edged it with Delicata Copper ink. Before removing the masking liquid, I ink blended white pigment ink gently over the edges of the circle.

I removed the masking fluid with my finger and coloured in the heart and the little girl with watercolor markers and added some Wink of Stella to her hair and the 'moon', with a few spots of white gel pen on her freckles.


To finish, I added some gold twine with a bow for the balloon string using liquid glue, and added glossy accents to the heart balloon and the heart on her dress.  

The sentiment was stamped with Versamark ink and heat embossed with Ranger Liquid Platinum embossing powder.   I then mounted it to a card base and called it done!

I hope you enjoyed my first project - thank you so much for visiting us at Topflight Stamps today.  If you have any questions or need more information, please head on over to my blog here. 

Have a wonderful week!
Jenny x


Tuesday, November 28, 2017

Fall Pumpkins

Welcome to the Topflights Stamp blog.  Steph Ackerman here again showcasing stamps from Leanne Creatief - Doodle Clear Stamp Pumpkin.


I cut layers for the base of my card and inked all edges with Distress Ink.   Fall was die cut from Rinea Foiled Paper using my Cricut Expression.  


I stamped the pumpkin in black ink and colored it with Copic Markers before fussy cutting it.  Fall was added to the card on a slight angle and the pumpkin was added to the corner.


Thanks for stopping by and please pop by my blog for more crafty inspiration. 

See you next Tuesday
.


Steph

Friday, November 10, 2017

Believe in yourself art page


Hello my dear crafty friends!
Irit is here and today I am going to share a large art journal page made with quite a few of Topflight Stamps shop stamps.
 This is designers free style week and Steampunk/grunge is my most favorite style lately.
Add the fantastic Carabelle Studio stamps that you can buy in the shop to my Steampunk mood and you get this Believe in yourself page.


The page is made over a thick A4 size white cardstock.
First I added a few stencils with texture paste and then misted and painted them with a mix of Distress inks and different mists to get this vintage background. A few Carabelle Studio stamps  were stamped with permanent black ink to add some interest to the background.
Then I added a cluster made of thin chipboards and stamped the Carabelle Steampunk heart to be hand cut, misted and added over the cluster.
The red paint drop were added to imitate the blood drops of the heart.


The sentiment was made with a few Rubber Dance stamps that were stamped over black cardstock using clear embossing ink and heat embossed with white embossing powder.
The sentiment was actually made as a collage of four different stamps. This sentiment stamps set is just the blessing for any art journal artist as you can make dozens of different inspirational sentiments just with  one stamp set and each and every sentiment is totally unique.


 Here is some close- up to the main stamped image.


  Here is a long line of stamps used to make this project:

  Circles and Stitches


Texture Stars


The heart has it's reasons


Affirmations Sentiment stamp set


Thanks for being here with me today and see you next weeks with a totally different project.
And if you want to see more of my work you are kindly invited to my own blog.

Friday, November 3, 2017

Shaker card with Crafty Individuals

Hello my dear crafty friends and welcome to my new post made for Topflight stamps shop.
 Irit is here today with a new Topflight Stamps shop inspiration.
This week the designers were challenged to make a project with Crafty Individuals stamps  and this is my shaker card made with one single, but so powerful stamp from this company.


I made the patterned cardstock background and made the shaker with a chipboard painted frame.
The inside image was stamped with clear embossing ink and heat embossed with black embossing powder.
Then the white cardstock was colored with a mix of distress inks and covered with clear transparency as it should be with shakers.
This card looks like a framed piece of art and it is so easy to make a similar card with this gorgeous Crafty Individuals stamp that you can find in Topflight Stamps shop.


And here is a stamp I used to make this card:
Dancing Dragonflies


Thanks for reading my weekly post.

If you would like to see more of my work you are mostly welcome to my own blog.
 See you all next weeks with a totally different stamping inspiration!

Friday, October 6, 2017

Spring Love Card

Welcome to the Topflight Stamps Blog!

Be sure to join us tomorrow for our huge World Card Making Day Contest. Before we get to Irit's post, here are the details.
 
World Cardmaking Day Contest
On Saturday, October 7 we will post a link-up on our blog and we encourage all our customers to post cards that they have created with stamps from our store. You can link as many cards as you would like. The link up will be open Saturday, October 7 through Friday, October 13 at midnight EST. Our winners will be announced on the blog Sunday, October 15. 

PRIZES
1 - Tim Holtz Stamp Platform
4 - Mystery Bags Full of Stamps - retail value at least $30
5 - $10 gift certificates to the Topflight Stamps Store

Hello my dear crafty friends and welcome to my first October TOPFLIGHT stamps post.

This week the DT was challenged to use Studio Light  and/or Craft Emotions stamps and I used both on my fancy shabby style card.


As you can see this card was made over white cardstock die cut front piece using the Studio Light background 180 stamp, clear embossing ink and black embossing powder.

Then the colorful background was made over the heat embossed image using a mix of Ranger Distress Oxide inks and water and I need to say that this is the most beautiful background made in just a few seconds. 

The Bird was stamped with clear embossing ink and heat embossed with black embossing powder using Birds-Spring from Craft Emotions. Then the hand cut image was colored with Zig Real Brush water colors markers and glued over the cluster of embellishments made with clay frame, chipboards, flowers, leaves die cuts and a Love word die cut. 


Here are  the stamps I used to make this project:


I really hope that you like my shabby card and would try to make a similar one with Topflight shop gorgeous stamps from both shown companies.

If you want to see more of my work you are kindly invited to my blog!

Friday, August 18, 2017

Jazz it up CAS Mixed Media card


Hello my dear crafty friends and welcome to my mid August inspiration made for Topflight Stamps shop.
This is a week to show some of my personal style and as I have a lot of styles I picked a Clean and Simple for this showcase.
But even with  CAS style this card has some Mixed Media add-ons such as using a stencil with clear modelling paste around the heat embossed stamped image.


The stamps I used are from Visible Image UK company and I just adore their Mixed Media style of images.
This is a stamp set I used - Jazz it up set

Visible Image - Jazz It Up - Clear Polymer Stamp Set

 My background was made with Tando stencil and new Ranger Distress Oxide inks.
The stamping was made with Memento Luxe ink and heat embossed with clear powder.


Thanks for reading my weekly post.
If you would like to see more of my work you are mostly welcome to my own blog.

Thursday, August 17, 2017

Shine Bright with IndigoBlu

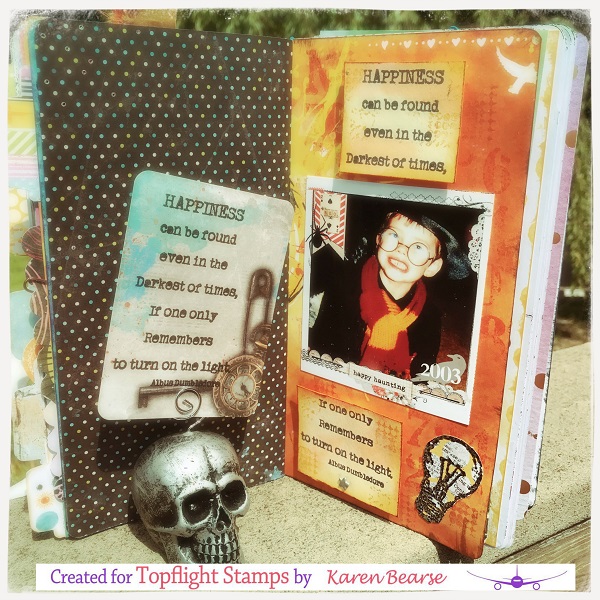
Hi Inky Friends, welcome to the Topflight Stamps Blog. Karen Bearse here today with a stamped up journal page from My Favorite Memories Journal. 


My son was Harry for Halloween, oh my gosh, 14 years ago. The sneaky way I turned this page into a Halloween theme was to alter the photo. There is no Halloween paper or ephemera on it yet it is still full of spooky fun.


I used the Shine Bright set from IndigoBlu which I just love! The background stamps are great with subtle detail & don't you just love light bulbs!!! 


Another way to use this quote is on a journal card for your art journal, pocket pages or project life. Just the different background gives the quote a whole new look. For more info & close ups of this layout feel free to visit me here. Thanks for joining me today!

Thursday, July 20, 2017

Time to Make The Christmas Cards!

Welcome to the Topflight Stamps Blog!

Karen Bearse here to bring some HOHOHO to your day! I decided to start working on my December Daily by making a journal card. It is all ready for me to add my journal info on it.


This card was made using the wonderful Christmas Tree stamp by Katzelkraft. It has fun doodles inside the tree & Merry Christmas written in different languages.


I hope this helps you with your Christmas card decisions, I have a wee tutorial on my blog you can check it out here! See you next week when I will be playing with something that requires lots of snow... Thanks for stopping by & please sign up for our newsletter so you get all the deals!!

Karen

Wednesday, July 12, 2017

Topflight, Crafty Individuals and Summer!

Welcome to the Topflights Stamp blog.  We're sharing summer projects on the blog this week. We're also having a HUGE sale on all our Summer Stamps. Be sure to check it out!!


Summer Sale Link


This week at Top Flight, it's summer!
The stamp for my first post


My basic medium used

The blue and green Bistre
That I applied on a SB paper
And then sprayed with water


I then applied my stamp with ink
Stazon "timber brown"


I discolored the basket, the flowers and the bird with
bleach


My two TCW stencils

"Mini complicated hearts" 6 X 6
"Mini art is" 6 X 6

Inks used for my stencils
Distress Pumice Stone and Brushed Corduroy

Do not forget to subscribe to
the Topflight Stamps newsletter to receive all 
information on sales and store updates

Nathalie


01 09 10