Thursday, April 3, 2025

Topflight Stamps 8th Birthday Blog Hop WINNERS!

 Before we begin, don't miss today's post with Colleen Dietrich's fabulous card. Check it out here when you are done checking out the winners below!


Thank you so much for celebrating with us for our 8th Birthday Hop! Hopefully you were inspired by all the wonderful cards and got some good ideas for your own projects. We have picked two winners from the main hop post comments here and they each won a $50 gift code to shop in the store! We also picked two winners from comments on our Instagram Hop post. Head on over to IG to see if you won there. If you see your name below, contact Topflight Stamps (donna@topflightstamps.com) to get your code.

Winners:

Prize for $50: Bo Gilmore


and Prize for $50: Patricia


Contact us for your codes Bo and Patricia, congratulations!


Congratulations to all the winners and thanks again!!


Lavender Birthday

Hello!  It's Thursday, so you've got Colleen with you to share during our "Anything Goes" week at Topflight Stamps. I used a page from Creative Expressions Nature's Compendium paper pad as my inspiration for a lavender card.  On a panel of lavender paper, I inked the edges and stamped some cute blackberries from the Lavinia Blackberry clear stamp.  I stamped extra blackberry images on a scrap of white cardstock, and fussy cut them.  Then, I die-cut a light plum rectangle using a Crealies Stitched Rectangle die, and mounted it on top of the lavender / blackberry background.  On a white piece of cardstock, die-cut with a circle, I stamped a birthday sentiment from the very versatile Hobby Art Stamps Hydrangea stamp set.  Also from the same set, I stamped little hydrangea blossoms and leaves, then fussy cut those.  It was fun to create little clusters of blossoms, berries and leaves on two corners of the sentiment circle.  Each blossom got a little dot of glitter glue, too.


Supplies Used From Topflight Stamps Store:


Creative Expressions - Nature's Compendium Paper Pad


Wednesday, April 2, 2025

Anything Goes Thank You Cards with AALL & Create

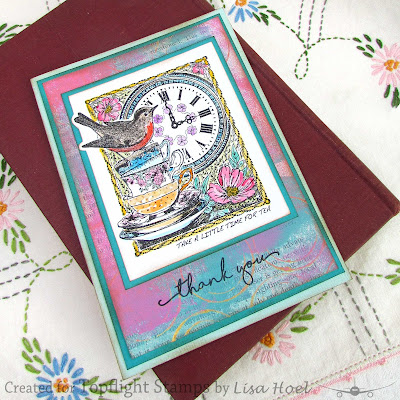
Hello, Lisa Hoel here. This week at Topflight Stamps our theme is Anything Goes! I made a set of small thank you cards that are perfect to have on hand. I used the AALL & Create Die Sets Garden Grace and Rustling Retreat plus the thank you sentiment stamp from Visible Image's Go To Words Set.


Lisa Hoel for Topflight Stamps #creativejuicefreshsqueezed #topflightstamps


Thanks for stopping by and be sure to check out the Topflight Stamps store for a wide selection of different and hard to find stamps, stencils and other paper crafting supplies from all around the world! Also keep an eye here on the Topflight Stamps blog. There is new inspiration posted daily!

Topflight Stamps Supplies Used:

Visible Image Stamp Set - Go To Words

AALL & Create Die Set - Garden Grace #55

AALL & Create Die Set - Rustling Retreat #54

Lavinia Elements Ink Pads - Russet OrangeGraphite


Tuesday, April 1, 2025

It's Never Too Late...

 It's Tuesday so you've got Kathi hereto share a project with you.. Our theme this week is "Anything Goes". I was inspired by the adage "April showers brings May flowers" since it's the first day of April. 

Here's a card created with the Bot-ology Rainy Day Cling Rubber Stamp Set by Andy Skinner for Creative Expressions and the Waterwall Unmounted Red Rubber Stamp by Katzelkraft. The sentiment is a mash-up of one from the Dreamer Sentiments Unmounted Red Rubber Stamp Set by Katzelkraft and the sentiment that comes with the Botology Rainy Day Cling Rubber Stamp Set.


Using a stamping platform, stamp Tuxedo Black Memento Ink by Imagine Crafts/Tsukineko to stamp the robot from the Bot-ology Rainy Day Cling Rubber Stamp Set by Andy Skinner for Creative Expressions twice — once onto a white cardstock image panel and once onto repositionable sticker paper.

Remove the image panel from the stamping platform and use Copic markers to color the robot, the grass, puddles, and the splashes. 

Fussy-cut the sticker paper version of the robot and the ground and place them over their counterparts on the image panel as masks. Brush Stormy Sky Distress Ink over the masked images. Remove the masks from the images.

Use Arctic VersaFine Clair Ink by Imagine Crafts/Tsukineko to stamp the Waterwall Unmounted Red Rubber Stamp by Katzelkraft first onto a piece of scrap paper, then onto the inked image panel. Heat set the image panel.

Use a white gel pen to emphasize the highlights in the robot's eyes. Use a red glitter pen to add sparkle to the tops of the robot's antennae. Use a black glitter pen to add a touch of glitter to the robot's loose wires. Trim the image panel and edge with a blue Copic marker. Set aside.

Take a piece of rust patterned paper and trim it to 4.25". The paper I used is no longer available at the store, but a paper from the Patina 6x6 Patterned Paper Pad by Paper Favourites would work as well. 

Place the rust patterned paper onto a stamping platform. Place the "It's never too late to" sentiment from the Dreamer Sentiments Unmounted Red Rubber Stamp Set by Katzelkraft facedown on the upper left of the patterned paper. Press the lid of the platform onto the back of the stamp and lift. Use low-tack tape to cover the second part of the sentiment. Ink the stamp with Nocturne VersaFine Clair Ink by Imagine Crafts/Tsukineko, remove the tape, and stamp. Remove the stamp from the platform. 

Position the sentiment from the Bot-ology Rainy Day Cling Rubber Stamp Set by Andy Skinner for Creative Expressions facedown below the stamped sentiment. Press the lid of the platform onto the back of the stamp and lift. Use low-tack tape to cover the first sentence of the sentiment. Ink the stamp with Nocturne VersaFine Clair Ink, remove the tape, and stamp.

Remove the stamped background patterned paper panel from the stamping platform, edge with Nocturne VersaFine Clair Ink, and heat set.

Adhere the image panel to the background paper, then adhere the background paper to a black A6 card.

Use a nuts, bolts, and screws die to cut silver metallic cardstock. Adhere a silver screw die-cut to each of the four corners to finish the card.

Please pop over to my blog, Kat's Tales of Stamping, for step-by-step instructions and complete supply lists. 

Topflight Stamps Products Used:


Thanks for visiting today!
01 09 10