Saturday, June 17, 2023

Secret garden

Hi MEL PILLING here today with a really quick card using a Gelpress trio circle  where you just use a hint of background to create a scene.  
.


I began by applying Elements Ink  in Lime Punch all over with a Brayer . Then with a make-up blender,  I applied Mermaid around the edges then took a print. Then I splattered wet mermaid with a Fan brush over the card.

All stamping was done with Versafine Clair Nocturne, then highlighted with pencil crayons.    I stencilled the hill with a hill mask of torn paper in Versafine Clair Morning Mist using a stencil brush.  I stamped the sign on wood grain paper, then fussy cut out the top and adhered it over the stamped image on the card. I then stamped some mixed media type words around the perimeter. I then shadowed  the characters. 


LAVINIA STAMPS USED


'


AALL&CREATE STAMP


With just a hint of background, this card takes no time at all.

Thanks for joining me today on the Topflight Stamps blog. See you soon.


Friday, June 16, 2023

PaperArtsy Stencil Card


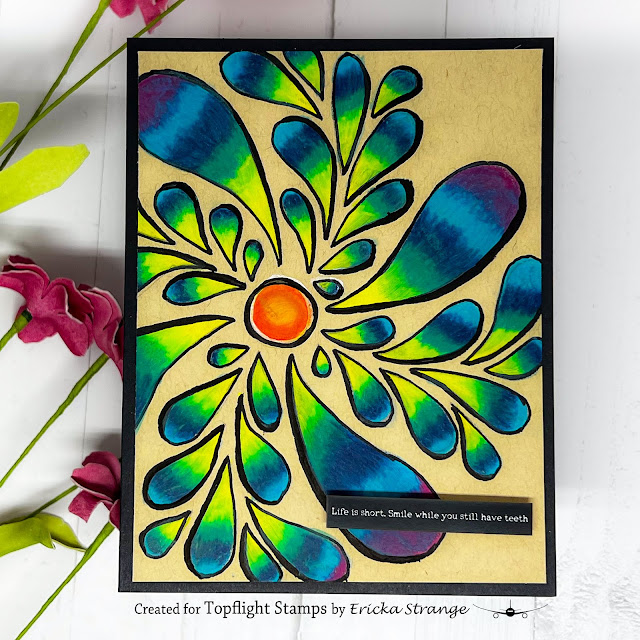
Hello crafty friends! Ericka with Strangely Creative here and today I am coloring up the PaperArtsy Tracy Scott stencil PS388. I love this large stencil and used a pencil to trace it. I then used my colored pencils and colored up the areas.


After I was done coloring up the shapes, I used a black paint pen and traced around the shapes to help them pop. I added the sentiment from the AALL & Create Bite Me Black Ephemera to complete my card and add a little snark.


 Thank you for stopping by and I hope you have a wonderful weekend!

Topflight Stamp Supplies Used


Thursday, June 15, 2023

Lavinia Stamps Forest Scene

  Hi Everyone,

Cornelia here today. This week the theme is "anything goes" at the Topflight blog. I recently pulled out my Lavinia stamps and could not stop playing with them. So another Lavinia card it is!
 
I made the background with distress inks. I used a die cut circle for the "moon" and  brushed around it. I added a bunch of stamps to create a scene - see below. I lightly colored in the trees on the right and added white accents and some "grass" to the mushrooms.
I hope you liked this. Thanks for visiting. 
See you next week with more Topflight Stamps inspiration.

Wednesday, June 14, 2023

Father's Day Card

Hello Crafty Friends, Mary Key here, and today is "anything goes". So I just got my order and I really wanted to use this cute stamp along with some others to make a Father's Day card using AALL & Create. I used #937 Father's Daughter and also #457 Background Voices along with a background using #118 Saturday Morning stencil. Colors I used are pink, yellow, blue and a light color for the main stamp. 

For my card base I used watercolor paper; I stamp the water reactive inks onto my craft mat with a pink color, next I added the yellow ink and then heat dry using my heat gun. Making sure my watercolor paper is dry, I then used a blue color ink using a blending brush with #118 Saturday Morning and then blended some more blue ink onto each corner of my card.

Then I used #937 Father's Daughter stamp and heat embossed with black embossing powder and watercolor the stamp image using watercolor brush markers and fussy cut my image. I stamped a small image using #457 Background Voices to the bottom of my stamp image and also stamped a sentiment from Father's Daughter and put it together on white cardstock. 


I hope you like it and have fun paper crafting! 

Tuesday, June 13, 2023

A Snarky Katzelkraft Tag

 It's Tuesday so you've got Kathi here to share a project cwith you. My Katzelkraft stamps were feeling neglected and I'm in a somewhat snarky mood, soI decided to make a tag featuring one of the fabulous critters from the the All Mad Here Unmounted Red Rubber Stamp Set along with a sentiment from the Whatchamacallit Unmounted Red Rubber Stamp Set by Katzelkraft.

Here it is:


I started the tag by stamping this guy from the All Mad Here Unmounted Red Rubber Stamp Set with Copic-friendly black ink two time, once onto a cardstock panel and once onto repositionable label paper. 

The label paper version was fussy-cut and placed atop its counterpart as a mask. A piece of plastic was used to block off the bottom part of the image panel, then Della Blue Elements Ink by Lavinia Stamps was brushed over the masked image. A stencil by Studio Light was placed over the image panel and Della Blue Elements Ink was brushed over the stencil to create some visual interest. 

The horizontal plastic piece was removed and Dark Denim Elements Ink by Lavinia Stamps was lightly brushed over the bottom part of the image panel.

The mask was lifted from the critter and he was colored with Copic markers.


The image panel was trimmed, edged with Dark Denim Elements Ink, and matted with darker blue cardstock. 

Light blue cardstock was trimmed and edged with Dark Denim Elements Ink. A tag punch was used to trim the top corners, and a circle punch was used to cut a hole.

The matted image panel was adhered to the tag. Strands of twine were threaded through the hole to finish the tag.

Please pop over to my blog, Kat's Tales of Stamping, for detailed instructions and complete supply lists. 

Topflight Stamps Products Used:


Thanks for visiting today!


Monday, June 12, 2023

You are awesome!!-a pop up card

 Hi MEL PILLING here with another pop-up card featuring Aall&create stamps set #467.


The background was done using ELEMENTS INK in Blue Lagoon and Pine  with a Stencil brush.

I stamped all the stamps on the background first then again, on clean card.  For the balloon, I smooshed clean card into wet elements ink in Mulberry and Confetti. Then when it was dry, I stamped onto it with Versafine Clair Nocturne.  I then fussy, cut the balloon out and adhered it to the card.   I coloured the basket with watercolour markers. All the stamps were done first on the card and then the fussy cut versions were glued on top.   This way, all the tiny details of the stamps show up. Attaching the sentiment to the very bottom of the inner card gives visual balance when the card sits open

AALL&CREATE STAMPS USED


This is one of the easiest pop-up cards to produce. It looks really impressive when it is open. I hope you give it a try.

Thanks for joining me on the Topflight Stamps blog today.  See you soon. 


Sunday, June 11, 2023

Don't Worry About a Thing

 Greetings! It's Kathi here on a Sunday since I missed my Tuesday post. I started my project on Sunday night as crafty therapy/hopeful wishes however, life intervened. 

This past week, my teammates and I showcased inks. I decided to use my beloved VersaFine Clair Inks to create almost every aspect of my cardd. I also used the Don't Worry Clear Stamp Set from the Art By Marlene Signature Collection for Studio Light and stencils from both Studio Light and AALL and Create.

Here's my card.


My first step was to ink a panel of white cardstock with Cheerful VersaFine Clair Ink by Imagine Crafts/TsukinekoSummertime VersaFine Clair Ink was brushed over the Music Notes Grunge 6x6 Stencil by Studio Light, then Charming Pink VersaFine Clair Ink was randomly brushed overtop. The stencil was lifted and the panel was heat set.

Warm Breeze VersaFine Clair Ink was smooshed onto a craft mat, misted with 91% Isopropyl Alcohol (in a well ventilated room), then a paint brush was used to splatter the ink onto the background panel. The panel was heat set and put aside.

Nocturne VersaFine Clair Ink and a stamping platform were used to stamp the sentiments from the Don't Worry Clear Stamp Set from the Art By Marlene Signature Collection for Studio Light onto the background panel. The panel was heat set then edged with black marker. Washi tape was adhered to the base of the panel.

Green OasisParadise, and Blue Belle VersaFine Clair Inks were smooshed onto a craft mat and misted with 91% Isopropyl Alcohol until the inks ran together. A panel of Bristol Paper was dipped into the puddles, then heat set.  Cheerful VersaFine Clair Ink was smooshed onto a piece of acetate, misted with the alcohol, and pressed into the panel to add touches of yellow to the background. The panel was heat set again. 

Nocturne VersaFine Clair Ink was used to stamp one of the birds from the Don't Worry Clear Stamp Set from the Art By Marlene Signature Collection for Studio Light onto the inked paper. The bird image was fussy-cut. 

Once again CheerfulWarm BreezeGreen Oasis, and Paradise VersaFine Clair Inks were smooshed onto the craft mat and misted with alcohol. Pointy cotton swabs were used to apply alcohol-diluted ink to color the bird.

A watercolor marker was used to color the bird's beak. A black marker was used to deepen the color of the bird's pupils and to blacken the white edges. White gel pen was used to highlight the bird's beak and add catchlights to his pupils. The bird was adhered to the background panel.

White cardstock was cut to 9" x 6.5", scored at 4.5", and folded to form a 4.5" x 6.5" card.

Warm Breeze and Paradise VersaFine Clair Inks were sponged around the periphery of the white card. Blue Belle VersaFine Clair Ink was brushed over the Totally Dotty Stencil by AALL and Create onto the sponged card. 

The card front was adhered to the stenciled and inked card.

Please pop over to my blog, Kat's Tales of Stamping, for instructions, notes, and complete supply lists.

Topflight Stamps Products Used:


Thanks for visiting today!
01 09 10