Happy Friday! I hope you are all doing well and have some fun plans this weekend. Ericka here with a bee card using this beautiful set called Bee Friendly from Hobby Arts.
This set is so pretty and the sentiments are unique and there are so many ways to combine these images.
I used some distress oxides around the edges and stamped the honeycomb in the background.
For more details on how I created my card, feel free to stop by Strangely Creative. Thanks for stopping by and have a wonderful weekend!
Friday, October 18, 2019
Thursday, October 17, 2019
Feeling Sheepish!
Hi there! It's Kathi here with two cards featuring the Baa Humbug Clear Polymer Stamp Set from Hobby Art! You might think that this stamp set's name would indicate that it's only for Christmas, but you'd be mistaken. It comes with three sheep, several accessories. and two sentiments which not only makes this set a great value, but very versatile as well!
For both cards I first stamped the bowler and Santa hats from the Baa Humbug Clear Polymer Stamp Set onto white cardstock, then onto masking paper. The masking paper versions were fussy-cut and placed atop their counterparts. Using a stamp positioner, I stamped the sheep in place, then stamped the monocle. For the Christmas card. I used Onyx Black VersaFine ink to stamp the sentiment. The lights were stamped with Memento ink and a stamp positioner.
The masks were removed and I colored the sheep and hats with Copic markers. Several layers of Clear Glaze pen were added to the monocle and the lights to add dimension and shine.
For the Halloween card, the image panel was matted with orange cardstock and patterned paper, edged with Distress ink, and adhered to coordinating patterned paper, then matted again with orange cardstock. Orange cardstock was cut with speech bubble and nameplate dies. Rub-ons from two different sets were added to the speech bubble die-cut to read "Boo" and "Baa". Onyx Black VersaFine ink was used to stamp the sentiment onto the nameplate die-cut. A thin strip of patterned paper was adhered to the card front as shown, then the speech bubble and sentiment were added. Two blue brads were added to the sentiment, the card front was edged with Distress ink, and the card front was adhered to an orange card.
For the Christmas card, the image panel was cut with a rounded rectangle die and matted with red cardstock that had been die-cut with a slightly larger rounded rectangle die. Patterned paper was cut, edged with Distress ink, matted on Kraft cardstock, then onto a red A2 card. Red cardstock was cut with a scalloped border die and a thin strip of coordinating patterned paper was adhered to it. The border die was adhered across the patterned paper panel as shown to finish the card.
Please visit my blog for a complete product list and detailed instructions.
For Halloween!
I decided that this sheep would be dressed as a proper gentleman for Halloween with a bowler hat and a monocle, plus the appropriate "Boo" and "Baa" sentiments.
For Christmas!
A Santa hat transforms this sheep into Santa, albeit a grumpy one.
Topflight Products used to create these cards
The masks were removed and I colored the sheep and hats with Copic markers. Several layers of Clear Glaze pen were added to the monocle and the lights to add dimension and shine.
For the Halloween card, the image panel was matted with orange cardstock and patterned paper, edged with Distress ink, and adhered to coordinating patterned paper, then matted again with orange cardstock. Orange cardstock was cut with speech bubble and nameplate dies. Rub-ons from two different sets were added to the speech bubble die-cut to read "Boo" and "Baa". Onyx Black VersaFine ink was used to stamp the sentiment onto the nameplate die-cut. A thin strip of patterned paper was adhered to the card front as shown, then the speech bubble and sentiment were added. Two blue brads were added to the sentiment, the card front was edged with Distress ink, and the card front was adhered to an orange card.
For the Christmas card, the image panel was cut with a rounded rectangle die and matted with red cardstock that had been die-cut with a slightly larger rounded rectangle die. Patterned paper was cut, edged with Distress ink, matted on Kraft cardstock, then onto a red A2 card. Red cardstock was cut with a scalloped border die and a thin strip of coordinating patterned paper was adhered to it. The border die was adhered across the patterned paper panel as shown to finish the card.
Please visit my blog for a complete product list and detailed instructions.
Wednesday, October 16, 2019
Sweet Piggies
Hello, Topflight fans! Toni here sharing a cute holiday card using Hobby Art Pigs in Blankets.
I had to do a bit of research on this one. I think of pigs in blankets as football game food but in other countries like the UK, it's something served during the holidays. Who knew?!
I sponged the piggies using Versafine Onyx Black then sponged around them using Distress Oxides. I spattered a bit of water for snow.
I masked the Magenta Holiday Text sentiment and stamped it with Prism Ink French Navy.
Last I sponged Pronty A5 Pretty and Cool Stars and colored up the Hobby Art Pigs in Blankets with Zig Real Brush Watercolor Pens.
Tuesday, October 15, 2019
Monday, October 14, 2019
Mixed Media Monday Making Tags!
Karen Bearse here for Mixed Media Monday & we are making tags! I had so much fun playing with inky products and lots of nummy stamps. There is a tutorial on my blog, a 3 step way to make quick & fun tags. You can check it out here.
Lot's of great products were used to create these pretties, like stamps:
Premier Stamping Press by Hunkydory.
Seth Apter embossing powder by Emerald Creek in Lime and Crimson. These can also be bought in kits.
Diamond Sparkles by Hunkydory in Festive .
These tags were so much fun to make I hope you get the chance to make some! You can also use these techniques to make cards, ATC's or Art Journal pages. Thanks so much for joining me today!!!
Lot's of great products were used to create these pretties, like stamps:
Shine Bright by Indigo Blu
Inks by Prism in colors like Fire Coral, Cinnamon Swirl, Ocean Spray, Canary Yellow, French Navy, & Blue Lagoon, Slate Grey & Thundercloud. Premier Stamping Press by Hunkydory.
Seth Apter embossing powder by Emerald Creek in Lime and Crimson. These can also be bought in kits.
Diamond Sparkles by Hunkydory in Festive .
Friday, October 11, 2019
Woodland Trio
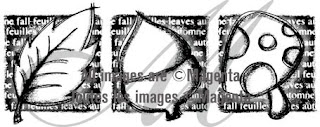
Happy Friday! Ericka here and today our weather here in Texas is finally turning fall-ish, around 70 degrees, so I thought I would use this Woodland Trio set from Magenta and celebrate.
I love the details on this stamp and it fits perfectly across a card.
I also made a quick card using Kraft cardstock.
This is the perfect fall set and you can make some fun stationary with it as well. To find out how I created my card, feel free to stop by my blog at Strangely Creative. Have a wonderful fall weekend and see you next week. Thanks for stopping by.
Thursday, October 10, 2019
CongRats!
Hi there! It's Kathi and I'm here with my second post as Topflight's September Guest Designer! It's a retirement card for my husband, who retired last week. When I first saw Katzelkraft's Les Rats des Villes - City Rats Unmounted Red Rubber Stamp Set, I knew that eventually I'd be making this card.
Three rats from the Les Rats des Villes - City Rats Unmounted Red Rubber Stamp Set were stamped with Tuxedo Black Memento ink onto white cardstock, fussy-cut, colored with Copic markers, then edged with a dark marker to get rid of those nasty white edges. The rats' eyes and teeth were coated with several layers of Clear Glaze® 3D Glossy Gel Pen to add dimension and shine.
The winners' podium from Katzelkraft's Les Drôles Accessoires-Funny Accessories Red Rubber Stamp set was stamped with Tuxedo Black Memento ink onto white cardstock. It also was fussy cut, colored with Copic markers, and edged with a dark marker.
The rats and the podium were set aside while I worked on the background.
I googled track and field race tracks, found a suitable free photo, downloaded it, then used PhotoElements to change it from color to a black and white charcoal background, which was lightened quite a bit before being printed onto Copic friendly cardstock using my laser printer. The background image was colored with Copic markers, softened even more with the colorless blender, then trimmed.
The banner was stamped with Memento ink, colored, fussy-cut, edged, then adhered to the background card front. Glittery letter stickers were added to spell out "CongRats". The card front was edged with Black Soot Distress ink. Then matted with black cardstock.
Light blue cardstock was die-cut with a small speech bubble die and the tiny sentiments were stamped with Onyx Black VersaFine ink onto them. VersaFine ink always gives a wonderful clean impression when stamping small and/or detailed stamps.
The winners podium and the rats were adhered to the card front and the tiny speech bubbles were added. The card front was then mounted onto a 5x7 blue card.
Here my card with Katzelkraft's Les Rats des Villes - City Rats and Les Drôles Accessoires-Funny Accessories Unmounted Red Rubber Stamp sets.
Three rats from the Les Rats des Villes - City Rats Unmounted Red Rubber Stamp Set were stamped with Tuxedo Black Memento ink onto white cardstock, fussy-cut, colored with Copic markers, then edged with a dark marker to get rid of those nasty white edges. The rats' eyes and teeth were coated with several layers of Clear Glaze® 3D Glossy Gel Pen to add dimension and shine.
The winners' podium from Katzelkraft's Les Drôles Accessoires-Funny Accessories Red Rubber Stamp set was stamped with Tuxedo Black Memento ink onto white cardstock. It also was fussy cut, colored with Copic markers, and edged with a dark marker.
The rats and the podium were set aside while I worked on the background.
I googled track and field race tracks, found a suitable free photo, downloaded it, then used PhotoElements to change it from color to a black and white charcoal background, which was lightened quite a bit before being printed onto Copic friendly cardstock using my laser printer. The background image was colored with Copic markers, softened even more with the colorless blender, then trimmed.
The banner was stamped with Memento ink, colored, fussy-cut, edged, then adhered to the background card front. Glittery letter stickers were added to spell out "CongRats". The card front was edged with Black Soot Distress ink. Then matted with black cardstock.
Light blue cardstock was die-cut with a small speech bubble die and the tiny sentiments were stamped with Onyx Black VersaFine ink onto them. VersaFine ink always gives a wonderful clean impression when stamping small and/or detailed stamps.
The winners podium and the rats were adhered to the card front and the tiny speech bubbles were added. The card front was then mounted onto a 5x7 blue card.
Here are the Topflight Stamps Products I used on this card.
For more information about my card, visit my blog, where you'll find detailed instructions and suchlike.
Subscribe to:
Posts (Atom)