Greetings! It's Kathi here today to share a project tutorial with you. On Tuesday of this week I showed you a card created with the Television Eclectic Red Rubber Cling Stamp by Darkroom Door. While I was working with this versatile stamp, other ways to use it kept popping into my mind so I jotted them down.
Here's the first idea, which uses the Television as a shaker element on a card using the Butterflies Background Red Rubber Cling Stamp, Abstract 12 Red Rubber Cling Stamp, Make Art Sentiment Strip Red Rubber Cling Stamp by Darkroom Door with Freya Clear Polymer Stamp and one of the fairiy stamps from the Fairy Foragers Clear Polymer Stamp Set by Lavinia Stamps.
Card laying down so that you can see the shaker contents and the background.
Card standing up so that you can see the glittery touches on the fairy's wings and the tv screen.
You had better go grab a beverage because this tutorial is going to be verbose!
Here goes!
Step #1:
Stamp the television set onto heavy cardstock. I used 140 lb. Mixed Media paper. Use a craft knife to cut out the TV screen.
Step #2:
Fussy-cut the television.
Step #3:
Use Copic markers to color the image. Use a dark marker to darken the edges including the window cut for the screen.
Step #4:
Flip the image over, adhere a piece of acetate over the tv screen aperture, then use foam adhesive to create a well for the shaker contents. Set aside.
Step #5:
Apply Distress inks to a piece of heavy cardstock. Lightly spray with water. Heat set.
Step #6:
Use white hybrid ink to stamp the Butterflies Background Red Rubber Cling Stamp. Repeat inking and stamping until you're happy with the result. Heat set.
Step #6b without photos.
Trim off the unstamped area and die-cut with a rounded rectangle die. I also used this die to cut a strip of cardstock that had been stamped with the Abstract 12 Red Rubber Cling Stamp.
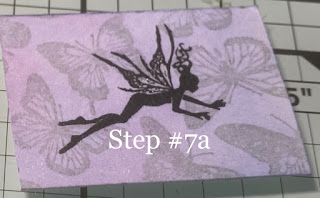
Step #7a (with two steps) because I forgot to take a photo, then had to go back and fix the step numbers. Oops.
Clean the Butterflies Background Red Rubber Cling Stamp stamp. Use grey ink to stamp the Butterflies Background Red Rubber Cling Stamp onto the strip cut off the background panel. This will become the backing panel of the shaker.
Use Nocturne VersaFine Clair to stamp the fairy from the Fairy Foragers Clear Polymer Stamp Set by Lavinia Stamps. Heat set. Use a glitter pen to add glitter to her wings.
Step #7b
Fill the tv screen aperture of the shaker with the contents of your choice. Peel off the foam adhesive tape backing and promptly get the contents all over the adhesive. Remove as much as possible.
Step #8
Secure the background panel to the base of a stamp platform with magnets. Place the trimmed die-cut border on the bottom and the TV where desired.
Place Freya face down where you want her. Press the lid onto the back of the stamp. Lift. Remove the border and the TV from the stamping platform.
Ink the stamp with Nocturne VersaFine Clair and stamp. Repeat if necessary.
Use a clear glitter pen to add glitter to her wings.
Another Missing Step
Sponge the Abstract 12 border strip with the same Distress inks used to create the background.
Step #9
Use a glue pen to add dots of glue between Freya's hand and the TV. Sprinkle glitter onto the glue, let set for a few minutes, then shake off excess.
Step #10
Use VersaMark ink or other embossing ink to stamp the Make Art Sentiment Strip onto black cardstock. Sprinkle wet ink with White Detail Embossing Powder, shake off excess, and heat set.
To assemble the card.
Adhere the inked stamped die-cut strip to the base of the background using foam tape.
Adhere the Television shaker element to the background as shown. Adhere the background to a black A6 card. Finish the card by adhering the sentiment as shown.
For links and supply lists, please visit my blog, Kat's Tales of Stamping.
Topflight Stamps Products Used:
Thanks for visiting today!


No comments:
Post a Comment